Nintendo TWLSSBA Operation Manual - Page 8
Using the Stylus and Touch Screen
 |
UPC - 045496718763
View all Nintendo TWLSSBA manuals
Add to My Manuals
Save this manual to your list of manuals |
Page 8 highlights
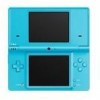
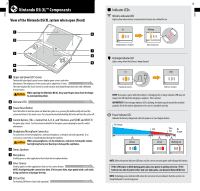
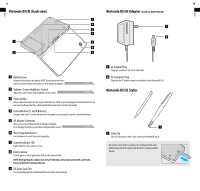
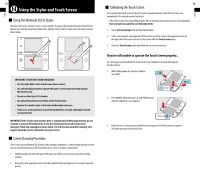
Basics Basics 13 Using the Stylus and Touch Screen Using the Nintendo DSi XL Stylus The lower LCD screen, or Touch Screen, is touch sensitive. For games that include this game control feature, operate the screen by using the included stylus. Lightly touch or slide the stylus across the Touch Screen as shown below. IMPORTANT STYLUS AND SCREEN GUIDELINES: • Use the stylus ONLY on the Touch Screen (lower screen). • Use only enough pressure to operate the game. Excessive pressure may damage the Touch Screen. • Do not use the stylus if it is broken. • Use only a Nintendo licensed stylus on the Touch Screen. • Replace the smaller stylus in the stylus holder when not in use. • If you use a screen protector on your Nintendo DSi XL, use only a Nintendo licensed screen protector. IMPORTANT: If the Touch Screen becomes dirty or contaminated with foreign material, do not continue to use your Nintendo DSi XL. It may not work properly and can become more damaged. Follow the cleaning procedures below. If it still does not work after cleaning, visit support.nintendo.com for information on repair service. Screen Cleaning Procedure If the screens on your Nintendo DSi XL have visible smudges, fingerprints, or other foreign material on them, you can clean them by using a soft clean cloth such as a lens or eyeglass cleaning cloth. 1. Slightly dampen the cloth with water ONLY and wipe off the screens to loosen any dirt or foreign material. 2. Using a dry cloth, wipe the screens to dry them and finish the cleaning process. If needed, repeat the process. 14 Calibrating the Touch Screen You can adjust the Touch Screen if it doesn't seem to respond properly or if the Touch Screen is not responding to the same place you're touching it. • If the Touch Screen is not responding properly, first try removing any screen protectors (sold separately) that you may have added to your Nintendo DSi XL. 1. Select System Settings from the Nintendo DSi Menu. 2. Select screen number 3 by tapping the #3 box at the top of the screen or by tapping the arrow on the right side of the screen until you see the screen with the Touch Screen option. 3. Select the Touch Screen option and follow the on-screen instructions. If you're still unable to operate the Touch Screen properly... Try starting up your Nintendo DSi XL at the Touch Screen Calibration screen by following the procedure below. 1. While holding down the L Button, R Button and START... 2. Press POWER. (Hold down the L, R, and START Buttons until the Calibration screen appears.) 3. Follow the on-screen instructions and then turn the power off. Turn the system on again to check the operation of the Touch Screen.
-
 1
1 -
2
-
 3
3 -
 4
4 -
 5
5 -
 6
6 -
 7
7 -
 8
8 -
 9
9 -
 10
10 -
 11
11 -
 12
12 -
 13
13 -
14
-
15
-
16
-
17
-
18
-
19
-
20
-
21
-
22
-
23
-
24
-
25
-
26
-
27
-
28
-
29
-
30
-
31
-
32
-
33
-
34
-
35
-
36
-
37
-
38
-
39
-
40
-
41
-
42
-
43
-
44
-
45
-
46
-
47
-
48
-
49
-
50
-
51
-
52
-
53
-
54
-
55
-
56
 |
 |