Nintendo UTLSBKA Operation Manual - Page 6
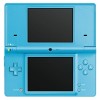
Nintendo DSi back view, Nintendo DSi AC Adapter, Nintendo DSi AC Stylus
 |
View all Nintendo UTLSBKA manuals
Add to My Manuals
Save this manual to your list of manuals |
Page 6 highlights
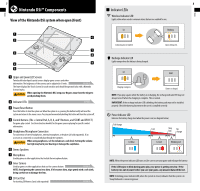
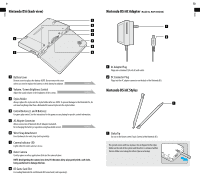
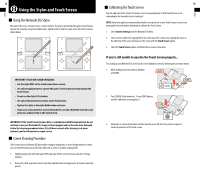
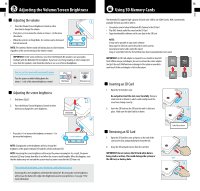
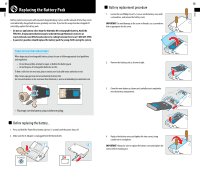
9 Nintendo DSi (back view) 10 Nintendo DSi AC Adapter Model No. WAP-002(USA) Basics Basics Battery Cover Remove cover to replace the battery. NOTE: Do not remove the cover unless you need to replace the battery or check battery installation. Volume / Screen Brightness Control Adjust the sound volume or the brightness of the screens. SEE PAGE 17 SEE PAGE 15 Stylus Holder Always replace the stylus into the stylus holder after use. NOTE: To prevent damage to the Nintendo DSi, do not insert anything other than a Nintendo DS licensed stylus into the stylus holder. Control Buttons [L and R Buttons] For game play control. See the instructions for the game you are playing for specific control information. AC Adapter Connector Allows connection of Nintendo DSi AC Adapter (included), for recharging the battery or operation using household current. SEE PAGE 11 Wrist Strap Attachment For attachment of a wrist strap (sold separately). Camera Indicator LED Lights when the outer camera is in use. Outer Camera Used by games or other applications that use the camera feature. NOTE: Avoid getting the camera lens dirty. If it becomes dirty, wipe gently with a soft cloth, being careful not to damage the lens. DS Game Card Slot For loading Nintendo DSi and Nintendo DS Game Cards (sold separately). AC Adapter Plug Plugs into a standard 120-volt AC wall outlet. DC Connector Plug Plugs into the AC adapter connector on the back of the Nintendo DSi. Nintendo DSi AC Stylus Stylus Tip For use on the lower screen (Touch Screen) of the Nintendo DSi. The system comes with two styluses. One is shipped in the stylus holder on the side of the system and the other is contained within the box. Make sure to keep the other stylus as a backup.
-
 1
1 -
 2
2 -
 3
3 -
 4
4 -
 5
5 -
 6
6 -
 7
7 -
 8
8 -
 9
9 -
 10
10 -
 11
11 -
 12
12 -
13
-
14
-
15
-
16
-
17
-
18
-
19
-
20
-
21
-
22
-
23
-
24
-
25
-
26
-
27
-
28
-
29
-
30
-
31
-
32
-
33
-
34
-
35
-
36
-
37
-
38
-
39
-
40
-
41
-
42
-
43
-
44
-
45
-
46
-
47
-
48
-
49
-
50
-
51
-
52
-
53
-
54
-
55
 |
 |
