Nintendo UTLSBKA Operation Manual - Page 9
Adjusting the Volume/Screen Brightness, Using SD Memory Cards
 |
View all Nintendo UTLSBKA manuals
Add to My Manuals
Save this manual to your list of manuals |
Page 9 highlights
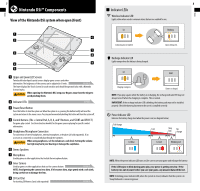
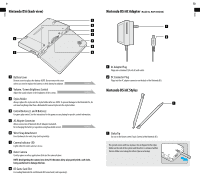
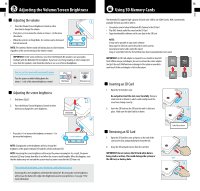
Basics Basics 15 Adjusting the Volume/Screen Brightness Adjusting the volume 1. Press the Volume/Screen Brightness Control in either direction to change the volume. • Press plus (+) to increase the volume or minus (-) to decrease the volume. • When the system is in Sleep Mode, the volume can be decreased but not increased. NOTE: The camera's shutter sound will always play at a fixed volume, regardless of the current setting of the volume control. Volume IMPORTANT: Under some conditions, noise from the Nintendo DSi speakers can cause audio feedback with the Nintendo DSi microphone. If you hear screeching, howling or other unexpected noise from the speakers, turn down the volume or use a set of stereo headphones. How to start the system with low (muted) volume Turn the power on while holding down the minus (-) side of the volume/brightness control. Hold down + Turn power on Adjusting the screen brightness 1. Hold down SELECT. 2. Press the Volume/Screen Brightness Control in either direction to change the screen brightness. Hold down • Press plus (+) to increase the brightness or minus (-) to decrease the brightness. Screen Brightness NOTE: Changing the screen brightness will also change the brightness of the power indicator LED and the wireless indicator LED. NOTE: Increasing the screen brightness will increase the power consumption. As a result, the power indicator LED may change from blue to red when the screen is made brighter. When this happens, note that the battery may run out and the system may lose power soon after the LED turns red. The relationship between screen brightness and battery duration Increasing the screen brightness will reduce the battery life. Decreasing the screen brightness will increase the battery life. Adjust the brightness based on your preference. See page 11 for more information. 16 Using SD Memory Cards The Nintendo DSi supports high-capacity SD Cards over 2 GB in size (SDHC Cards). With commercially available SD Cards you will be able to: • Save photos you've taken in Nintendo DSi Camera to the SD Card • Play AAC-format audio files saved on the SD Card • Copy downloadable software and its save data to the SD Card NOTE: It may not be possible to copy some software. Data copied to SD Cards cannot be used on other systems. Save data on Game Cards cannot be copied. Song or sound files from the SD Card that have been manupulated are not saved. IMPORTANT: An SD Card adapter is required to use miniSD or microSD Cards. When using a card adapter, be sure to remove the entire adapter (not just the card). Malfunction or damage to the system or your data could result if the card adapter is left in the system. Inserting an SD Card 1. Open the SD Card slot cover. Do not pull or twist the slot cover forcefully. Doing so could stretch or deform it, which could could prevent the cover from closing correctly. 2. Insert the SD Card into the SD Card slot until it clicks into place. Make sure the label side faces down. Removing an SD Card 1. Open the SD Card slot cover and press on the end of the card until it clicks and partially ejects from the slot. 2. Grasp the SD Card and remove from the card slot. IMPORTANT: Do not remove the SD Card while data is being read or written. This could damage the system or the SD Card, or destroy data. Label faces down
-
 1
1 -
2
-
3
-
 4
4 -
 5
5 -
 6
6 -
 7
7 -
 8
8 -
 9
9 -
 10
10 -
 11
11 -
 12
12 -
 13
13 -
 14
14 -
15
-
16
-
17
-
18
-
19
-
20
-
21
-
22
-
23
-
24
-
25
-
26
-
27
-
28
-
29
-
30
-
31
-
32
-
33
-
34
-
35
-
36
-
37
-
38
-
39
-
40
-
41
-
42
-
43
-
44
-
45
-
46
-
47
-
48
-
49
-
50
-
51
-
52
-
53
-
54
-
55
 |
 |
