Nokia 002Q942 User Manual - Page 16
Charge the battery, Keys and parts
 |
View all Nokia 002Q942 manuals
Add to My Manuals
Save this manual to your list of manuals |
Page 16 highlights
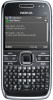
Get started Charge the battery Your battery has been partially charged at the factory. If the device indicates a low charge, do the following: 1. Connect the charger to a wall outlet. 2. Connect the charger plug to the device. 2. If the device is switched on, select from the available USB modes. Keys and parts 3. When the device indicates a full charge, disconnect the charger from the device, then from the wall outlet. You do not need to charge the battery for a specific length of time, and you can use the device while it is charging. If the battery is completely discharged, it may take several minutes before the charging indicator appears on the display or before any calls can be made. Charging with the USB data cable Charging with the USB data cable is slower than charging with the charger. Charging with the USB data cable may not work if you use a USB hub. USB hubs may be incompatible for charging a USB device. 1 - Power key 2 - Headset connector 3 - Earpiece 4 - Optical Navi™ key (scroll key) 5 - Selection key 6 - Call key When the USB data cable is connected, you can transfer 7 - Microphone data at the same time as charging. 8 - Keypad 1. Connect a compatible USB device to your device using 9 - End key 16 a compatible USB data cable. Depending on the type of the device that is used for charging, it may take a while for charging to start. 10 - Selection key 11 - Light sensor
-
 1
1 -
2
-
3
-
4
-
5
-
6
-
7
-
8
-
9
-
10
-
 11
11 -
 12
12 -
 13
13 -
 14
14 -
 15
15 -
 16
16 -
 17
17 -
 18
18 -
 19
19 -
 20
20 -
 21
21 -
22
-
23
-
24
-
25
-
26
-
27
-
28
-
29
-
30
-
31
-
32
-
33
-
34
-
35
-
36
-
37
-
38
-
39
-
40
-
41
-
42
-
43
-
44
-
45
-
46
-
47
-
48
-
49
-
50
-
51
-
52
-
53
-
54
-
55
-
56
-
57
-
58
-
59
-
60
-
61
-
62
-
63
-
64
-
65
-
66
-
67
-
68
-
69
-
70
-
71
-
72
-
73
-
74
-
75
-
76
-
77
-
78
-
79
-
80
-
81
-
82
-
83
-
84
-
85
-
86
-
87
-
88
-
89
-
90
-
91
-
92
-
93
-
94
-
95
-
96
-
97
-
98
-
99
-
100
-
101
-
102
-
103
-
104
-
105
-
106
-
107
-
108
-
109
-
110
-
111
-
112
-
113
-
114
-
115
-
116
-
117
-
118
-
119
-
120
-
121
-
122
-
123
-
124
-
125
-
126
-
127
-
128
-
129
-
130
-
131
-
132
-
133
-
134
-
135
-
136
-
137
-
138
-
139
-
140
-
141
-
142
-
143
-
144
-
145
-
146
-
147
-
148
-
149
-
150
-
151
-
152
-
153
 |
 |
