Nokia 6160 User Guide - Page 18
• Other PC Composer views, • Save your new ringing tone, • Transfer ringing tone to your phone
 |
View all Nokia 6160 manuals
Add to My Manuals
Save this manual to your list of manuals |
Page 18 highlights
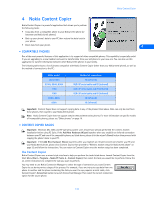
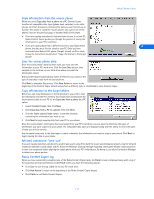
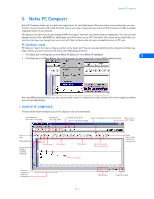
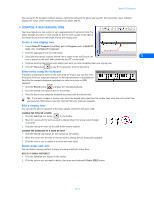
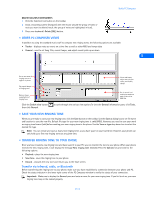
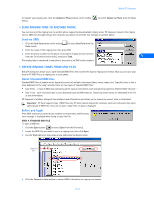
Nokia PC Composer DELETE MULTIPLE NOTES/RESTS 1 Click the Selection tool button on the toolbar. 2 Draw a bounding outline (marquee) with the mouse around the group of notes or rests you want to delete (result: the group of notes are highlighted in blue). 3 Press your keyboard's Delete (DEL) button. • OTHER PC COMPOSER VIEWS In addition to using the standard music staff to compose new ringing tones, the following options are available: • Tracker - displays notes as events on a time line as well as other MIDI and tempo data • General - used to set Song Title, overall tempo, and adjust overall pitch up or down 5 Use to set name of ringing tone as it appears in phone Set overall tempo of ringing tone Raise or lower overall pitch of ringing tone Click the Switch view button then click General. Use to add notes, adjust note pitch or value, and modify tempo Use to create text note to be saved as a part of the .ott or MIDI file to cycle through the various view options.To view the General information pane, click Tools, • SAVE YOUR NEW RINGING TONE When you are ready to save your new ringing tone, click the Save button on the toolbar. Use the Save as dialog box to set file name and location to save the new file. Default file type for your new ringing tone is .mid (MIDI). However, you need to save your work as ringing tone format (.ott) before sending your new ringing tone to the phone. Use the Save as type drop down box to select the desired file type. Note: You can create and save as many new ringing tones as you have space on your hard drive. However, your phone can only hold up to five new ringing tones at any given time. • TRANSFER RINGING TONE TO YOUR PHONE Once you have created a new ringing tone and have saved it to your PC, you can transfer the tone to your phone. When your phone receives the new ringing tone, it will display the message New ringing tone received. Press the Options key and scroll to the following options: • Playback - plays the new ringing tone • Save tone- saves the ringing tone to your phone • Discard - discards the new tone and returns you to the Start screen. Transfer via infrared, cable, or Bluetooth Before transferring the ringing tone to your phone, make sure you have established a connection between your phone and PC. Check the status indicator in the lower right corner of the PC Composer window to verify the status of your connection. Important: Make sure to display the General pane and enter a name for your new ringing tone. If you fail to do so, your new ringing tone may not be named properly. [ 13 ]
-
 1
1 -
2
-
3
-
4
-
5
-
6
-
7
-
8
-
9
-
10
-
11
-
12
-
 13
13 -
 14
14 -
 15
15 -
 16
16 -
 17
17 -
 18
18 -
 19
19 -
 20
20 -
 21
21 -
 22
22 -
 23
23 -
24
-
25
-
26
-
27
-
28
-
29
-
30
-
31
-
32
-
33
-
34
-
35
-
36
-
37
-
38
-
39
-
40
-
41
-
42
-
43
-
44
-
45
-
46
-
47
-
48
-
49
-
50
-
51
-
52
-
53
-
54
-
55
-
56
-
57
-
58
-
59
-
60
-
61
-
62
-
63
 |
 |
