| Section |
Page |
| Nokia 6590 User Guide |
2 |
| Phone notes |
2 |
| Contents |
6 |
| 1. Safety first 1 |
6 |
| 2. Welcome 3 |
6 |
| 3. Basic operations 21 |
6 |
| 4. Text entry 34 |
6 |
| 5. Use the Phone book 42 |
6 |
| 6. Check call log 56 |
6 |
| 7. Use voice features 63 |
7 |
| 8. Messages 72 |
7 |
| 9. Personalize your phone 94 |
7 |
| 10. Advanced calling features 103 |
7 |
| 11. Manage phone security 115 |
8 |
| 12. Your wireless Internet browser 122 |
8 |
| 13. Your personal digital assistant 132 |
8 |
| 14. Fun and games 149 |
8 |
| 15. Advanced features 154 |
8 |
| 16. Reference information 160 |
9 |
| 17. Technical information 177 |
9 |
| 18. Troubleshooting 178 |
9 |
| 19. Frequently asked questions (FAQ) 180 |
9 |
| 20. Nokia One-Year Limited Warranty 184 |
9 |
| 1 Safety first |
10 |
| SWITCH OFF WHERE PROHIBITED |
10 |
| ROAD SAFETY COMES FIRST |
10 |
| INTERFERENCE |
10 |
| SWITCH OFF IN HOSPITALS |
10 |
| SWITCH OFF IN AIRCRAFT |
10 |
| SWITCH OFF WHEN REFUELING |
10 |
| SWITCH OFF NEAR BLASTING |
10 |
| USE SENSIBLY |
10 |
| OBSERVE INFRARED PRECAUTIONS |
11 |
| QUALIFIED SERVICE |
11 |
| ACCESSORIES AND BATTERIES |
11 |
| WATER-RESISTANCE |
11 |
| BACKUP COPIES |
11 |
| CONNECTING TO OTHER DEVICES |
11 |
| CALLING |
11 |
| EMERGENCY CALLS |
11 |
| 2 Welcome |
12 |
| • Get the most out of this guide |
12 |
| Understand the terms |
12 |
| Notice text conventions |
13 |
| Follow graphic clues |
13 |
| Look for updates |
13 |
| • Learn about accessibility solutions |
14 |
| Alternate format user guides |
14 |
| LPS-3 Loopset |
14 |
| TTY/TDD Adapter (HDA-9) |
15 |
| what you’ll need |
15 |
| Accessible features |
15 |
| • Understand wireless network services |
16 |
| Note differences among service providers |
16 |
| • Register your phone |
17 |
| • E-newsletters |
17 |
| • Get help |
17 |
| Find your phone’s label |
17 |
| Contact Nokia |
18 |
| Have the right information available |
18 |
| Contact your service provider |
18 |
| Have the phone or accessory handy |
19 |
| • Understand your phone |
20 |
| Keys and features |
20 |
| Back |
21 |
| Tips on efficient operation |
21 |
| Install the SIM card |
22 |
| 1 With the back of the phone facing you, press and hold the back cover release button. |
22 |
| 2 Slide the cover off. |
22 |
| 3 Lift out the battery. |
22 |
| 4 Grasp the front of the SIM card door. |
22 |
| 5 Push the SIM card door gently towards the gold contacts. |
22 |
| 6 Lift the SIM card door. |
23 |
| 7 Install the SIM card; beveled corner on the left, gold contact area face down. |
23 |
| 8 Lower SIM card door and gently slide to lock into place. |
23 |
| Notes about SIM cards |
23 |
| Install the battery |
24 |
| 1 Place the battery in the compartment with the label side facing up and the gold contact area al... |
24 |
| 2 Lower the battery into place. |
24 |
| 3 Replace the back cover. |
24 |
| Charge the battery |
24 |
| 1 Plug the charger into a standard wall outlet. |
24 |
| 2 Connect the plug from the charger to the bottom of the phone. |
25 |
| 3 When the battery bar stops scrolling, the battery charge is complete. Battery full appears also... |
25 |
| 4 Unplug the phone and charger once charging is complete. |
25 |
| Remove the battery |
25 |
| 1 With the back of the phone facing you, press and hold the back cover release button. |
25 |
| 2 Lift out the battery. |
26 |
| Important battery information |
26 |
| Learn the keys |
26 |
| Selection keys |
26 |
| scroll key |
27 |
| Memory use |
27 |
| Quick guide |
28 |
| Menu Shortcuts |
29 |
| 1 Messages |
29 |
| 1 Write message 01-1 |
29 |
| 2 Write e-mail 01-2 |
29 |
| 3 Chat 01-3 |
29 |
| 4 Inbox 01-4 |
29 |
| 5 Multimedia inbox 01-5 |
29 |
| 6 Outbox 01-6 |
29 |
| 7 Archive 01-7 |
29 |
| 8 Templates 01-8 |
29 |
| 9 My folders 01-9 |
29 |
| 10 Erase messages 01-10 |
29 |
| 11 Voice messages 01-11 |
29 |
| 12 Info messages 01-12 |
29 |
| 13 Service command editor 01-13 |
29 |
| 14 Message settings 01-14 |
29 |
| 2 Call log |
29 |
| 1 Missed calls 2-1 |
29 |
| 2 Received calls 2-2 |
29 |
| 3 Dialed numbers 2-3 |
29 |
| 4 Clear call lists 2-4 |
29 |
| 5 Call timers 2-5 |
29 |
| 6 Call costs 2-6* |
29 |
| 7 GPRS data counter 2-7 |
29 |
| 8 GPRS connection timer 2-8 |
29 |
| 3 Profiles |
29 |
| 1 Normal 3-1 |
29 |
| 2 Silent 3-2 |
29 |
| 3 Meeting 3-3 |
29 |
| 4 Outdoor 3-4 |
29 |
| 5 Pager 3-5 |
29 |
| 4 Settings |
29 |
| 1 Time settings 4-1 |
29 |
| 2 Call settings 4-2 |
29 |
| 3 Phone settings 4-3 |
29 |
| 4 Tone settings 4-4 |
29 |
| 5 Accessory settings 4-5 |
29 |
| 6 GPRS modem settings 4-6 |
29 |
| 7 Security settings 4-7 |
29 |
| 8 Restore factory settings 4-8 |
29 |
| 5 Radio |
29 |
| 6 Organizer |
29 |
| 1 Alarm clock 6-1 |
29 |
| 2 Calendar 6-2 |
29 |
| 3 To-do list 6-3 |
29 |
| 7 Extras |
29 |
| 1 Calculator 7-1 |
29 |
| 2 Voice recorder 7-2 |
29 |
| 3 Voice commands 7-3 |
29 |
| 4 Countdown timer 7-4 |
29 |
| 5 Stopwatch 7-5 |
29 |
| 8 Games |
29 |
| 1 Select game 8-1 |
29 |
| 2 Settings 8-2 |
29 |
| 9 Infrared |
29 |
| 10 Services |
29 |
| 1 Home 10-1 |
29 |
| 2 Bookmarks 10-2 |
29 |
| 3 Service inbox 10-3 |
29 |
| 4 Settings 10-4 |
29 |
| 5 Go to address 10-5 |
29 |
| 6 Clear the cache 10-6 |
29 |
| 11 SIM Services * |
29 |
| 3 Basic operations |
30 |
| • Switch on your phone |
30 |
| Set the time and date |
30 |
| 1 Enter the correct time and press OK. |
30 |
| 2 Enter the correct date and press OK. After a brief pause the Start screen appears in your screen. |
30 |
| • About the Start screen |
31 |
| • Review phone symbols |
32 |
| • Make and answer calls |
33 |
| 1 Enter the area code and phone number. |
33 |
| 2 Press . |
33 |
| 3 Hold the phone with the earpiece over your ear and microphone near your mouth, or connect and u... |
33 |
| Adjust the earpiece volume during a call |
34 |
| If an accessory with its own speaker is connected to your phone, the volume keys adjust the �volu... |
34 |
| Caller ID |
34 |
| Redial the last-dialed number |
34 |
| Dial any of the 20 last-dialed numbers |
34 |
| 1 Press . |
34 |
| 2 Scroll to the number you want to redial and press again. |
34 |
| • Use the menu |
35 |
| Use the scroll method |
35 |
| The menu number and scroll bar |
35 |
| 1 When the menu you want appears in the screen, press Select. |
35 |
| 2 Once inside the menu, use the scroll key ( or ) to highlight an item or page through submenus. ... |
35 |
| Help text |
35 |
| 1 Press Menu-4-3-8 (Settings-Phone settings-Help text activation) |
35 |
| 2 Press Select and scroll to Off. |
35 |
| 3 Press Select to turn help text off. |
35 |
| Use a menu shortcut |
36 |
| List of menu shortcuts |
37 |
| 1 Messages |
37 |
| 1 Write message 01-1 |
37 |
| 2 Write e-mail 01-2 |
37 |
| 3 Chat 01-3 |
37 |
| 4 Inbox 01-4 |
37 |
| 5 Multimedia inbox 01-5 |
37 |
| 6 Outbox 01-6 |
37 |
| 7 Archive 01-7 |
37 |
| 8 Templates 01-8 |
37 |
| 9 My folders 01-9 |
37 |
| 10 Erase messages 01-10 |
37 |
| 1 All messages 01-10-1 |
37 |
| 2 Inbox 01-10-2 |
37 |
| 3 Outbox 01-10-3 |
37 |
| 4 Archive 01-10-4 |
37 |
| 11 Voice messages 01-12 |
37 |
| 1 Listen to voice messages 01-11-1 |
37 |
| 2 Voice mailbox number 01-11-2 |
37 |
| 12 Info messages 01-12 |
37 |
| 1 Info service 01-12-1 |
37 |
| 2 Topics 01-12-2 |
37 |
| 3 Language 01-12-3 |
37 |
| 4 Info topics saved on SIM card 01-12-4 |
37 |
| 5 Read 01-12-5 |
37 |
| 13 Service command editor 01-13 |
37 |
| 14 Message settings 01-11 |
37 |
| 1 Text messages 01-14-1 |
37 |
| 2 Multimedia msg. 01-14-2 |
37 |
| 2 Call log |
37 |
| 1 Missed calls 2-1 |
37 |
| 2 Received calls 2-2 |
37 |
| 3 Dialed numbers 2-3 |
37 |
| 4 Clear call lists 2-4 |
37 |
| 1 All 2-4-1 |
37 |
| 2 Missed 2-4-2 |
37 |
| 3 Received 2-4-3 |
37 |
| 4 Dialed 2-4-4 |
37 |
| 5 Call timers 2-5 |
37 |
| 1 Duration of last call 2-5-1 |
37 |
| 2 Duration of dialed calls 2-5-2 |
37 |
| 3 Duration of received calls 2-5-3 |
37 |
| 4 Duration of all calls 2-5-4 |
37 |
| 5 Clear timers 2-5-5 |
37 |
| 6 Call costs 2-6 (Check with your service provider for availability.) |
37 |
| 1 Last call units 2-6-1 |
37 |
| 2 All calls units 2-6-2 |
37 |
| 3 Call cost settings 2-6-3 |
37 |
| 7 GPRS data counter 2-7 |
37 |
| 1 Data sent in last session 2-7-1 |
37 |
| 2 Data received in last session 2-7-2 |
38 |
| 3 All sent data 2-7-3 |
38 |
| 4 All received data 2-7-4 |
38 |
| 5 Clear counters 2-7-5 |
38 |
| 8 GPRS connection timer 2-8 |
38 |
| 1 Duration of last session 2-8-1 |
38 |
| 2 Duration of all sessions 2-8-2 |
38 |
| 3 Clear timers 2-8-3 |
38 |
| 3 Profiles |
38 |
| 1 Normal 3-1 |
38 |
| 1 Select 3-1-1 |
38 |
| 2 Customize 3-1-2 |
38 |
| 3 Timed 3-1-3 |
38 |
| 2 Silent 3-2 |
38 |
| 3 Meeting 3-3 |
38 |
| 4 Outdoor 3-4 |
38 |
| 5 Pager 3-5 |
38 |
| 4 Settings |
38 |
| 1 Time settings 4-1 |
38 |
| 1 Clock 4-1-1 |
38 |
| 2 Auto update of date and time 4-1-2 |
38 |
| 2 Call settings 4-2 |
38 |
| 1 Call Forwarding 4-2-1 |
38 |
| 2 Anykey answer 4-2-2 |
38 |
| 3 Automatic redial 4-2-3 |
38 |
| 4 1-touch dialing 4-2-4 |
38 |
| 5 Call waiting 4-2-5 |
38 |
| 6 Summary after call 4-2-6 |
38 |
| 7 Send own caller ID when calling 4-2-7 |
38 |
| 8 Line for outgoing calls 4-2-8 |
38 |
| 3 Phone settings 4-3 |
38 |
| 1 Language 4-3-1 |
38 |
| 2 Automatic keyguard 4-3-2 |
38 |
| 3 Screen saver 4-3-3 |
38 |
| 4 Cell info display 4-3-4 |
38 |
| 5 Welcome note 4-3-5 |
38 |
| 6 System selection 4-3-6 |
38 |
| 7 Start-up tone 4-3-7 |
38 |
| 8 Help text activation 4-3-8 |
38 |
| 4 Tone settings 4-4 |
38 |
| 1 Ringing options 4-4-1 |
38 |
| 2 Ringing tone 4-4-2 |
38 |
| 3 Ringing volume 4-4-3 |
38 |
| 4 Vibrating alert 4-4-4 |
38 |
| 5 Message alert tone 4-4-5 |
38 |
| 6 Keypad tones 4-4-6 |
38 |
| 7 Warning tones 4-4-7 |
38 |
| 8 Alert for 4-4-8 |
38 |
| 5 Accessory settings 4-5 |
38 |
| 1 Headset 4-5-1 |
38 |
| 2 Handsfree 4-5-2 |
38 |
| 3 Loopset 4-5-3 |
38 |
| 4 TTY/TDD 4-5-4 |
38 |
| 6 GPRS modem settings 4-6 |
38 |
| 1 Active access point 4-6-1 |
38 |
| 2 Edit active access point 4-6-2 |
38 |
| 7 Security settings 4-7 |
38 |
| 1 PIN code request 4-7-1 |
38 |
| 2 Call restrictions 4-7-2 |
38 |
| 3 Fixed dialing 4-7-3 |
38 |
| 4 Closed user group 4-7-4 |
38 |
| 5 Security level 4-7-5 |
38 |
| 6 Change access codes 4-7-6 |
38 |
| 8 Restore factory settings 4-8 |
38 |
| 5 Radio |
38 |
| 6 Organizer |
38 |
| 1 Alarm clock 6-1 |
38 |
| 2 Calendar 6-2 |
38 |
| 3 To-do list 6-3 |
38 |
| 7 Extras |
39 |
| 1 Calculator 7-1 |
39 |
| 2 Voice recorder 7-2 |
39 |
| 3 Voice commands 7-3 |
39 |
| 4 Countdown timer 7-4 |
39 |
| 5 Stopwatch 7-5 |
39 |
| 8 Games |
39 |
| 1 Select game 8-1 |
39 |
| 1 Nokia Sugarbowl 8-1-1 |
39 |
| 2 Snake II 8-1-2 |
39 |
| 3 Space impact 8-1-3 |
39 |
| 4 Bumper 8-1-4 |
39 |
| 2 Settings 8-2 |
39 |
| 1 Game sounds 8-2-1 |
39 |
| 2 Game lights 8-2-2 |
39 |
| 3 Shakes 8-2-3 |
39 |
| 9 Infrared |
39 |
| 10 Services |
39 |
| 1 Home 10-1 |
39 |
| 2 Bookmarks 10-2 |
39 |
| 3 Service inbox 10-3 |
39 |
| 4 Settings 10-4 |
39 |
| 1 Active service settings 10-4-1 |
39 |
| 5 Go to address 10-5 |
39 |
| 6 Clear the cache 10-6 |
39 |
| 11 SIM services |
39 |
| • Set up your Phone |
40 |
| Connect the headset |
40 |
| 1 Plug the headset jack into the bottom of your phone. |
40 |
| 2 Put the round ear plug into one ear. |
40 |
| Use the headset |
40 |
| Use the carrying case |
40 |
| Change Xpress-on™ color covers |
40 |
| Remove the back cover |
41 |
| 1 With the back of the phone facing you, press and hold the back cover release button. |
41 |
| 2 Slide the cover off. |
41 |
| Remove the front cover and keypad |
41 |
| 1 With the back of the phone facing you, grasp the phone body and gently separate it from the fro... |
41 |
| 2 Lift the keypad from inside the old front cover and place it in the new cover. |
41 |
| Replace the new front cover |
42 |
| 3 Align the top of the phone with the top of the front cover. Make sure both sets of plastic tabs... |
42 |
| 4 Align the cover and snap it shut all the way around the edge of the phone. |
42 |
| Replace the back cover |
42 |
| 1 Direct the back cover towards the locking catches on the phone. |
42 |
| 2 Slide the back cover until it locks into place. |
42 |
| 4 Text entry |
43 |
| • ABC mode |
43 |
| Add letters |
43 |
| 1 Find the key that has the letter you want to enter. |
43 |
| 2 Press the key as many times as needed for the letter to appear on the screen. |
43 |
| 1 |
44 |
| 7 |
44 |
| 2 |
44 |
| 8 |
44 |
| 3 |
44 |
| 9 |
44 |
| 4 |
44 |
| 0 |
44 |
| 5 |
44 |
| * |
44 |
| 6 |
44 |
| # |
44 |
| Enter spaces and punctuation |
44 |
| Erase mistakes |
44 |
| Change letter case |
44 |
| Enter numbers |
45 |
| Use special characters |
45 |
| In ABC mode |
45 |
| In 123 mode |
46 |
| • Predictive text input |
47 |
| Select a language and turn on predictive text |
47 |
| 1 Press Menu, then press Select. Write message appears. |
47 |
| 2 Press Select, then press Options. |
47 |
| 3 Scroll to Predictive text, then press Select. |
47 |
| 4 Scroll to the language you want, then press Select. T9 prediction on appears. |
47 |
| Turn off predictive text |
47 |
| Write words using predictive text |
48 |
| Add a new word to the dictionary |
48 |
| 1 Press until Spell appears in place of Options in the lower left corner of the screen. |
48 |
| 2 Press Spell, then enter the word(s) using ABC mode. (See “ABC mode” on page�34.) |
48 |
| 3 Press Save to add the word to the dictionary. |
48 |
| Use predictive text shortcuts |
49 |
| Insert symbols |
50 |
| 1 Press and hold until the symbol screen appears. |
50 |
| 2 Scroll to the desired symbol and press Insert. |
50 |
| Insert numbers |
50 |
| 1 To add a number to the message, press and hold . The 123 mode icon () appears. |
50 |
| 2 Key in the desired numbers, then press and hold to return to ABC mode. |
50 |
| Write compound words |
50 |
| 1 Write the first part of the word and press to accept it. |
50 |
| 2 Write the last part of the compound word and press to enter the word in memory. |
50 |
| 5 Use the Phone book |
51 |
| • Your phone’s memory |
51 |
| Memory specific information |
52 |
| Select a memory |
53 |
| 1 At the Start screen, press Names, scroll to Settings, and press Select. |
53 |
| 2 Scroll until Memory in use appears in the screen and press Select. The following options are av... |
53 |
| 3 Scroll to the memory option of your choice and press Select. |
53 |
| • View the Phone book |
53 |
| • Open the Phone book |
53 |
| 1 At the Start screen, press Names. The submenus in the following table appear in the screen. |
53 |
| 2 Use the scroll key ( or ) to highlight an option. Press Select () to activate an option or ente... |
53 |
| Add an entry to the Phone book |
55 |
| 1 At the Start screen press Names, scroll to Add entry, and press Select. |
55 |
| 2 Enter a name for the entry and press OK. |
55 |
| 3 Enter the area code and number for the entry and press OK. The name and number are saved to the... |
55 |
| 1 At the Start screen, enter the area code and number you’d like to save |
55 |
| 2 Press and hold Options. The number is saved to your Phone book as a stand-alone entry. |
55 |
| Add a number to a Phone book entry |
55 |
| 1 At the Start screen, enter the area code and number you’d like to save. |
55 |
| 2 Press Options and scroll to Add to name. |
55 |
| 3 Press Select. The Phone book name list appears. |
55 |
| 4 Scroll to the name that you want to add the number to and press Add�no. A list of number types ... |
55 |
| 5 Scroll to the number type of your preference and press Select. A confirmation message appears i... |
55 |
| Number types |
55 |
| Assign or change a number type |
56 |
| 1 At the Start screen, press the scroll key ( or ) to display your Phone book entries. |
56 |
| 2 Scroll to the entry containing the numbers you wish to change and press Details. |
56 |
| 3 Use the scroll key to highlight the number you wish to change and press Options. |
56 |
| 4 Scroll to Change type and press Select. |
56 |
| 5 Scroll to the number type of your preference and press Select. A confirmation message appears i... |
56 |
| Add details to a Phone book entry |
56 |
| 1 With an entry in your Phone book highlighted, press Details. |
56 |
| 2 Press Options, scroll to Add detail, and press Select. |
56 |
| 3 Scroll to E-mail, Web address, Street addr., or Note and press Select. |
56 |
| 4 Enter text with the keypad and press OK. |
56 |
| Save a number (only) |
57 |
| 1 At the Start screen, enter the area code and number you’d like to save. |
57 |
| 2 Press and hold Options. The number is saved to your Phone book as a stand-alone entry. |
57 |
| Scroll through Phone book entries |
57 |
| Search for Phone book entries |
57 |
| 1 At the Start screen, press the scroll key ( or ) to display your Phone book. |
57 |
| 2 Press the key which contains the first letter of the entry you’re searching (example; press twi... |
57 |
| 3 Continue entering letters to locate the entry, or move through and highlight other entries usin... |
57 |
| 4 Once you’ve highlighted the desired entry, press to dial the number. Or, press Details, then pr... |
57 |
| 5 Scroll to an option. Press Select to activate an option or enter its submenu |
57 |
| Edit names |
59 |
| 1 At the Start screen, press Names and scroll to Edit name. |
59 |
| 2 Press Select and scroll to the name you wish to change. |
59 |
| 3 Press Edit, modify the name as desired, and press OK once you’ve finished. |
59 |
| 4 Press done to return to the Start screen. |
59 |
| Erase names and numbers |
59 |
| Erase a single entry |
59 |
| 1 At the Start screen, press Names, scroll to Erase, and press Select. |
59 |
| 2 Ensure One by one is highlighted and press Select. |
59 |
| 3 Scroll to the entry you wish to erase and press Erase. |
59 |
| 4 Press OK again to confirm the erasure, or Back to select another. |
59 |
| Erase all names and numbers |
59 |
| 1 At the Start screen, press Names, scroll to Erase and press Select. |
59 |
| 2 Ensure Erase all is highlighted and press Select. |
59 |
| 3 Scroll to Phone or SIM card and press Erase. |
59 |
| 4 Press OK to confirm or Back to select from Phone or SIM card again. If you pressed OK, you’re p... |
59 |
| 5 Enter the security code and press OK to erase or Back to select from Phone or SIM card again. |
59 |
| Assign a primary number |
60 |
| 1 At the Start screen, press or to display a list of Phone book entries. |
60 |
| 2 Scroll to a name containing multiple numbers and press Details. |
60 |
| 3 Scroll to the number you’d like to assign as the primary number (or change to the primary numbe... |
60 |
| 4 Scroll to As primary no. and press Select. Now, the phone dials the primary number when you sel... |
60 |
| Add an E-mail address |
60 |
| 1 Press Names. Find appears highlighted. |
60 |
| 2 Press Select. The Name box appears. |
60 |
| 3 Enter the name you want to add an e-mail address to and press OK. OR Press List, or or to scrol... |
60 |
| 4 Press Details, then press Options. |
60 |
| 5 Scroll to Add detail, then press Select. E-mail appears highlighted. |
60 |
| 6 Press Select. The Text box appears. |
60 |
| 7 Enter the e-mail address, then press OK. |
60 |
| Copy Phone book entries |
61 |
| 1 At the Start screen, press Names, scroll to Copy, and press Select. |
61 |
| 2 Scroll to From phone to SIM card or From SIM card to phone and press Select. The following opti... |
61 |
| 3 Scroll to the copy method of your choice and press Select. |
61 |
| a) If you selected One by one, go to step 4. |
61 |
| b) If you selected All or Primary nos., go to step 6. |
61 |
| 4 Scroll to the entry you wish to copy and press Copy. |
61 |
| 5 Scroll to Keep original or Move original and press Select. The entry is copied and you’re retur... |
61 |
| 6 If you selected All or Primary nos. in step 3, scroll to Keep original or Move original and pre... |
61 |
| 7 Press OK to confirm your choice. All entries are copied to the selected destination. Press Back... |
61 |
| View service numbers |
62 |
| 1 At the Start screen, press Names, Scroll to Service nos. and press Select. |
62 |
| 2 To view details of a number, scroll to the number and press Details. |
62 |
| Use caller groups |
62 |
| Add names to a caller group |
62 |
| 1 From the Start screen, scroll to the name or number you want. |
62 |
| 2 Press Details, then press Options. |
62 |
| 3 Scroll to Caller groups and press Select. |
62 |
| 4 Scroll to the group you want and press Select. |
62 |
| Remove names from a caller group |
62 |
| 1 Follow steps 1 through 3 above. |
62 |
| 2 Scroll to No group and press Select. |
62 |
| Assign a ringing tone to a caller group |
62 |
| 1 From the Start screen, press Names. |
62 |
| 2 Scroll to Caller groups and press Select. |
62 |
| 3 Scroll to the group you want and press Select. |
62 |
| 4 Scroll to Group ringing tone and press Select. |
62 |
| 5 Scroll to the tone you want to hear when anyone from this group calls you and press Select. |
63 |
| Rename a caller group |
63 |
| 1 Follow steps 1 through 3 above. |
63 |
| 2 Scroll to Rename group and press Select. |
63 |
| 3 Enter the group name, then press OK. |
63 |
| Assign group logos |
63 |
| 1 Press Names, scroll to Caller groups, and press Select. |
63 |
| 2 Scroll to the name of the group and press Select. |
63 |
| 3 Scroll to Group logo and press Select. |
63 |
| 4 Scroll to On and press Select. |
63 |
| View a received logo |
64 |
| 1 When you receive a logo from someone else, Group logo received appears. |
64 |
| 2 Press Show to see the logo. |
64 |
| 3 Press Options and scroll to Save to save it (you must choose which caller group gets the new lo... |
64 |
| 6 Check call log |
65 |
| • Check for missed calls |
65 |
| After missing a call |
65 |
| 1 Press List. The number appears on the screen. If you have missed more than one call, the missed... |
65 |
| 2 To dial the displayed number, press . |
65 |
| 3 For other options, press Options. |
65 |
| 4 To exit, press Back. |
65 |
| At any time |
65 |
| 1 Press Menu 2-1 (Call log > Missed calls). |
65 |
| 2 Scroll to the number you want to see. |
66 |
| 3 To dial the number, press . |
66 |
| 4 For other options, press Options. |
66 |
| • Check received calls |
66 |
| 1 Press Menu 2-2 (Call log > Received calls). |
66 |
| 2 Scroll to the number you want to see. |
66 |
| 3 To dial the number, press ; for other options, press Options. |
66 |
| • Check dialed numbers |
66 |
| 1 Press Menu 2-3 (Call log > Dialed numbers). |
66 |
| 2 Scroll to the number you want to see. |
66 |
| 3 To dial the number, press , or press Options for more choices. |
66 |
| Choose options in call lists |
67 |
| • Clear call lists |
67 |
| 1 Press Menu 2-4 (Call log > Clear call lists). |
68 |
| 2 Scroll to All, Missed, Received or Dialed, then press Select. |
68 |
| • Use call timers |
68 |
| View the call duration |
68 |
| 1 Press Menu 2-5 (Call log > Call timers). |
68 |
| 2 Scroll to Duration of last call, Duration of dialed calls, Duration of received calls, or Durat... |
68 |
| Clear call timers |
68 |
| 1 Press Menu 2-5 (Call log > Call timers). |
68 |
| 2 Scroll to Clear timers, then press Select. |
68 |
| 3 Enter your security code, then press OK. |
68 |
| • Check data calls |
68 |
| Check the data counter |
68 |
| 1 Press Menu 2-7 (Call log > GPRS data counter). |
69 |
| 2 Scroll to the information you are interested in viewing. Your options include the following: |
69 |
| Clear the data counter |
69 |
| 1 Press Menu 2-7 (Call log > GPRS data counter). |
69 |
| 2 Scroll to Clear counters, then press Select. |
69 |
| 3 Enter your security code, then press OK. |
69 |
| Check the connection timer |
69 |
| 1 Press Menu 2-8 (Call log > GPRS connection timer). |
69 |
| 2 Scroll to the information you are interested in viewing. |
69 |
| Clear the connection timer |
69 |
| 1 Press Menu 2-8 (Call log > GPRS connection timer). |
69 |
| 2 Scroll to Clear timers and press Select. |
69 |
| 3 Enter your security code, then press OK. |
69 |
| • Manage call costs |
70 |
| View call costs |
70 |
| 1 Press Menu 2-6 (Call log > Call costs). |
70 |
| 2 Scroll to Last call units (cost of last call, or current call if applicable) or All calls units... |
70 |
| Clear call cost counters |
70 |
| 1 Press Menu 2-6-3 (Call log > Call costs > Call cost settings). |
70 |
| 2 Scroll to Clear counters, then press Select. |
70 |
| 3 Enter your PIN2 code, then press OK. |
70 |
| Show costs in units or currency |
70 |
| 1 Press Menu 2-6-3 (Call log > Call costs > Call cost settings). |
70 |
| 2 Scroll to Show costs in, then press Select. |
71 |
| 3 Enter your PIN2 code, then press OK. |
71 |
| 4 Scroll to Currency or Units, then press Select. If you select Currency, your phone prompts you ... |
71 |
| Limit your call costs |
71 |
| Set a limit |
71 |
| 1 Press Menu 2-6-3 (Call log > Call costs > Call cost settings). |
71 |
| 2 Scroll to Call cost limit and press Select. |
71 |
| 3 Enter your PIN2 code (see “The PIN2 Code” on page 118), then press OK. |
71 |
| 4 Scroll to Set, then press Select. |
71 |
| 5 Enter the number of charging units or dollars, then press OK. |
71 |
| Remove a limit |
71 |
| 1 Follow steps 1 and 2 above. |
71 |
| 2 Scroll to Off, then press OK. |
71 |
| 7 Use voice features |
72 |
| • About voice mail |
72 |
| voice mail indicators |
72 |
| • Save the voice mailbox number |
73 |
| 1 Press Menu 01-11-2 (Messages > Voice messages > Voice mailbox number). The Mailbox number box a... |
73 |
| 2 Enter your voice mailbox number, then press OK. |
73 |
| • Set up your voice mail |
73 |
| 1 After you’ve saved the voice mailbox number, press and hold . |
73 |
| 2 Once you connect and the pre-recorded greeting begins, follow the automated instructions to set... |
73 |
| Listen to your voice messages |
73 |
| • Automate voice mail with dialing codes |
74 |
| Write down some information |
74 |
| 1 Write down your voice mailbox number. |
74 |
| 2 Call and check your voice mail as you normally would. |
74 |
| Insert dialing codes |
74 |
| Set up voice mail with dialing codes |
75 |
| 1 At the Start screen, press Menu 01-11-2 (Messages > Voice messages > Voice mailbox number). The... |
75 |
| 2 Refer to the dialing codes table above and enter any codes as necessary along with the informat... |
75 |
| 3 Enter any remaining pauses, PIN codes, and other information that allows you to listen to your ... |
75 |
| • Use voice dialing |
75 |
| Add a voice tag to a Phone book entry |
75 |
| 1 At the Start screen, scroll to the name you want to give a voice tag. |
75 |
| 2 Press Details, then Options. Add voice tag appears highlighted. |
75 |
| 3 Press Select. The phone displays Press Start, then speak after tone. |
75 |
| 4 Press Start. You will hear several beeps, and Please speak now appears. |
75 |
| 5 Speak clearly into the microphone. |
75 |
| Notes about voice tags |
76 |
| Make a call using a voice tag |
76 |
| 1 Press and hold Names. You can also press and hold the down volume key. |
76 |
| 2 Pronounce the voice tag clearly into the microphone. Searching appears. When the phone finds th... |
76 |
| Voice dial with the headset |
77 |
| 1 At the Start screen, press and hold the remote button on the headset. Your phone beeps and Plea... |
77 |
| 2 Pronounce the voice tag into the microphone. When the phone finds the voice tag, Found appears,... |
77 |
| Listen to a voice tag |
77 |
| 1 Press Names and scroll to Voice tags. |
77 |
| 2 Press Select, then scroll to the name with the voice tag you want to hear. |
77 |
| 3 Press Options, scroll to Playback, and press Select. |
77 |
| Change or erase a voice tag |
77 |
| 1 At the Start screen, press Names, scroll to Voice tags, and press Select. |
77 |
| 2 Scroll until the voice tag you wish to change or erase appears in the screen, then press Options. |
77 |
| Scroll to Change or Erase and press Select. |
77 |
| • Use voice commands |
77 |
| View available functions |
78 |
| Add a voice tag for the command |
78 |
| 1 Press Menu 7-3 (Extras > Voice commands). |
78 |
| 2 Scroll to the phone function, then press Select. |
78 |
| 3 Scroll to one of the available features, and press Options. Add command appears on the screen. |
78 |
| 4 Press Select. |
79 |
| 5 Press Start, and speak the voice tag clearly into the microphone. |
79 |
| Activate a voice command |
79 |
| 1 If you have the headset attached, press and hold the headset button. |
79 |
| 2 When Please speak now appears, pronounce the voice tag clearly into the microphone. When the ph... |
79 |
| Work with an existing voice command tag |
79 |
| Play back a voice command tag |
79 |
| 1 Press Menu 7-3 (Extras> Voice commands) A list of phone functions appears, with Profiles highli... |
79 |
| 2 Scroll to the phone function containing the voice command you want to hear and press Select. Fo... |
80 |
| 3 Scroll to the profile with the voice command you want to hear. Look for the voice tag icon (). |
80 |
| 4 Press Options. Playback appears highlighted. |
80 |
| 5 Press Select. Playing voice command appears as the phone plays the command. |
80 |
| CHange or erase a voice command tag |
80 |
| 1 At the Start screen, press Menu 7-3 (Extras > Voice commands). |
80 |
| 2 After a brief pause, the list of phone functions appears in the screen. |
80 |
| 3 Scroll to the feature you wish to modify and press Select. |
80 |
| 4 When the command you wish to modify appears in the screen, press Options. |
80 |
| 5 Scroll to Change or Erase and press Select. |
80 |
| 8 Messages |
81 |
| Understand text messaging |
81 |
| Message icons |
81 |
| i |
81 |
| • Set up message profiles |
81 |
| Choose a message sending profile |
81 |
| 1 Press Menu 01-14-1-1(Messages > Message settings > Text messages > Sending profile Sending prof... |
82 |
| 2 Press Select to begin setting the features for the Default profile. |
82 |
| Save the message center number |
82 |
| 1 With Default profile highlighted, press Select. Message center number appears. |
82 |
| 2 Press Select. The Center number box appears. |
82 |
| 3 Enter your message center number, then press OK. |
82 |
| Choose the message format |
82 |
| 1 While in Default profile, press Select and scroll to Messages sent as. |
82 |
| 2 Press Select and scroll to Text, E-mail, Page, or Fax. For example, Text. |
82 |
| 3 Press OK to set the message type for that message sending profile. |
82 |
| Choose other message settings |
83 |
| Set up additional message sending profiles |
83 |
| 1 Press Menu-01-14-1-1(Messages > Message settings > Text messages > Sending profile Sending prof... |
83 |
| 2 Scroll to the profile you want (Profile 2, 3, or 4), and press Select. For example, Profile 2. |
83 |
| 3 Follow the steps under “Save the message center number” on page�73. |
83 |
| 4 After saving the message center number, scroll to Messages�sent�as and press Select. |
84 |
| 5 Scroll to the message format you want and press OK. For example, E-mail. |
84 |
| 6 Scroll to E-mail server and press Select. |
84 |
| 7 Enter the e-mail server number and press Options. |
84 |
| 8 Accept appears highlighted. |
84 |
| 9 Press Select. A confirmation message appears. |
84 |
| • Write a message |
84 |
| 1 Press Menu and Select. (Messages > Write message). |
84 |
| 2 Write the message. The indicator in the upper right corner shows the number of characters avail... |
84 |
| Send a message as text |
85 |
| Send to one |
85 |
| 1 When you’re finished writing, press Options. Send appears highlighted. |
85 |
| 2 Press Select. |
85 |
| 3 Enter the �recipient’s phone number, or press Find to retrieve a number from your Phone book, a... |
85 |
| Send to many |
85 |
| 1 When you’re finished writing, press Options, then scroll to Sending options. |
85 |
| 2 Press Select. Send to many appears highlighted. |
85 |
| 3 Press Select. The Phone book appears. |
85 |
| 4 Scroll to the first name that you want to send the message to and press OK. Confirmation messag... |
85 |
| 5 Scroll to another name and press OK. Continue sending the message to as many names in your Phon... |
86 |
| 6 When you’re finished sending the message, press Done, then press Back twice to return to the me... |
86 |
| Send the message as e-mail |
86 |
| 1 After composing your message using the keypad, press Options. |
86 |
| 2 Scroll to Sending options and press Select. |
86 |
| 3 Scroll to Sending profile and press Select. |
86 |
| 4 Scroll to the profile you set up for sending e-mail, and press Select. |
86 |
| 5 Enter the recipient’s e-mail address (or press Find and retrieve it from your Phone book) and p... |
86 |
| 6 The e-mail server number box appears. Enter the number and press OK. Your e-mail is sent. |
86 |
| Send a text message as a fax |
86 |
| Save messages in the outbox |
86 |
| 1 While writing the message, press Options. |
86 |
| 2 Scroll to Save message, then press Select. |
86 |
| 3 Scroll to Outbox, then press Select. |
86 |
| Resend a message from the outbox |
87 |
| 1 Press Menu, then press Select. |
87 |
| 2 Scroll to Outbox, then press Select. |
87 |
| 3 Scroll to the message you want to resend, then press Select. The message appears on the screen. |
87 |
| 4 Press Options and scroll to Send. As txt msg and As e-mail appear. |
87 |
| 5 Scroll to your choice and press Select. |
87 |
| As text message |
87 |
| 1 After you’ve selected As text msg, the Number box appears. |
87 |
| 2 Enter the recipient’s phone number and press OK to send the message. |
87 |
| As e-mail |
87 |
| 1 After you’ve selected As e-mail, the E-mail address box appears. |
87 |
| 2 Enter the recipient’s e-mail address (or press Find and retrieve it from your Phone book) and p... |
87 |
| 3 The E-mail server box appears. Enter the number for your service provider’s e-mail server (also... |
87 |
| Send a message from the Phone book |
88 |
| Choose a name |
88 |
| 1 Press or . The name list appears. |
88 |
| 2 Scroll to the name you want and press Details. The name and any information stored with it appe... |
88 |
| Send a text message |
88 |
| 1 When the name appears, scroll to the phone number you want (if there is more than one stored) a... |
88 |
| 2 Scroll to Send message and press Select. |
88 |
| 3 Write your message using the keypad. |
88 |
| 4 When you’re finished writing, press Options. Send appears highlighted. |
88 |
| 5 Press Select. The message is sent and confirmation messages appear. |
88 |
| Send an e-mail message |
88 |
| 1 When the name appears, scroll to the email address and press Options. Send e-mail appears highl... |
88 |
| 2 Press Select. The Subject box appears. |
88 |
| 3 Enter a subject for the e-mail and press OK. The message screen appears. |
89 |
| 4 Write your message using the keypad. |
89 |
| 5 Once you have finished writing, press Options. Send e-mail appears again |
89 |
| 6 Press Select. If the E-mail server number box appears, enter the number for your service provid... |
89 |
| • Read text messages |
89 |
| Read new text messages now |
89 |
| Read new text messages later |
89 |
| 1 When you receive a text message, press Exit. |
89 |
| 2 Later when you want to read the message, press Menu, then press Select. |
89 |
| 3 Scroll to Inbox, then press Select. |
89 |
| 4 Scroll to the message you want to read, then press Select. |
89 |
| 5 If the message is long, use the scroll key to scroll through the message. |
89 |
| Choose text message options |
90 |
| Read linked messages |
91 |
| • Store messages |
91 |
| Save a message to a folder |
91 |
| 1 Press Menu 01-1 (Messages > Write message). After a brief pause, the message entry screen appea... |
91 |
| 2 Write your message and press Options. |
91 |
| 3 Scroll to Save message and press Select. |
91 |
| 4 Scroll to the folder where you’d like to save the message and press OK. The message is saved. |
91 |
| Inbox folder |
92 |
| Outbox folder |
92 |
| Archive folder |
92 |
| Templates folder |
92 |
| My folders |
92 |
| Add a folder of your own |
92 |
| 1 At the Start screen, press Menu, then press Select. |
92 |
| 2 Scroll to My folders, then press Select. |
92 |
| 3 Press Options and scroll to Add folder. |
92 |
| 4 Press Select. The folder name box appears. |
92 |
| 5 Enter a name for the new folder and press OK. The folder is added. |
92 |
| Remove a folder |
92 |
| 1 At the Start screen, press Menu, then press Select. |
92 |
| 2 Scroll to My folders, then press Select. Any folders that you’ve created appear in the screen. |
92 |
| 3 Scroll to the folder you wish to remove and press Options. |
92 |
| 4 Scroll to Delete folder and press Select. |
93 |
| 5 Press OK if you wish to delete and Back if you wish to exit. |
93 |
| Move a message to a folder |
93 |
| 1 While viewing the message, press Options. |
93 |
| 2 Scroll to Move and press Select. |
93 |
| 3 Scroll to the destination folder and press Select. The message is moved. |
93 |
| • Chat with other phone users |
93 |
| About the chat screen |
93 |
| Start a chat session |
93 |
| 1 Press Menu, then press Select. |
93 |
| 2 Scroll to Chat, then press Select. |
93 |
| 3 Enter the other party’s phone number or recall it from the Phone book and press OK. |
93 |
| 4 Enter your chat name and press OK. |
94 |
| 5 Write your chat message, press Options, then press Send. |
94 |
| 6 Press OK to clear the screen and reply to the message. |
94 |
| Use predictive text for quick replies |
94 |
| 1 From the message screen press Options. |
94 |
| 2 Scroll to Predictive text, then press Select. |
94 |
| 3 Scroll to the language you want, then press Select. T9 prediction on appears on the screen. |
94 |
| View chat history |
94 |
| 1 From the message screen press Options. |
94 |
| 2 Scroll to Chat history and press Select. |
94 |
| Change your nickname |
94 |
| 1 From the message screen press Options. |
94 |
| 2 Scroll to Chat name, press Select, then enter a new nickname. |
94 |
| End your chat session |
94 |
| 1 From the message screen press Options. |
94 |
| 2 Scroll to Quit and press Select. |
94 |
| • Use picture messages |
95 |
| Notes about picture messages |
95 |
| Send picture messages |
95 |
| 1 Press Menu, then Select. |
95 |
| 2 Scroll to Templates, then press Select. |
95 |
| 3 Scroll to the picture you want to send, and press Select. The picture appears. To choose a diff... |
95 |
| 4 Press Options, scroll to Send, then press Select. |
95 |
| 5 Recall or enter the phone number to which you want to send the picture message. |
95 |
| 6 Press OK. |
95 |
| Send picture messages with text |
95 |
| 1 Press Menu 01-1 (Messages > Write messages). |
95 |
| 2 Enter your message, then press Options. |
96 |
| 3 Scroll to Attach picture, then press Select. |
96 |
| 4 Scroll to the picture you want to send, then press View. |
96 |
| 5 After viewing the picture, select Attach. |
96 |
| 6 Select Options, scroll to Send, |
96 |
| 7 Enter the phone number or recall a number from your Phone book, then press OK. |
96 |
| Receive picture messages |
96 |
| 1 When your phone displays Message received, press Show. The picture appears along with the sende... |
96 |
| 2 If the picture has a text message with it, scroll up or down to see the entire message. |
96 |
| 3 Press Options. All message handling options are available, including Save picture. |
96 |
| 4 To save the picture message, scroll to Save picture and press Select. |
96 |
| 5 The Picture title box appears. Edit the text in the box, if needed and press OK. The picture me... |
96 |
| Preview, change, or erase a picture message |
96 |
| 1 After a picture has been attached to your message, press Options at the message edit screen. |
96 |
| 2 Scroll to one of the following options and press Select. |
96 |
| a) Preview - Previews the attached message before sending. Press Back to return to the list of op... |
96 |
| b) Change picture - Takes you back to the picture list. Scroll to highlight a new picture, press ... |
97 |
| c) Erase picture - Press OK to erase the picture from your message, or press Back to return to th... |
97 |
| • Use a template |
97 |
| Send a template message |
97 |
| 1 At the Start screen, press Menu 01-8 (Messages - Templates). After a brief pause, the templates... |
97 |
| 2 Scroll to the template of your choice and press Select. Available templates are as follows: |
97 |
| 3 If you’d like to send the template as it is, press Options, scroll to Send, and press Select. T... |
98 |
| a) Press Options, scroll to Edit instead of Send and press Select. As text msg. and As e-mail app... |
98 |
| b) Scroll to your choice, press Select, and edit the message. |
98 |
| c) Press Options. Send appears highlighted. |
98 |
| d) If you want to save the template before sending, scroll to Save message (instead of Send), and... |
98 |
| e) Press OK to save over the original template, or press No to save it as a new template to a fol... |
98 |
| 4 Refer to “Send a message as text” on page�76, or “Send the message as e-mail” on page�77. |
98 |
| Insert a template into a message |
98 |
| Create a custom template |
98 |
| 1 Press Menu 01-1 (Messages - Write message). After a brief pause, the message entry screen appea... |
98 |
| 2 Compose your custom template and press Options. |
98 |
| 3 Scroll to Save message, and press Select. |
98 |
| 4 Scroll to Templates and press Select. Your message is saved as a template. |
98 |
| • Receive multimedia messages (MMS) |
99 |
| Message receiving limitations |
99 |
| Define MMS settings |
99 |
| Allow multimedia reception |
99 |
| You can choose to receive all messages or to receive messages only when you are in your service p... |
99 |
| 1 Press Menu, then press Select. |
99 |
| 2 Scroll up to Message settings, then press Select. |
99 |
| 3 Scroll to Multimedia msg., then press Select. |
99 |
| 4 Scroll to Allow multimedia reception, then press Select. |
99 |
| 5 Scroll to one of the following, then press Select: |
100 |
| 6 Scroll to Incoming multimedia messages, then press Select. |
100 |
| 7 Scroll to Retrieve, then press Select. |
100 |
| Block all messages |
100 |
| 1 Press Menu, then press Select. |
100 |
| 2 Scroll up to Message settings, then press Select. |
100 |
| 3 Scroll to Multimedia msg., then press Select. |
100 |
| 4 Scroll to Allow multimedia reception, then press Select. |
100 |
| 5 Scroll to No, then press Select. |
100 |
| Allow advertisements |
100 |
| 1 Press Menu, then press Select. |
100 |
| 2 Scroll up to Message settings, then press Select. |
100 |
| 3 Scroll to Multimedia msg., then press Select. |
100 |
| 4 Scroll to Allow advertisements, then press Select. |
100 |
| 5 Scroll to Yes, then press Select. |
100 |
| Block advertisements |
100 |
| 1 Press Menu, then press Select. |
100 |
| 2 Scroll up to Message settings, then press Select. |
100 |
| 3 Scroll to Multimedia msg., then press Select. |
100 |
| 4 Scroll to Allow advertisements, then press Select. |
100 |
| 5 Scroll to No, then press Select. |
100 |
| About Connection settings |
101 |
| View a multimedia message |
101 |
| Discard a multimedia message |
101 |
| 1 To discard the message, press Exit. Discard received message? appears. |
101 |
| 2 Press OK to confirm. |
101 |
| Choose multimedia message options |
101 |
| 1 While viewing a message, press Options. |
101 |
| 2 Scroll to one of these choices listed below, then press Select. |
101 |
| • Use the info message service |
102 |
| • Use the service command editor |
102 |
| 9 Personalize your phone |
103 |
| • Profiles |
103 |
| Select a profile |
103 |
| 1 At the Start screen, press Menu 3 (Profiles). |
103 |
| 2 Scroll through the list of profiles and press Select once the profile of your choice is highlig... |
103 |
| 3 Scroll to Select and press Select. |
103 |
| Customize a profile |
103 |
| 1 Press Menu 3 (Profiles). |
103 |
| 2 Scroll to the profile you want to customize (for example, Normal) and press Select. |
103 |
| 3 Scroll to Customize, then press Select. The Customize menu appears. |
103 |
| 4 Use the scroll key to display each of the options in the following table. Choose the option you... |
103 |
| Set a timed profile |
105 |
| 1 While viewing the list of profiles, scroll to the profile you wish to activate and set for time... |
105 |
| 2 Scroll to Timed and press Select. |
105 |
| 3 Enter the time of day for the profile to expire and press OK. |
105 |
| Accessory profiles |
105 |
| Default profile |
106 |
| 1 Press Menu 4-5 (Settings>Accessory settings) Headset appears highlighted. |
106 |
| 2 Press Select. Default profile appears along with Current profile. |
106 |
| 3 Press Select. Current profile appears highlighted, along with a list of profiles. |
106 |
| 4 Scroll to the profile you want and press Select. For example, Silent. A confirmation message ap... |
106 |
| Set automatic answer |
106 |
| 1 Press Menu 4-5 (Settings > Accessory settings). |
106 |
| 2 Scroll to Headset, Handsfree, or Loopset and press Select. |
106 |
| 3 Scroll to Automatic answer, and press Select. |
106 |
| 4 Scroll to On and press Select. |
106 |
| Set up the loopset profile |
107 |
| 1 Plug the loopset jack into the bottom of your phone. |
107 |
| 2 Press Menu 4-5-3 (Settings > Accessory settings > Loopset). |
107 |
| 3 Scroll to Use loopset, then press Select. |
107 |
| 4 Scroll to Yes, then press Select. |
107 |
| Set up car profile |
107 |
| Adjust volume control |
107 |
| • Choose the display language |
107 |
| 1 Press Menu 4-3-1 (Settings > Phone settings > Language). |
107 |
| 2 Scroll to the language you want, then press Select. |
107 |
| • Set up the clock |
108 |
| Set the time |
108 |
| 1 Press Menu 4-1-1 (Settings > Time settings > Clock). |
108 |
| 2 Scroll to Set the time, then press Select. |
108 |
| 3 Enter the current time, using two digits for both hours and minutes. |
108 |
| 4 Press OK. |
108 |
| 5 Select am or pm and press Select. |
108 |
| Select the time format |
108 |
| 1 Press Menu 4-1-1-3 (Settings > Time settings > Clock > Time format). |
108 |
| 2 Scroll to 24-hour or am/pm. |
108 |
| 3 Press Select. |
108 |
| Display the clock |
108 |
| 1 Press Menu 4-1-1 (Settings > Time settings > Clock). |
108 |
| 2 Scroll to Hide clock or Show clock (only one choice appears, depending on the current setting). |
108 |
| 3 Press Select. |
108 |
| Set automatic update of date and time |
109 |
| 1 Press Menu 4-1-2 (Settings > Time settings > Auto update of date and time). |
109 |
| 2 Scroll to one of the following options, then press Select: |
109 |
| • Download ringing tones |
109 |
| Notification of received ringing tone |
109 |
| Listen to received ringing tones |
109 |
| 1 When your phone displays Ringing tone received, press Options. |
109 |
| 2 Press Select. |
109 |
| Save received ringing tones |
110 |
| 1 After listening to the ringing tone, press Quit. Playback appears highlighted. |
110 |
| 2 Scroll to Save tone, then press Select. The tone is saved to your list of ringing tones. |
110 |
| Discard received ringing tones |
110 |
| • Use a screen saver |
110 |
| Choose a screen saver |
110 |
| 1 Press Menu 4-3-3 (Settings>Phone settings>Screen saver). |
110 |
| 2 Scroll to Clocks and press Select. |
110 |
| 3 Scroll to the clock format you want and press Select. The Screen saver menu appears again. |
110 |
| 4 Scroll to On and press Select. A confirmation message appears. |
110 |
| Choose a timeout |
110 |
| 1 While in the Screen saver menu, scroll to Timeout and press Select. Choose one of the two prese... |
110 |
| 2 Enter a time in minutes/seconds. The time can range from five seconds to 59 minutes |
110 |
| 3 Press OK to set the time. |
110 |
| • Restore factory settings |
111 |
| 10 Advanced calling features |
112 |
| • Active call options |
112 |
| Use call waiting |
112 |
| Activate/cancel call waiting |
112 |
| 1 Press Menu 4-2-5 (Settings > Call settings > Call waiting). |
112 |
| 2 Scroll to Activate or Cancel. |
112 |
| 3 Press Select. |
112 |
| Confirm call waiting status |
112 |
| 1 Press Menu 4-2-5 (Settings > Call settings > Call waiting). |
112 |
| 2 Scroll to Check status and press Select. |
112 |
| Answer a waiting call |
112 |
| 1 Your phone signals when you have a call waiting. |
112 |
| 2 Press or Answer to put the current call on hold and answer the waiting call. |
112 |
| Reject a waiting call |
112 |
| 1 Press Options and scroll to Decline call. |
112 |
| 2 Press Select. |
112 |
| Switch between calls |
112 |
| End the active call |
113 |
| 1 Press Options and scroll to End call. |
113 |
| 2 Press Select. |
113 |
| Third call waiting |
113 |
| 1 Press to end the active call. |
113 |
| 2 Press Answer to answer the new call. |
113 |
| Use in-call options |
113 |
| Put a call on hold |
114 |
| 1 To put a call on hold, press Hold. |
114 |
| 2 To return to the call, press Unhold. |
114 |
| Make a new call |
114 |
| 1 Enter the second phone number, or recall it from the Phone book. |
114 |
| 2 Press . OR |
114 |
| 1 Press Options. |
114 |
| 2 Scroll to New call, then press Select. |
114 |
| 3 Enter the second phone number, or recall it from the Phone book. |
114 |
| 4 Press Call. |
114 |
| Switch between two calls in progress |
114 |
| End the active call |
114 |
| Send touch tones |
114 |
| Save touch tone strings |
115 |
| Send a touch tone string |
115 |
| 1 Press Options. |
115 |
| 2 Scroll to Touch tones and press Select. |
115 |
| 3 Enter a touch tone string or recall a touch tone string from the Phone book and press Tones. A ... |
115 |
| End all calls |
115 |
| 1 Press Options. |
115 |
| 2 Scroll to End all calls, then press Select. |
115 |
| Access the Phone book |
115 |
| 1 Press Options. |
115 |
| 2 Scroll to Phone book and press Select. Now your Phone book functions are available. See “Use th... |
115 |
| Access menus |
115 |
| 1 Press Options and scroll to Menu. |
115 |
| 2 Press Select then scroll up or down to access any of your phone’s menus. |
115 |
| 3 Press Back and Exit to return to the call. |
115 |
| Mute/unmute the microphone |
116 |
| 1 Press Options. |
116 |
| 2 Scroll to Mute, then press Select. |
116 |
| 3 To unmute the microphone, press Unmute. |
116 |
| Make a conference call |
116 |
| 1 Place a call to the first person. |
116 |
| 2 Press Options and scroll to New call. |
116 |
| 3 Press Select, recall or dial the number of the next party you want to include, then press Call. |
116 |
| 4 After the other party answers, press Options. |
116 |
| 5 Scroll to Conference, then press Select. |
116 |
| 6 To add other parties to the call, repeat steps 2 through 5. |
116 |
| 7 To end the conference call, press . |
116 |
| Have a private conversation with a participant |
116 |
| 1 While in a conference call, press Options. |
116 |
| 2 Scroll to Private call then press Select. |
116 |
| 3 Scroll to the person you want to speak with, then press OK. The other participants can continue... |
116 |
| 4 To rejoin the conference call, press Options. |
117 |
| 5 Scroll to Conference, then press Select. |
117 |
| Drop a participant from the �conference call |
117 |
| 1 While in a conference call, press Options. |
117 |
| 2 Scroll to Private call, then press Select. |
117 |
| 3 Scroll to the person you want to drop, then press OK. |
117 |
| 4 Press Options. |
117 |
| 5 Scroll to End call, then press Select. |
117 |
| • Use call forwarding |
117 |
| • Work with two phone lines |
118 |
| 1 At the Start screen, press and hold . |
118 |
| 2 Press OK. |
118 |
| Activate call forwarding |
118 |
| 1 Press Menu 4-2-1 (Settings > Call settings > Call forwarding). |
118 |
| 2 Press Select. |
119 |
| 3 Activate is highlighted; press Select. |
119 |
| 4 Select To voice mailb. OR Select To other no. |
119 |
| 5 If you choose To other no., enter the phone number to which you want to forward calls, then pre... |
119 |
| Cancel call forwarding |
119 |
| 1 Press Menu 4-2-1 (Settings > Call settings > Call forwarding). |
119 |
| 2 Scroll to Cancel all call forwarding and press Select. |
119 |
| Check call forwarding status |
119 |
| 1 Press Menu 4-2-1 (Settings > Call settings > Call forwarding). |
119 |
| 2 Scroll to the call forwarding option you want to check, press Select. |
119 |
| 3 Scroll to Check status, then press Select. |
119 |
| • Use anykey answer |
120 |
| Turn on Anykey answer |
120 |
| 1 Press Menu 4-2-2 (Settings > Call settings > Anykey answer). |
120 |
| 2 Scroll to On and press Select. |
120 |
| Turn off Anykey answer |
120 |
| 1 Press Menu 4-2-2 (Settings > Call settings > Anykey answer). |
120 |
| 2 Scroll to Off and press Select. |
120 |
| • Use automatic redial |
120 |
| Activate automatic redial |
120 |
| 1 Press Menu 4-2-3 (Settings > Call settings > Automatic redial). |
120 |
| 2 Scroll to On, then press Select. |
120 |
| 3 Press and hold Back to return to the Start screen. |
120 |
| • Send your own number in caller ID |
121 |
| 1 Press Menu 4-2-7 (Settings > Call settings > Send own caller ID when calling). |
121 |
| 2 Chose one of the following options: |
121 |
| • Use 1-touch dialing |
121 |
| Activate 1-touch dialing |
121 |
| 1 Press Menu 4-2-4 (Settings > Call settings > 1-touch dialing). |
121 |
| Scroll to On, then press Select. |
121 |
| Assign a number to a 1-touch dialing key |
121 |
| 1 Press Names and scroll to 1-touch dialing. |
121 |
| 2 Press Select. |
122 |
| 3 Press Assign. Enter the number or recall it from the Phone book, then press Select twice. |
122 |
| Call a 1-touch dial number |
122 |
| 1-touch dialing for key 1 |
122 |
| Change 1-touch dialing numbers |
122 |
| 1 Press Names. |
122 |
| 2 Scroll to 1-touch dialing and press Select. |
122 |
| 3 Scroll to the key that you want to change, and press Options. |
122 |
| 4 Scroll to Change and press Select. |
122 |
| 5 Enter a phone number, then press OK. |
122 |
| 6 Enter a name, then press OK. |
122 |
| Erase 1-touch dialing numbers |
122 |
| 1 Press Names. |
122 |
| 2 Scroll to 1-touch dialing and press Select. |
122 |
| 3 Scroll to the key that you want to erase and press Options. |
122 |
| 4 Scroll to Erase and press Select. |
123 |
| 5 Press OK to confirm. |
123 |
| • Make an international call |
123 |
| 1 Press twice to enter the international dialing prefix (+). |
123 |
| 2 Enter the country code, area code, and phone number, and press . |
123 |
| • Select a system |
123 |
| 1 Press Menu 4-3-6 (Settings > Phone settings > System selection). |
123 |
| 2 Scroll to Automatic or Manual, then press Select. |
123 |
| 11 Manage phone security |
124 |
| • Lock the keypad (Keyguard) |
124 |
| Manual Keyguard |
124 |
| Automatic Keyguard |
125 |
| 1 Press Menu 4-3-2 (Settings> Phone settings>Automatic keyguard. |
125 |
| 2 Scroll to On and press Select. Set delay appears, with the time displayed in minutes�:�seconds. |
125 |
| 3 In minutes and seconds, enter the amount of time you want the phone to wait before turning Keyg... |
125 |
| • About Access codes |
125 |
| The security code |
125 |
| Change your security code |
126 |
| 1 Press Menu 4-7-6-1 (Settings > Security settings > Access codes > Change security code). |
126 |
| 2 Enter the current security code and press OK. You’re prompted to enter the new security code. |
126 |
| 3 Enter the new security code (up to 10 characters) and press OK. You’re asked to re-enter the ne... |
126 |
| 4 Enter the new security code again and press OK. A message appears in the screen confirming your... |
126 |
| The PIN code |
126 |
| PIN code request |
126 |
| 1 Press Menu 4-7-1 (Settings > Security settings > PIN code request). |
126 |
| 2 After a brief pause, you’re prompted to enter the current PIN code. Enter the PIN code and pres... |
126 |
| 3 Scroll to On and press OK. A message appears in the screen confirming your selection. |
126 |
| Change your PIN code |
127 |
| 1 Press Menu 4-7-6-2 (Settings > Security settings > Access codes > Change PIN code). |
127 |
| 2 After a brief pause, you’re prompted to enter the current PIN code. Enter the PIN code and pres... |
127 |
| 3 You’re prompted to enter the new PIN code. Enter the new PIN code and press OK. |
127 |
| 4 You’re prompted to re-enter the new PIN code for verification. Enter the new PIN code again and... |
127 |
| The PIN2 Code |
127 |
| Change your PIN2 code |
127 |
| 1 Press Menu 4-7-6-3 (Settings > Security settings > Access codes > Change PIN2 code). You’re pro... |
127 |
| 2 Enter the current PIN2 code and press OK. You’re prompted to enter the new PIN2 code. |
127 |
| 3 Enter the new PIN2 code and press OK. You’re asked to verify the new PIN2 code by entering it a... |
127 |
| 4 Enter the new PIN2 code again and press OK. A message appears in the screen confirming you’ve c... |
127 |
| Personal unblocking key (PUK) codes |
128 |
| • Use call restrictions |
128 |
| Turn fixed dialing on or off |
128 |
| 1 Press Menu 4-7-3 (Settings > Security settings > Fixed dialing). |
128 |
| 2 Scroll to On or Off, then press Select. |
128 |
| 3 Enter your PIN2 code, then press OK. |
128 |
| Add numbers to the fixed dialing list |
128 |
| 1 Press Menu 4-7-3 (Settings > Security settings > Fixed dialing). |
128 |
| 2 Scroll to Number list, then press Select. |
128 |
| 3 Scroll to Add, then press Select. |
128 |
| 4 Enter your PIN2 code and press OK. |
128 |
| 5 Enter the phone number you want to restrict, then press OK. |
129 |
| 6 Enter a name to go with the restricted phone number, then press OK. |
129 |
| • Restrict calls |
129 |
| Turn on call restrictions |
129 |
| 1 Press Menu 4-7-2 (Settings > Security settings > Call restrictions). |
129 |
| 2 Scroll through the types of calls you can restrict, and press Select when you see the one you w... |
129 |
| 3 Scroll to one of the following options: |
130 |
| 4 Press OK. |
130 |
| About your restriction password |
130 |
| Change your restriction password |
130 |
| 1 Press Menu 4-7-6 (Settings > Security settings > Change access codes). |
130 |
| 2 Scroll to Change restriction password, then press Select. |
130 |
| 3 Enter your new password, then press OK. |
130 |
| • Set up a closed user group |
130 |
| Turn on closed user group |
130 |
| 1 Press Menu 4-7-4 (Settings >Security settings > Closed user group). |
130 |
| 2 Scroll to On, enter the group number, then press Select. |
130 |
| Turn off closed user group |
130 |
| 1 Press Menu 4-7-4 (Settings >Security settings > Closed user group). |
130 |
| 2 Scroll to Off, then press OK. |
130 |
| 12 Your wireless Internet browser |
131 |
| • Notes on wireless Internet access |
131 |
| Technology background |
131 |
| Wap |
131 |
| gprs |
132 |
| The service provider’s role |
132 |
| • Set up for browsing |
133 |
| • Sign on to the Internet |
133 |
| 1 Press Menu 10 (Services). Home appears highlighted. |
133 |
| 2 Press Select. |
133 |
| • Use browser options |
133 |
| • Navigate the wireless Internet |
134 |
| General guidelines for using the phone keys |
134 |
| Scroll and selection keys |
134 |
| Numeric keys |
135 |
| 1 Press Menu 10-4 (Services> Settings). |
135 |
| 2 Press Select and scroll to Appearance settings. |
135 |
| 3 Press Select twice and scroll to Numeric keys. |
135 |
| 4 Press Select. |
135 |
| Examples of wireless Internet sites |
135 |
| • Use bookmarks |
136 |
| Set a bookmark while browsing |
136 |
| 1 Press Menu 10-1 (Services > Home), then press Options. |
136 |
| 2 Scroll to Bookmarks, then press Select. |
136 |
| 3 Press Options. |
136 |
| 4 Scroll to New bookmark, then press Select. |
136 |
| 5 Enter address, then press OK. |
136 |
| 6 Enter a title, then press OK. |
136 |
| • Disconnect from the Internet |
136 |
| • Security issues |
136 |
| Be sure to clear the cache memory |
136 |
| Clear the cache |
137 |
| Clear the cache while browsing |
137 |
| 1 Press Options. |
137 |
| 2 Scroll to Clear cache, then press Select. |
137 |
| About authority certificates |
137 |
| View the list of certificates |
137 |
| 1 Press Menu 10 (Services). |
137 |
| 2 Scroll to Settings, then press Select. |
137 |
| 3 Scroll to Certificates, then press Select. |
137 |
| • Notes about GPRS |
138 |
| Set up an automatic connection |
138 |
| Receive a call while online |
139 |
| Make a call while online |
140 |
| Make an emergency call while online |
140 |
| 1 To close your Internet connection and return to the Start screen, simply press twice. |
140 |
| 2 Enter the emergency number for your present location (for example, 911 or any other official em... |
140 |
| 3 Press . |
140 |
| 13 Your personal digital assistant |
141 |
| • Use the alarm clock |
141 |
| Set the alarm clock |
141 |
| 1 Press Menu 6-1 (Organizer > Alarm clock). |
141 |
| 2 Enter the alarm time in hh:mm format. |
141 |
| 3 Press OK. |
141 |
| 4 Select either am or pm and press Select. |
141 |
| Manage the alarm |
141 |
| Phone on |
141 |
| Phone off |
142 |
| Turn off the alarm clock |
142 |
| 1 Press Menu 6-1 (Organizer > Alarm clock). |
142 |
| 2 Scroll to Off and press Select. |
142 |
| • Use the calendar |
142 |
| Open the Calendar |
142 |
| Set the date |
142 |
| 1 While in the Monthly view screen press Options. |
142 |
| 2 Scroll to Settings and press Select. Set the date appears highlighted. |
142 |
| 3 Press Select. The date appears in mm-dd-yyyy format (for English. Date format for other languag... |
143 |
| 4 Enter the date and press OK. |
143 |
| Set the date format |
143 |
| 1 While in the Monthly view screen, press Options. |
143 |
| 2 Scroll to Settings and press Select. |
143 |
| 3 Scroll to Date format and press Select. |
143 |
| 4 Scroll to the date format you want and press Select. |
143 |
| Use four-way scrolling |
143 |
| Jump to a date |
143 |
| 1 Press Menu 6-2 (Organizer - Calendar). After a brief pause, the Monthly view appears in the scr... |
143 |
| 2 Press Options, scroll to Go to date, and press Select. |
143 |
| 3 Enter the date (for example 12/15/2002) and press OK. The Monthly view appears in the screen wi... |
143 |
| Make a note for a specific date |
144 |
| 1 Jump to a date as outlined in the previous section. |
144 |
| 2 From the Monthly view (with the jump date highlighted), press Options. |
144 |
| 3 Scroll to Make a note, and press Select. |
144 |
| 4 Scroll to one of the following note types and press Select. |
144 |
| 5 Enter your note, press Options, scroll to Save, and press Select. |
144 |
| View calendar notes - the Day view |
144 |
| 1 At the Start screen, press Menu 6-2 (Organizer - Calendar). After a brief pause, the Monthly vi... |
144 |
| 2 Jump, or scroll to the date containing the notes you wish to view. |
144 |
| 3 Press Options, scroll to View day, and press Select. Any notes you have for the day will appear... |
144 |
| Options while viewing the notes list |
145 |
| 1 Press Options while viewing the day’s notes to display the options listed in the following table. |
145 |
| 2 Scroll to an option. Press Select to activate the option or enter its submenu. |
145 |
| Send a Calendar note to another device |
146 |
| Send a note via Infrared or SMS |
146 |
| 1 At the Start screen, press Menu 6-2 (Organizer - Calendar). After a brief pause, the Monthly vi... |
146 |
| 2 Jump, or scroll to the date containing the note you wish to send. |
146 |
| 3 Press Options, scroll to View day, and press Select. |
146 |
| 4 Scroll to the note you wish to send and press Options. |
146 |
| 5 Scroll to Send note and press Select. |
146 |
| 6 Scroll to Via IR, As note, or As text msg., and press Select. |
146 |
| 7 If you selected Send via IR, align the infrared ports of both devices and press Select. The not... |
146 |
| 8 If you selected Send as note, enter the number for the recipient (or press Find to retrieve a n... |
146 |
| 9 Press Options, scroll to Send, and press Select. |
146 |
| 10 Enter the number for the recipient (or press Find to retrieve a number from your Phone book), ... |
146 |
| Receive Calendar notes from another device |
146 |
| View received Calendar notes |
147 |
| 1 When your phone displays Calendar note received, press Show. |
147 |
| 2 The text of your note appears in the screen. Use the scroll key to view the entire message, if ... |
147 |
| Save received Calendar notes |
147 |
| 1 After viewing the Calendar note, press Options. |
147 |
| 2 Scroll to Save and press Select. |
147 |
| Discard viewed Calendar notes |
147 |
| 1 After viewing the Calendar note, press Options. |
147 |
| 2 Scroll to Discard and press Select. |
147 |
| • Make a to-do list |
147 |
| Add a to-do note |
147 |
| 1 At the Start screen, press Menu 6-3 (Organizer - To-do list). |
147 |
| 2 After a brief pause, press Options. If this is your first time to use the to-do list, Add is hi... |
147 |
| 3 Press Select, enter your to-do note and press Options. |
147 |
| 4 Scroll to Save and press Select. |
147 |
| 5 Scroll to High, Medium, or Low priority and press Select. The to-do note is saved. |
147 |
| Choose other to-do options |
148 |
| • Use the calculator |
148 |
| 1 At the Start screen, press Menu 7-1 (Extras >Calculator). After a brief pause, the calculator s... |
148 |
| 2 Enter the first number in your calculation. |
148 |
| 3 Enter the second number in your calculation. |
148 |
| 4 Press Options. The following list of options appear in the screen. Use the scroll key to highli... |
149 |
| 5 Press Select to complete the calculation as selected in the calculator options. The sum of your... |
149 |
| Use currency conversion |
149 |
| Edit the exchange rate |
149 |
| 1 At the Start screen, press Menu 7-1 (Calculator). After a brief pause, the calculator screen ap... |
149 |
| 2 Press Options. Exchange rate appears. |
149 |
| 3 Press Select and scroll to one of the following options. |
149 |
| 4 Press Select to edit your choice. |
150 |
| Make conversions |
150 |
| 1 At the Start screen, enter a currency amount to convert. |
150 |
| 2 Press Options, scroll to one of the following and press Select: |
150 |
| 3 Enter the exchange rate and press OK. The converted amount appears in the screen. |
150 |
| • Use the voice recorder |
151 |
| Record a memo |
151 |
| 1 Press Menu 7-2 (Extras > Voice recorder). Record appears highlighted. |
151 |
| 2 To begin recording, scroll to Record, then press Select. |
151 |
| 3 Clearly state your note. When you are finished, press Stop. The Title: box appears on the scree... |
151 |
| 4 Key in a name for the recording and press OK to save it. Recording saved appears on the screen. |
151 |
| 1 Press Clear to erase the name. Then press Back. Recording will not be not saved. Continue? appe... |
151 |
| 2 Press OK. |
151 |
| Record a phone conversation |
151 |
| 1 Place the call. |
151 |
| 2 While in the call, press Options. |
151 |
| 3 Scroll to Record, then press Select. |
151 |
| 4 When you are finished, press Stop. |
152 |
| 5 Recording saved appears on the screen, and the conversation is automatically saved under the na... |
152 |
| Audio cues |
152 |
| Listen to or edit a memo |
152 |
| 1 To listen to or edit a recorded memo, press Menu 7-2-2 (Extras > Voice recorder > Recordings li... |
152 |
| 2 Scroll to the recording you want then press Options. A list of options appears: |
152 |
| Set an alarm |
152 |
| 1 Press Menu 7-2-2 (Extras > Voice recorder > Recordings list). |
152 |
| 2 Press Options. Scroll to Add alarm and press Select. |
152 |
| 3 Enter the date and time for the alarm, then press OK. Alarm added appears on the screen. |
152 |
| Notes about voice memos |
153 |
| • Use the countdown timer |
153 |
| Set the countdown timer |
153 |
| 1 Press Menu 7-4 (Extras > Countdown timer), then press Select. |
153 |
| 2 Enter two digits for hours, two digits for minutes, then press OK. |
153 |
| 3 Enter a note, if needed, then press OK. Timer running appears, and the icon appears in the Star... |
153 |
| Change the time |
153 |
| 1 Press Menu 7-4 (Extras > Countdown timer). |
153 |
| 2 Scroll to Change time, then press Select. |
153 |
| 3 Enter the time, then press OK. |
153 |
| 4 Save the current note, or enter a new note and press OK. |
154 |
| Stop the timer |
154 |
| Before the alarm sounds |
154 |
| 1 Press Menu 7-4 (Extras > Countdown timer), then press Select. |
154 |
| 2 Scroll to Stop timer, then press Select. Timer stopped appears on the screen. |
154 |
| • Use the stopwatch |
154 |
| Measure split time |
154 |
| 1 Press Menu 7-5 (Extras > Stopwatch). |
154 |
| 2 Scroll to Split timing, then press Select. |
154 |
| 3 Press Start. |
154 |
| 4 Press Split to take an intermediate time. |
154 |
| 5 When you’re finished timing, press Stop, then press Options. |
155 |
| 6 Save appears highlighted. If you want to save the time, see “Save the time” on page�147. |
155 |
| 7 Scroll up to Start and press Select to continue, OR Scroll down to Reset and press Select to se... |
155 |
| Measure lap time |
155 |
| 1 Press Menu 7-5 (Extras > Stopwatch). |
155 |
| 2 Scroll to Lap timing, then press Select. |
155 |
| 3 Press Start. |
155 |
| 4 Press Lap to take a lap time. |
155 |
| 5 When you’re finished timing, press Stop, then press Options. |
155 |
| 6 Save appears highlighted. If you want to save the time, see “Save the time” below. |
155 |
| 7 Scroll up to Start and press Select to continue. OR Scroll down to Reset and press Select to se... |
155 |
| Save the time |
156 |
| 1 Press Stop to end timing, then press Options. Save appears highlighted. |
156 |
| 2 Press Select, then enter a name for the measurement. If a name is not entered, the total time i... |
156 |
| 3 Press OK to store the time in the stopwatch memory. |
156 |
| Choose other stopwatch options |
156 |
| 1 Press Menu 7-5 (Extras > Stopwatch), scroll to Continue. |
156 |
| 2 Press Select. |
156 |
| • Share business cards |
157 |
| Send a business card as a short text message |
157 |
| 1 Recall the name from your Phone book. |
157 |
| 2 Press Details, if shown, or skip to Step 3. |
157 |
| 3 Press Options. |
157 |
| 4 Scroll to Send bus. card and press Select. |
157 |
| 5 Scroll to Via text msg. and press Select. |
157 |
| 6 Enter or recall the phone number to which you want to send the business card. |
157 |
| 7 Press OK. |
157 |
| 14 Fun and games |
158 |
| • FM Radio |
158 |
| Turn the radio on |
158 |
| 1 Connect a headset. |
158 |
| 2 Press Menu 5. Radio on appears. |
158 |
| 3 Press Options. |
158 |
| Set a frequency |
158 |
| Direct entry |
158 |
| 1 Scroll to Set frequency and press Select. |
158 |
| 2 Enter the frequency number and press OK. For example, to enter 100.7, press 1,0,0,7. The cursor... |
158 |
| Manual Search |
158 |
| 1 Scroll to Manual tuning and press Select. |
158 |
| 2 Press or until you hear the station you want. |
158 |
| 3 Press OK. Frequency set appears. |
158 |
| Automatic tuning |
159 |
| 1 Scroll to Auto-tuning and press Select. |
159 |
| 2 Press or . The radio automatically seeks and stops on the next active frequency. |
159 |
| 3 Press OK. Frequency set appears, followed by the frequency number. |
159 |
| Save frequencies in the phone’s memory |
159 |
| 1 With the frequency displayed in the screen, press Options. |
159 |
| 2 Scroll to Save channel and press Select. The Channel name box appears. |
159 |
| 3 Key in a name for the channel, and press OK. For example, KWCR. Select channel location appears... |
159 |
| 4 The next open channel location number appears. OR Scroll to the channel location number you wan... |
159 |
| Recall a stored frequency |
159 |
| Change channels |
159 |
| Handle calls while listening to the radio |
160 |
| Incoming calls |
160 |
| Outgoing calls |
160 |
| Incoming messages |
160 |
| • Game rules |
160 |
| Start a new game |
160 |
| 1 Press Menu 8-1 (Games>Select game). |
160 |
| 2 Scroll to the desired game, and press Select. |
160 |
| Adjust game settings |
161 |
| 1 To adjust sound, lights, or vibrator, press Menu 8, scroll to Settings, then press Select. |
161 |
| 2 Scroll to the desired setting and press Select. |
161 |
| • Nokia Sugar bowl |
161 |
| • Snake II |
161 |
| Start a two-player game |
161 |
| • Space Impact |
161 |
| • Bumper |
162 |
| 15 Advanced features |
163 |
| • Your phone and other devices |
163 |
| • Prepare the devices for IR connection |
163 |
| 1 Clear any obstructions between the two devices. |
163 |
| 2 Point the IR ports at each other. |
163 |
| 3 Make sure the two devices are no more than 3 feet apart. |
163 |
| • Infrared basics |
164 |
| 1 Make sure the two devices are ready for the IR connection. |
164 |
| 2 To receive information on your phone, press Menu 9 (Infrared) and then press Select. |
164 |
| 3 Have the user of the sending device select the desired IR function to start data transfer. |
164 |
| Check the status of an IR connection |
164 |
| • Send and receive information |
164 |
| Send a business card to another device |
165 |
| 1 Recall the name from your Phone book. |
165 |
| 2 Press Details, if shown, or skip to Step 3. |
165 |
| 3 Press Options. |
165 |
| 4 Scroll to Send bus. card and press Select. |
165 |
| 5 Scroll to Via infrared and press Select. |
165 |
| Receive a business card from another device |
165 |
| 1 Point the IR ports at each other. |
165 |
| 2 Press Menu 9 (Infrared). |
165 |
| 3 When you see the message Business card received, press Show. |
165 |
| 4 Press Options, scroll to Save or Discard, then press OK. |
165 |
| Send calendar notes to another device |
166 |
| 1 Select the calendar note you want to send, then press Options. |
166 |
| 2 Scroll to Send note, then press Select. |
166 |
| 3 Scroll to Send via IR, then press Select. |
166 |
| Receive calendar notes from another device |
166 |
| 1 Point the IR ports at each other. |
166 |
| 2 Press Menu 9 (Infrared). |
166 |
| 3 When you see the message Calendar note received, press Show. |
166 |
| 4 Press Options, scroll to Save or Discard, then press OK. |
166 |
| • PC connectivity |
167 |
| Nokia PC Suite |
167 |
| Wireless modem setup |
168 |
| Download Nokia PC Suite and Modem Setup |
168 |
| • GPRS dial-up connections |
168 |
| 16 Reference information |
169 |
| • Battery statements |
169 |
| Charging and Discharging |
169 |
| • Important safety information |
170 |
| Traffic safety |
170 |
| Operating environment |
170 |
| Electronic devices |
170 |
| Pacemakers |
171 |
| Hearing aids |
171 |
| Other medical devices |
171 |
| Vehicles |
171 |
| Posted facilities |
172 |
| Potentially explosive atmospheres |
172 |
| Vehicles |
172 |
| • Emergency calls |
173 |
| 1 If the phone is not on, switch it on. Check for adequate signal strength. |
173 |
| 2 Press as many times as needed (for example, to exit a call, to exit a menu, etc.) to clear the ... |
173 |
| 3 Key in the emergency number for your present location (for example, 911 or other official emerg... |
173 |
| 4 Press the key. |
173 |
| Certification Information (SAR) |
175 |
| • Care and maintenance |
177 |
| • Accessories |
178 |
| A few practical rules for accessory operation |
178 |
| • Battery information |
179 |
| Charging Times |
179 |
| 3 hours |
179 |
| 2 hours |
179 |
| 1 hour, 30 min |
179 |
| Standby and Talk Times |
179 |
| Up to 5 hours |
179 |
| up to 16 days (radio off) up to 20 hours (radio on) |
179 |
| • Chargers and other accessories |
180 |
| Standard Travel Charger (ACP�7) |
180 |
| Rapid Travel Charger (ACP-8) |
180 |
| Travel Charger (ACP-12) |
181 |
| Rapid Cigarette Lighter Charger (LCH-9) |
181 |
| Desktop Stand (DCD-1) |
182 |
| Spare Battery Charger (DDC-1) |
182 |
| Full Car Kit (CARK-132) |
182 |
| Express Car Kit (CARK-130) |
183 |
| Mobile holder (MBD-10) |
183 |
| Headset Kit (HDC-5) |
183 |
| HDD-1 Dual headset |
184 |
| Loopset LPS-3 |
184 |
| Leather carry case CSH-3 |
184 |
| Leather carry case CSL-18 |
184 |
| Microfiber carry case CSM-10 |
185 |
| 17 Technical information |
186 |
| 18 Troubleshooting |
187 |
| 19 Frequently asked questions (FAQ) |
189 |
| 20 Nokia One-Year Limited Warranty |
193 |
| 1 The limited warranty for the Product extends for ONE (1) year beginning on the date of the purc... |
193 |
| 2 The limited warranty extends only to the original purchaser (“Consumer”) of the Product and is ... |
193 |
| 3 The limited warranty extends only to Consumers who purchase the Product in the United States of... |
193 |
| 4 During the limited warranty period, Nokia will repair, or replace, at Nokia’s sole option, any ... |
193 |
| 5 Upon request from Nokia, the Consumer must prove the date of the original purchase of the Produ... |
194 |
| 6 The Consumer shall bear the cost of shipping the Product to Nokia in Melbourne, Florida. Nokia ... |
194 |
| 7 The Consumer shall have no coverage or benefits under this limited warranty if any of the follo... |
194 |
| a) The Product has been subjected to abnormal use, abnormal conditions, improper storage, exposur... |
194 |
| b) The Product has been damaged from external causes such as collision with an object, or from fi... |
194 |
| c) Nokia was not advised in writing by the Consumer of the alleged defect or malfunction of the P... |
194 |
| d) The Product serial number plate or the accessory data code has been removed, defaced or altered. |
194 |
| e) The defect or damage was caused by the defective function of the cellular system or by inadequ... |
194 |
| 8 Nokia does not warrant uninterrupted or error-free operation of the Product. If a problem devel... |
195 |
| a) The Consumer shall return the Product to the place of purchase for repair or replacement proce... |
195 |
| b) If “a” is not convenient because of distance (more than 50 miles) or for other good cause, the... |
195 |
| c) The Consumer shall include a return address, daytime phone number and/or fax number, complete ... |
195 |
| d) The Consumer will be billed for any parts or labor charges not covered by this limited warrant... |
195 |
| e) Nokia will repair the Product under the limited warranty within 30 days after receipt of the P... |
195 |
| f) If the Product is returned during the limited warranty period, but the problem with the Produc... |
196 |
| 9 You (the Consumer) understand that the product may consist of refurbished equipment that contai... |
196 |
| 10 ANY IMPLIED WARRANTY OF MERCHANTABILITY, OR FITNESS FOR A PARTICULAR PURPOSE OR USE, SHALL BE ... |
196 |
| 11 Some states do not allow limitation of how long an implied warranty lasts, so the one year war... |
197 |
| 12 Nokia neither assumes nor authorizes any authorized service center or any other person or enti... |
197 |
| 13 This is the entire warranty between the Nokia and the Consumer, and supersedes all prior and c... |
197 |
| 14 This limited warranty allocates the risk of failure of the Product between the Consumer and No... |
197 |
| 15 Any action or lawsuit for breach of warranty must be commenced within eighteen (18) months fol... |
197 |
| 16 Questions concerning this limited warranty may be directed to: Nokia Inc. Attn: Customer Servi... |
197 |
| 17 The limited warranty period for Nokia supplied attachments and accessories is specifically def... |
197 |
| 4868846 |
198 |
| 4969192 |
198 |
| 5001372 |
198 |
| 5101175 |
198 |
| 5212834 |
198 |
| 5230091 |
198 |
| 5241583 |
198 |
| 5311179 |
198 |
| 5331638 |
198 |
| 5331638 |
198 |
| 5335362 |
198 |
| 5384782 |
198 |
| 5384782 |
198 |
| 5390223 |
198 |
| 5396657 |
198 |
| 5400949 |
198 |
| 5416435 |
198 |
| 5442521 |
198 |
| 5444816 |
198 |
| 5446364 |
198 |
| 5479476 |
198 |
| 5487084 |
198 |
| 5519885 |
198 |
| 5526366 |
198 |
| 5553125 |
198 |
| 5557639 |
198 |
| 5581244 |
198 |
| 5625274 |
198 |
| 5640395 |
198 |
| 5664053 |
198 |
| 5677620 |
198 |
| 5692032 |
198 |
| 5699406 |
198 |
| 5699482 |
198 |
| 5701392 |
198 |
| 5729534 |
198 |
| 5729541 |
198 |
| 5754976 |
198 |
| 5760568 |
198 |
| 5782646 |
198 |
| 5805301 |
198 |
| 5827082 |
198 |
| 5835889 |
198 |
| 5839101 |
198 |
| 5844884 |
198 |
| 5845219 |
198 |
| 5857151 |
198 |
| 5862178 |
198 |
| 5870683 |
198 |
| 5887266 |
198 |
| 5889770 |
198 |
| 5892475 |
198 |
| 5898925 |
198 |
| 5907823 |
198 |
| 5914796 |
198 |
| 5915440 |
198 |
| 5917868 |
198 |
| 5920826 |
198 |
| 5926138 |
198 |
| 5926769 |
198 |
| 5930233 |
198 |
| 5946651 |
198 |
| 5956625 |
198 |
| 5956633 |
198 |
| 5960389 |
198 |
| 5963901 |
198 |
| 5966374 |
198 |
| 5966378 |
198 |
| 5970059 |
198 |
| 5987137 |
198 |
| 5991716 |
198 |
| 5991857 |
198 |
| 6005857 |
198 |
| 6011853 |
198 |
| 6014573 |
198 |
| 6026161 |
198 |
| 6028567 |
198 |
| 6029128 |
198 |
| 6038238 |
198 |
| 6043760 |
198 |
| 6047196 |
198 |
| 6049796 |
198 |
| 6055439 |
198 |
| 6060193 |
198 |
| 6069923 |
198 |
| 6081534 |
198 |
| 6084962 |
198 |
| 6088746 |
198 |
| 6094587 |
198 |
| 6097964 |
198 |
| 6112099 |
198 |
| 6115617 |
198 |
| 6118775 |
198 |
| 6122498 |
198 |
| 6128322 |
198 |
| 6128509 |
198 |
| 6138091 |
198 |
| 6144243 |
198 |
| 6144676 |
198 |
| 6148209 |
198 |
| 6151507 |
198 |
| 6163609 |
198 |
| 6164547 |
198 |
| 6167248 |
198 |
| 6170073 |
198 |
| 6185295 |
198 |
| 6188909 |
198 |
| 6195338 |
198 |
| 6199035 |
198 |
| 6201876 |
198 |
| 6240076 |
198 |
| 6240079 |
198 |
| 6249584 |
198 |
| 6266330 |
198 |
| 6292668 |
198 |
| 6295286 |
198 |
| 6310609 |
198 |
| 6324412 |
198 |
| 29159800* |
198 |
| 29159801* |
198 |
| 29159803* |
198 |
| 29159804* |
198 |
| 29159805* |
198 |
| 29159806* |
198 |
| Notes |
199 |
| Appendix A Message from the CTIA (Cellular Telecommunications & Internet Association) to all user... |
200 |
| A Guide to Safe and Responsible Wireless Phone Use |
201 |
| 1 Get to know your wireless phone and its features such as speed dial and redial. Carefully read ... |
201 |
| 2 When available, use a hands free device. A number of hands free wireless phone accessories are ... |
201 |
| 3 Position your wireless phone within easy reach. Make sure you place your wireless phone within ... |
201 |
| 4 Suspend conversations during hazardous driving conditions or situations. Let the person you are... |
201 |
| 5 Do not take notes or look up phone numbers while driving. If you are reading an address book or... |
202 |
| 6 Dial sensibly and assess the traffic; if possible, place calls when you are not moving or befor... |
202 |
| 7 Do not engage in stressful or emotional conversations that may be distracting. Stressful or emo... |
202 |
| 8 Use your wireless phone to call for help. Your wireless phone is one of the greatest tools you ... |
202 |
| 9 Use your wireless phone to help others in emergencies. Your wireless phone provides you a perfe... |
202 |
| 10 Call roadside assistance or a special wireless non-emergency assistance number when necessary.... |
202 |
| Appendix B Message from the FDA (U.S. Food and Drug Administration) to all users of mobile phones. |
204 |
| Consumer Update on Wireless Phones |
205 |
| Index |
209 |
| Numerics |
209 |
| A |
209 |
| B |
209 |
| C |
210 |
| D |
211 |
| E |
211 |
| F |
211 |
| G |
211 |
| H |
211 |
| I |
211 |
| J |
212 |
| K |
212 |
| L |
212 |
| M |
212 |
| N |
213 |
| P |
213 |
| R |
214 |
| S |
214 |
| T |
215 |
| U |
215 |
| V |
215 |
| W |
216 |
 1
1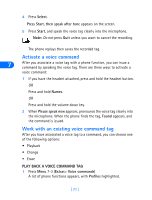 79
79 80
80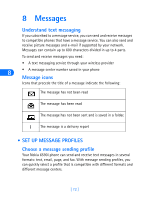 81
81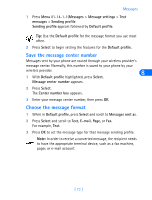 82
82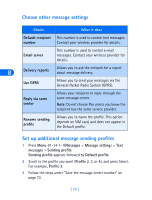 83
83 84
84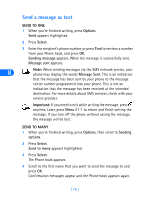 85
85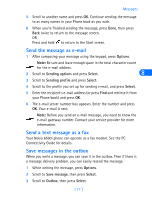 86
86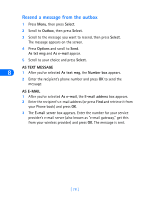 87
87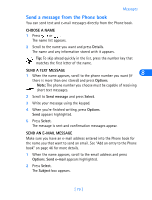 88
88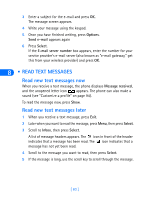 89
89