NordicTrack E 2500 Treadmill English Manual - Page 12
Distance/Laps
 |
View all NordicTrack E 2500 Treadmill manuals
Add to My Manuals
Save this manual to your list of manuals |
Page 12 highlights
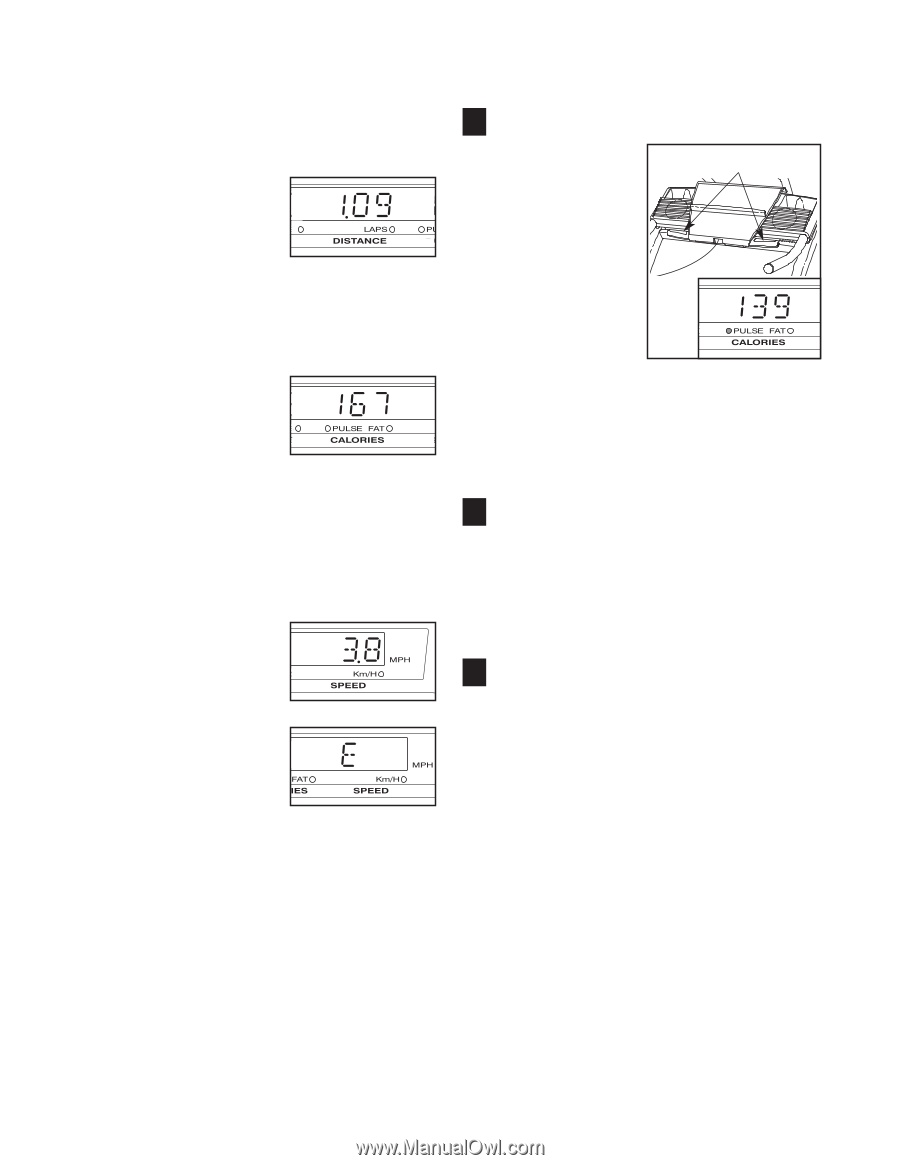
number to the other every few seconds; the Pace indicator will light when your pace is shown. When a program is selected, the display will show the time remaining in the program, your current pace, and the time remaining in the current segment of the program. Distance/Laps-The center section of the main display shows the distance that you have walked and the number of 1/4-mile laps you have completed. The display will change from one number to the other every few seconds; the Laps indicator will light when the number of laps is shown. Calories/Pulse-When you are not using the handgrip pulse sensor, the next section of the main display will show the approximate numbers of calories and fat calories you have burned (see FAT BURNING on page 29). The display will change from one number to the other every few seconds; the Fat indicator will light when the number of fat calories is shown. When you are using the handgrip pulse sensor, the display will show your heart rate (see step 6 at the right). Speed-The right side of the main display shows the speed of the walking belt. Note: The console can display speed and distance in either miles or kilometers. To find which unit of measurement is selected, hold down the Stop button while inserting the key into the console. An "E" for English miles or an "M" for metric kilometers will appear on the right side of the main display. Press the Speed + button to change the unit of measurement. When the desired unit of measurement is selected, remove the key and then reinsert it. Note: For simplicity, all instructions in this manual refer to miles. To reset the main display, press the Stop button, remove the key, and then reinsert the key. 6 Measure your heart rate if desired. To measure your heart rate, stand Metal Contacts on the foot rails and place your hands on the metal contacts on the handrail. Your palms must be resting on the upper contacts, and your fingers must be touching the lower con- tacts-avoid mov- ing your hands. When your pulse is detected, the Pulse indicator will light and then your heart rate will be shown in the main display. For the most accurate heart rate reading, continue to hold the contacts for about 15 seconds. 7 Turn on the fans if desired. To turn on the fans at low speed, press the Fans button. To turn on the fans at high speed, press the Fans button a second time. To turn off the fans, press the Fans buttons a third time. Note: Any time that the walking belt is stopped for a few minutes, the fans will automatically turn off. 8 When you are finished exercising, stop the walking belt and remove the key. Step onto the foot rails, press the Stop button, and adjust the incline of the treadmill to the lowest level. The incline must be at the lowest level when the treadmill is raised to the storage position or the treadmill will be damaged. Next, remove the key from the console and put it in a secure place. Note: If the displays and indicators on the console remain lit after the key is removed, the console is in the "demo" mode. See page 24 and turn off the demo mode. When you are finished using the treadmill, switch the reset/off circuit breaker to the off position and unplug the power cord. 12
-
 1
1 -
2
-
3
-
4
-
5
-
6
-
 7
7 -
 8
8 -
 9
9 -
 10
10 -
 11
11 -
 12
12 -
 13
13 -
 14
14 -
 15
15 -
 16
16 -
 17
17 -
18
-
19
-
20
-
21
-
22
-
23
-
24
-
25
-
26
-
27
-
28
-
29
-
30
-
31
-
32
-
33
-
34
 |
 |