Oki B930dn B930 Setup Guide (English Fran栩s Espa?ol Portugu( - Page 12
Print the Demo
 |
View all Oki B930dn manuals
Add to My Manuals
Save this manual to your list of manuals |
Page 12 highlights
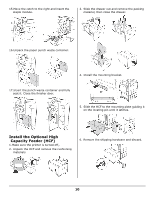
Connect the USB cable to the USB port on the computer, then to the USB port on the printer. Power Up WARNING! Be sure to use only the power cable supplied with your printer! Use of a power cord not supplied with this printer, or an extension cord, could be a safety hazard. 1. Insert the power cable. Plug the cable into a suitable grounded outlet. 2. Turn the printer on. Caution! Do not connect this product to an uninterruptible power supply (UPS). For more information, please contact Oki Data at 1-800OKIDATA. Print the Demo Page _____ 1. Press the MENU key. 2. Press the NEXT (!) key until the display shows INFORMATION MENU. 3. Press the SELECT key to enter the menu. 4. Press the NEXT (5) key until the display shows PRINT DEMO. 5. Press SELECT. The demo page prints. Load Software__________ Windows Network Note: For more information see the Network section in the User Guide. Print the Configuration Sheets 1. Turn the Printer ON and wait for the print server status light to stop blinking. 2. Press the INFO button on the Operator Panel to print the Network Information pages. Keep these sheets handy: they contain information you need to set up the printer on your network. Install the Printer Driver 1. Insert the CD in the CD-ROM drive. The CD will autorun. If it doesn't, click Start → Run → Browse. Browse to your CD-ROM drive, double-click Install.exe. Click OK. 2. Select your language. 3. Accept the license agreement. 4. The installer screen appears. 5. Click Install Driver. 6. Select network printer. 7. Select TCP/IP. 8. Enter the IP address. 9. Follow the on-screen instructions. Test the Driver Install 1. To make sure the printer driver is correctly installed, print a page from any program. 2. Reinstall the driver if the installation failed. Using the Web Browser (Optional) Use your web browser to configure print server and printer menu settings on an embedded web page. Note: For more details, see the User's Guide on the CD supplied with the printer. 1. Activate your web browser (Microsoft Explorer®/™, Mozilla® Firefox®, Netscape Navigator™ 4.4 or higher). 2. Enter the IP Address for the printer. Find the address on the network Configuration Sheet (see page 12). 3. Click on a tab to see a particular category. Utilities and Downloads Note: You must be connected to the internet to download utilities. 12
-
 1
1 -
2
-
3
-
4
-
5
-
6
-
 7
7 -
 8
8 -
 9
9 -
 10
10 -
 11
11 -
 12
12 -
 13
13 -
 14
14 -
 15
15 -
 16
16 -
 17
17 -
18
-
19
-
20
-
21
-
22
-
23
-
24
-
25
-
26
-
27
-
28
-
29
-
30
-
31
-
32
-
33
-
34
-
35
-
36
-
37
-
38
-
39
-
40
-
41
-
42
-
43
-
44
-
45
-
46
-
47
-
48
-
49
-
50
-
51
-
52
 |
 |
