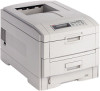
Oki C7200 English: C7200 & C7400 Series Handy Reference - Page 12
Walk-Up Functions cont.
 |
View all Oki C7200 manuals
Add to My Manuals
Save this manual to your list of manuals |
Page 12 highlights
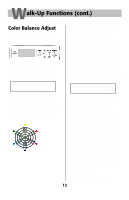
Walk-Up Functions (cont.) Color Balance Adjust To set the Color Balance using the front panel: 1. Press MENU repeatedly until COLOR MENU displays. 2. Press ITEM + repeatedly until COLOR BALANCE ADJUST RESET TO DEFAULT displays. 3. Press SELECT. This restores factory balance settings, which form a baseline for the adjustment. The Color Balance test pattern prints. 4. Check the color of the center circle in the printout against the surrounding circles: • If the center circle matches the circles labeled 00, the color balance is okay. Skip to step 9. • If the center circle does not match circle 00, determine which surrounding circle the center circle most closely matches and note its number. 5. Press VALUE (+ to increase # value or - to decrease # value) until COLOR BALANCE ADJUST SELECT PATTERN # displays, where # represents the number determined in step 4. 6. Press SELECT. The new value is engaged and a new test pattern prints. 7. Check the pattern again and repeat steps 4 through 6 until the color of the center circle most closely matches the circles labeled 00. ! The color balance process is subjective. It is unlikely that you will get an exact match of the center circle to the circles labeled 00. Repeat the color balance process until you feel you have a match, but no more than three times. 9. Press ON LINE. The printer goes back on line. 12
-
 1
1 -
2
-
3
-
4
-
5
-
6
-
 7
7 -
 8
8 -
 9
9 -
 10
10 -
 11
11 -
 12
12 -
 13
13 -
 14
14 -
 15
15 -
 16
16 -
 17
17 -
18
-
19
-
20
-
21
-
22
-
23
-
24
-
25
-
26
-
27
-
28
-
29
-
30
 |
 |
