Olympus E-P3 E-P3 Instruction Manual (English) - Page 49
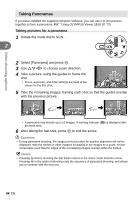
Sequential shooting/using the self timer, Press the, button, to display the direct menu.
 |
View all Olympus E-P3 manuals
Add to My Manuals
Save this manual to your list of manuals |
Page 49 highlights
AUTO 200 - 12800 The sensitivity is set automatically according to the shooting conditions. Sensitivity is set to the selected value. % Tips • The default value and upper limit for auto ISO sensitivity can be selected using [ISO-Auto Set]. The options available for ISO sensitivity can be selected using [ISO Step]. 1 Auto sensitivity can be enabled in M mode using [ISO-Auto]. g "Customizing camera settings" (P. 81) Basic photography/frequently-used options Sequential shooting/using the self timer The camera will take photos at a rate of about 3 frames per second (fps) while the shutter button is pressed all the way down. Alternatively, the self-timer can be used for self- or group-portraits or to reduce camera shake when the camera is mounted on a tripod or otherwise fixed in place. 1 Press the jY button (G) to display the direct menu. 2 Select an option using HI and press Q. o Single-frame shooting Shoots 1 frame at a time when the shutter button is pressed (normal shooting mode). j Sequential shooting Photographs are taken at about 3 frames per second (fps) while the shutter button is pressed all the way down ([S-AF] or [MF] selected for [AF Mode], P. 36). Y12s Self-timer 12 SEC Press the shutter button halfway to focus, the rest of the way down to start the timer. First, the self-timer lamp lights up for approximately 10 seconds, then it blinks for approximately 2 seconds and the picture is taken. Y2s Self-timer 2 SEC Press the shutter button halfway to focus, the rest of the way down to start the timer. The self-timer lamp blinks for approximately 2 seconds, and then the picture is taken. $ Notes • To cancel the activated self-timer, press the jY button. • During sequential shooting, focus, exposure, and white balance are locked at the first frame (during [S-AF], [MF]). # Cautions • During sequential shooting, if the battery check blinks due to low battery, the camera stops shooting and starts saving the pictures you have taken on the card. The camera may not save all of the pictures depending on how much battery power remains. • Fix the camera securely on a tripod for self-timer shooting. • If you stand in front of the camera to press the shutter button halfway when using the self- timer, the photograph may be out of focus. EN 49
-
 1
1 -
2
-
3
-
4
-
5
-
6
-
7
-
8
-
9
-
10
-
11
-
12
-
13
-
14
-
15
-
16
-
17
-
18
-
19
-
20
-
21
-
22
-
23
-
24
-
25
-
26
-
27
-
28
-
29
-
30
-
31
-
32
-
33
-
34
-
35
-
36
-
37
-
38
-
39
-
40
-
41
-
42
-
43
-
 44
44 -
 45
45 -
 46
46 -
 47
47 -
 48
48 -
 49
49 -
 50
50 -
 51
51 -
 52
52 -
 53
53 -
 54
54 -
55
-
56
-
57
-
58
-
59
-
60
-
61
-
62
-
63
-
64
-
65
-
66
-
67
-
68
-
69
-
70
-
71
-
72
-
73
-
74
-
75
-
76
-
77
-
78
-
79
-
80
-
81
-
82
-
83
-
84
-
85
-
86
-
87
-
88
-
89
-
90
-
91
-
92
-
93
-
94
-
95
-
96
-
97
-
98
-
99
-
100
-
101
-
102
-
103
-
104
-
105
-
106
-
107
-
108
-
109
-
110
-
111
-
112
-
113
-
114
-
115
-
116
-
117
-
118
-
119
-
120
-
121
-
122
-
123
-
124
-
125
-
126
-
127
 |
 |
