Olympus E-P3 E-P3 Instruction Manual (English) - Page 88
Utility, Option, Description, Pixel Mapping, Exposure Shift, Warning, Level, Level Adjust
 |
View all Olympus E-P3 manuals
Add to My Manuals
Save this manual to your list of manuals |
Page 88 highlights
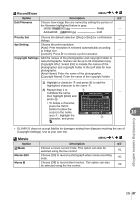
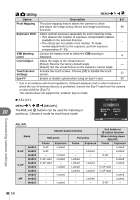
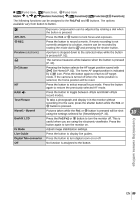
Customizing camera settings 10 b K Utility MENU c b Option Description g Pixel Mapping The pixel mapping feature allows the camera to check and adjust the image pickup device and image processing 98 functions. Exposure Shift Adjust optimal exposure separately for each metering mode. • This reduces the number of exposure compensation options available in the selected direction. • The effects are not visible in the monitor. To make - normal adjustments to the exposure, perform exposure compensation (P. 40). 8 Warning Level Choose the battery level at which the 8 warning is displayed. 6 Level Adjust Adjust the angle of the virtual horizon. [Reset]: Restore the factory default angle. - [Adjust]: Set the virtual horizon to the camera's current angle. Touch Screen Activate the touch screen. Choose [Off] to disable the touch Settings screen. 22 Eye-Fi* Enable or disable upload when using an Eye-Fi card. 99 * Use in accordance with local regulations. Onboard airplanes and in other locations in which the use of wireless devices is prohibited, remove the Eye-Fi card from the camera or select [Off] for [Eye-Fi]. The camera does not support the "endless" Eye-Fi mode. „ AEL/AFL MENU c S [AEL/AFL] The Fn1 and R buttons can be used for metering or autofocus. Choose a mode for each focus mode. S-AF AEL/AFL mode1 Half Way Fully AEL AFL AEL/S-AF Exposure AEL Back Set AEL/AFL Mode S-AF C-AF MF mode1 mode2 mode3 mode1 mode2 mode3 mode4 mode1 mode2 mode3 Shutter button function Half-press Focus S-AF S-AF - C-AF start C-AF start - - - - - Exposure Locked - Locked Locked - Locked - Locked - Locked Full press Focus - - - Locked Locked Locked Locked - - - Exposure - Locked - - Locked - Locked - Locked - Fn1 button or R button function When holding down AEL/AFL Focus Exposure - Locked - Locked S-AF - - Locked - Locked C-AF start - C-AF start - - Locked - Locked S-AF - 88 EN
-
 1
1 -
2
-
3
-
4
-
5
-
6
-
7
-
8
-
9
-
10
-
11
-
12
-
13
-
14
-
15
-
16
-
17
-
18
-
19
-
20
-
21
-
22
-
23
-
24
-
25
-
26
-
27
-
28
-
29
-
30
-
31
-
32
-
33
-
34
-
35
-
36
-
37
-
38
-
39
-
40
-
41
-
42
-
43
-
44
-
45
-
46
-
47
-
48
-
49
-
50
-
51
-
52
-
53
-
54
-
55
-
56
-
57
-
58
-
59
-
60
-
61
-
62
-
63
-
64
-
65
-
66
-
67
-
68
-
69
-
70
-
71
-
72
-
73
-
74
-
75
-
76
-
77
-
78
-
79
-
80
-
81
-
82
-
 83
83 -
 84
84 -
 85
85 -
 86
86 -
 87
87 -
 88
88 -
 89
89 -
 90
90 -
 91
91 -
 92
92 -
 93
93 -
94
-
95
-
96
-
97
-
98
-
99
-
100
-
101
-
102
-
103
-
104
-
105
-
106
-
107
-
108
-
109
-
110
-
111
-
112
-
113
-
114
-
115
-
116
-
117
-
118
-
119
-
120
-
121
-
122
-
123
-
124
-
125
-
126
-
127
 |
 |
