Olympus P-10 P-10 Instruction Manual - Page 22
Using the digital camera to control the print, operation - printer cartridge
 |
UPC - 050332145085
View all Olympus P-10 manuals
Add to My Manuals
Save this manual to your list of manuals |
Page 22 highlights
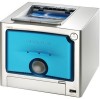
Printing images from digital camera 4 Pull the paper stopper on the top of the printer down toward the front. ENGLISH Introduction Preparation Using the digital camera to control the print operation 1 Control print operations using the digital camera. SELECt GO Sample Digital Camera display After printing begins, the ACCESS indicator on the printer will blink. When printing is finished, the indicator turns off. See the digital camera operations manual for details on digital camera operations. 2 After printing is complete, turn off the digital camera and printer before removing the USB cable. Caution Never open the cartridge door or paper tray door during printing. Do not move the printer during printing. Do not turn off printer or digital camera, or remove the AC adapter during printing. In the event that power is interrupted or the AC adapter removed, restore power and perform the interrupted operations again. Leaving the printer unplugged in printing mode may cause it to malfunction. 22 Printing For Your Information
-
 1
1 -
2
-
3
-
4
-
5
-
6
-
7
-
8
-
9
-
10
-
11
-
12
-
13
-
14
-
15
-
16
-
 17
17 -
 18
18 -
 19
19 -
 20
20 -
 21
21 -
 22
22 -
 23
23 -
 24
24 -
 25
25 -
 26
26 -
 27
27 -
28
-
29
-
30
-
31
-
32
-
33
-
34
-
35
-
36
-
37
-
38
-
39
-
40
-
41
-
42
-
43
-
44
-
45
-
46
-
47
-
48
-
49
-
50
-
51
-
52
-
53
-
54
-
55
-
56
-
57
-
58
-
59
-
60
-
61
-
62
-
63
-
64
-
65
-
66
-
67
-
68
-
69
-
70
-
71
-
72
-
73
-
74
-
75
-
76
-
77
-
78
-
79
-
80
-
81
-
82
-
83
-
84
-
85
-
86
-
87
-
88
-
89
-
90
-
91
-
92
-
93
-
94
-
95
-
96
-
97
-
98
-
99
-
100
-
101
-
102
-
103
-
104
-
105
-
106
-
107
-
108
-
109
-
110
-
111
-
112
-
113
-
114
-
115
-
116
-
117
-
118
-
119
-
120
-
121
-
122
-
123
-
124
-
125
-
126
-
127
-
128
-
129
-
130
-
131
-
132
-
133
-
134
-
135
-
136
-
137
-
138
-
139
-
140
-
141
-
142
-
143
-
144
-
145
-
146
-
147
-
148
 |
 |
