Olympus SP-590 UZ SP-590UZ Instruction Manual (English) - Page 52
Viewing the image immediately after shooting, Selecting where the top menu is displayed
 |
UPC - 050332168497
View all Olympus SP-590 UZ manuals
Add to My Manuals
Save this manual to your list of manuals |
Page 52 highlights
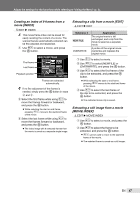
Viewing the image immediately after shooting [REC VIEW] E SETUP REC VIEW Submenu 2 Submenu 3 OFF - LCD ONLY ON CURRENT Application The image being recorded is not displayed. This allows the user to prepare for the next shot while following the subject in the monitor or viewfinder after shooting. The last image being recorded is always displayed on the monitor. The last image being recorded is displayed on the currently selected display device (monitor or viewfinder). "Switching between the monitor and viewfinder" (p. 25) Even when set to [ON], you can resume shooting while the image is being displayed. Selecting where the top menu is displayed [MENU DISPLAY] E SETUP MENU DISPLAY Submenu 2 LCD ONLY CURRENT Application The top menu is always displayed on the monitor. The top menu is displayed on the currently selected display device (monitor or viewfinder). The submenu chosen in [MENU DISPLAY] will be displayed on the screen when the following operations are done. ● Pressing the button ● Pressing the D button in playback mode Increasing the brightness of the monitor when taking pictures [LIVE VIEW BOOST] E SETUP LIVE VIEW BOOST Submenu 2 OFF ON Application The subject will be displayed on the monitor at the brightness level according to the exposure that was set. This allows you to preview the images to be captured on the monitor before shooting. The camera will automatically adjust the brightness level and display the subject on the monitor for easier confirmation. The results of the exposure compensation adjustment will not be shown on the monitor. 52 EN
-
 1
1 -
2
-
3
-
4
-
5
-
6
-
7
-
8
-
9
-
10
-
11
-
12
-
13
-
14
-
15
-
16
-
17
-
18
-
19
-
20
-
21
-
22
-
23
-
24
-
25
-
26
-
27
-
28
-
29
-
30
-
31
-
32
-
33
-
34
-
35
-
36
-
37
-
38
-
39
-
40
-
41
-
42
-
43
-
44
-
45
-
46
-
 47
47 -
 48
48 -
 49
49 -
 50
50 -
 51
51 -
 52
52 -
 53
53 -
 54
54 -
 55
55 -
 56
56 -
 57
57 -
58
-
59
-
60
-
61
-
62
-
63
-
64
-
65
-
66
-
67
-
68
-
69
-
70
-
71
-
72
-
73
-
74
-
75
-
76
-
77
-
78
-
79
-
80
-
81
-
82
-
83
-
84
-
85
-
86
 |
 |
