Olympus SP-600UZ SP-600UZ Instruction Manual (English) - Page 37
Brightening areas that are dark, due to backlight or other reasons, SHADOW ADJ] - sd card
 |
UPC - 050332173569
View all Olympus SP-600UZ manuals
Add to My Manuals
Save this manual to your list of manuals |
Page 37 highlights
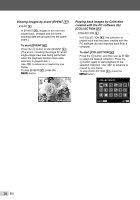
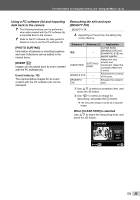
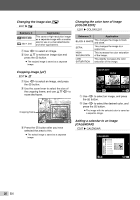
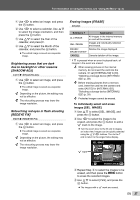
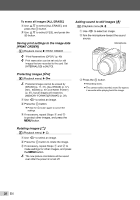
For information on using the menus, see "Using the Menu" (p. 4). 1 Use HI to select an image, and press the A button. 2 Use HI to select a calendar. Use FG to select the image orientation, and then press the A button. 3 Use FG to select the Year of the calendar, and press I. 4 Use FG to select the Month of the calendar, and press the A button. ● The edited image is saved as a separate image. Brightening areas that are dark due to backlight or other reasons [SHADOW ADJ] EDIT X SHADOW ADJ 1 Use HI to select an image, and press the A button. ● The edited image is saved as a separate image. Depending on the picture, the editing may not be effective. The retouching process may lower the image resolution. Retouching red eyes in flash shooting [REDEYE FIX] EDIT X REDEYE FIX 1 Use HI to select an image, and press the A button. ● The edited image is saved as a separate image. Depending on the picture, the editing may not be effective. The retouching process may lower the image resolution. Erasing images [ERASE] ERASE Submenu 1 Application ALL ERASE All images in the internal memory or card will be erased. SEL. IMAGE Images are individually selected and erased. ERASE/ Deletes the image displayed. ERASE EVENT*1 CANCEL Cancels deletion of the image. *1 If G is pressed when an event is played back, all images in the event are erased. When erasing pictures in the internal memory, do not insert the card into the camera. Or set [INTERNAL/SD] to [IN]. "Selecting a storage device [INTERNAL/ SD]" (p. 39) Before erasing pictures from a memory card, insert the card into the camera and select [AUTO] for [INTERNAL/SD]. "Selecting a storage device [INTERNAL/ SD]" (p. 39) Protected images cannot be erased. To individually select and erase images [SEL. IMAGE] 1 Use FG to select [SEL. IMAGE], and press the A button. 2 Use HI to select the image to be erased, and press the A button to add a R mark to the image. ● Turn the zoom lever to the W end to display an index view. Images can be quickly selected using the FGHI buttons. Turn to the T end to return to the single frame display. SEL. IMAGE R mark OK ERASE/CANCEL MENU 3 Repeat Step 2 to select the images to be erased, and then press the m button to erase the selected images. 4 Use FG to select [YES], and press the A button. ● The images with a R mark are erased. EN 37
-
 1
1 -
2
-
3
-
4
-
5
-
6
-
7
-
8
-
9
-
10
-
11
-
12
-
13
-
14
-
15
-
16
-
17
-
18
-
19
-
20
-
21
-
22
-
23
-
24
-
25
-
26
-
27
-
28
-
29
-
30
-
31
-
 32
32 -
 33
33 -
 34
34 -
 35
35 -
 36
36 -
 37
37 -
 38
38 -
 39
39 -
 40
40 -
 41
41 -
 42
42 -
43
-
44
-
45
-
46
-
47
-
48
-
49
-
50
-
51
-
52
-
53
-
54
-
55
-
56
-
57
-
58
-
59
-
60
-
61
-
62
-
63
-
64
-
65
-
66
-
67
-
68
-
69
-
70
 |
 |