Olympus Stylus 740 Stylus 750 Instruction Manual (English) - Page 27
Erase - memory card
 |
UPC - 050332158429
View all Olympus Stylus 740 manuals
Add to My Manuals
Save this manual to your list of manuals |
Page 27 highlights
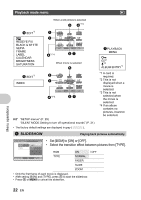
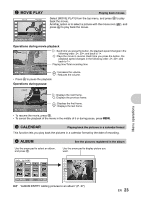
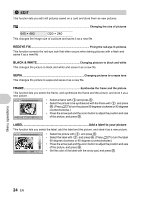
ALBUM ENTRY Adding pictures to an album Pictures recorded to the card can be organized by sorting them into albums. Pictures stored in the internal memory cannot be entered in albums. g"Album playback menus" (P. 28) Select the album entry method ALBUM ENTRY SEL. IMAGE SET CALENDAR SET ALL BACK MENU SET OK Select an album to add the pictures SEL. ALBUM 1 BACK MENU SET OK [SEL. IMAGE] SEL. IMAGE 1 2 3 4 5 6 7 8 9 10 11 12 SET OK EXIT OK HOLD Select one frame at a time for entry • Use the arrow pad to select a picture, and press o to add R. • Press o again to cancel the selection. • When the selection is completed, press o for a while. [SET CALENDAR] Add pictures taken on the same day Use the arrow pad to select the date with pictures to enter in the album, and press o. Menu operations [SET ALL] SET ALL PHOTO MOVIE 0 BACK MENU Select all still images, all protected images, or all movies SET OK 8 ERASE Erase selected pictures/Erase all pictures Protected pictures cannot be erased. Cancel protection before erasing protected pictures. Once erased, pictures cannot be restored. Check each picture before erasing to avoid accidentally erasing pictures you want to keep. • When erasing the picture in the internal memory, do not insert the card into the camera. • When erasing the picture from the card, insert a card into the camera in advance. SEL. IMAGE Erase by selecting the single-frame SEL. IMAGE [ I N ] • Use the arrow pad to select the picture, and press o to put R. • To cancel the selection, press o again. • When the selection is completed, press S. • Select [YES], and press o. BACK MENU OK GO S EN 27
-
 1
1 -
2
-
3
-
4
-
5
-
6
-
7
-
8
-
9
-
10
-
11
-
12
-
13
-
14
-
15
-
16
-
17
-
18
-
19
-
20
-
21
-
 22
22 -
 23
23 -
 24
24 -
 25
25 -
 26
26 -
 27
27 -
 28
28 -
 29
29 -
 30
30 -
 31
31 -
 32
32 -
33
-
34
-
35
-
36
-
37
-
38
-
39
-
40
-
41
-
42
-
43
-
44
-
45
-
46
-
47
-
48
-
49
-
50
-
51
-
52
-
53
-
54
-
55
-
56
-
57
-
58
-
59
-
60
-
61
-
62
-
63
-
64
-
65
-
66
-
67
-
68
-
69
-
70
-
71
-
72
-
73
-
74
-
75
-
76
-
77
-
78
-
79
-
80
 |
 |
