Olympus VG-120 VG-140 Instruction Manual (English)
Olympus VG-120 Manual
 |
View all Olympus VG-120 manuals
Add to My Manuals
Save this manual to your list of manuals |
Olympus VG-120 manual content summary:
- Olympus VG-120 | VG-140 Instruction Manual (English) - Page 1
DIGITAL CAMERA VG-140/D-715 VG-130/D-710 VG-120/D-705 Instruction Manual ● Thank you for purchasing an Olympus digital camera. Before you start to use your new camera, please read these instructions carefully to enjoy optimum performance and a longer service life. Keep this manual in a safe place - Olympus VG-120 | VG-140 Instruction Manual (English) - Page 2
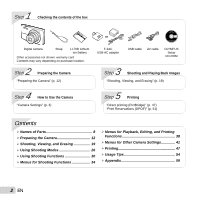
of the box or Digital camera Strap LI-70B Lithium Ion Battery Other accessories not shown: warranty card Contents may vary depending on purchase location. 2 Step Preparing the Camera "Preparing the Camera" (p. 12) F-2AC USB-AC adapter USB cable AV cable OLYMPUS Setup CD-ROM 3 Step - Olympus VG-120 | VG-140 Instruction Manual (English) - Page 3
Camera Settings Using the Direct Buttons Frequently used functions can be accessed using the direct buttons. Shutter button (p. 20) Zoom buttons (p. 21) R button (shooting movies) (p. 20) q button (switch between shooting and playback) (p. 20, 22) MENU m button (p. 5) E button (menu guide) (p. - Olympus VG-120 | VG-140 Instruction Manual (English) - Page 4
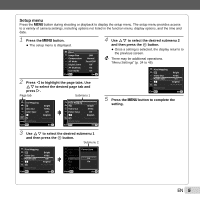
Using the Menu Use the menu to change camera settings such as the shooting mode. There may be menus that are unavailable depending on other related settings or the s mode (p. 26). Function menu Press H - Olympus VG-120 | VG-140 Instruction Manual (English) - Page 5
access to a variety of camera settings, including options not listed in the function menu, display options, and the time and date. 1 Press the m button. ● The setup menu is displayed. 1 Reset 2 Image Size Compression AF Mode 1 Digital Zoom 2 AF Illuminat. Icon Guide Exit MENU 14M Normal Face - Olympus VG-120 | VG-140 Instruction Manual (English) - Page 6
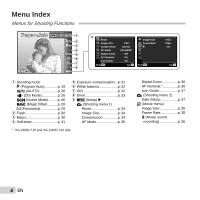
p (Shooting menu 1) Reset p. 34 Image Size p. 34 Compression p. 34 AF Mode p. 35 *1 VG-140/D-715 and VG-130/D-710 only Digital Zoom p. 36 AF Illuminat.*1 p. 36 Icon Guide p. 37 q (Shooting menu 2) Date Stamp p. 37 A (Movie menu) Image Size p. 35 Frame Rate p. 35 R (Movie sound recording - Olympus VG-120 | VG-140 Instruction Manual (English) - Page 7
y (Rotate p. 40 Exit MENU Set OK Menus for Other Camera Settings 1 Format 2 Backup USB Connection Storage q Power On Yes 1 1 Keep K Settings Yes Settings Exit MENU Set OK 1 r (Settings 1) Memory Format/ Format p. 41 Backup p. 41 USB Connection........... p. 41 q Power On p. 42 Keep - Olympus VG-120 | VG-140 Instruction Manual (English) - Page 8
of Parts Camera unit 1 2 3 4 *1 VG-140/D-715 and VG-130/D-710 only 5 1 Multi-connector p. 14, 16, 44, 47 6 2 Connector cover p. 14, 16, 44, 47 3 Strap eyelet p. 9 7 4 Battery/card compartment cover p. 12 5 Flash p. 30 6 Self-timer lamp p. 31 AF illuminator*1 p. 36 8 7 Lens p. 59, 73 - Olympus VG-120 | VG-140 Instruction Manual (English) - Page 9
1 2 3 Attaching the camera strap 1 n button........ p. 17, 19 2 Shutter button p. 20 3 Monitor p. 19, 54 4 Zoom buttons information display p. 22, 25 10 11 D button (erase p. 24 10 E button (menu guide) p. 25 11 m button p. 5 Pull the strap tight so that it does not come loose. EN 9 - Olympus VG-120 | VG-140 Instruction Manual (English) - Page 10
11 1/100 F2.8 24 23 1 Battery check p. 16 2 Shooting mode ....... p. 19, 26 3 Flash p. 30 Flash standby/flash charge p. 54 4 Macro p. 30 memory p. 61 18 Movie recording icon .... p. 20 19 Continuous recording length (movies p. 20 20 Image size (movies p. 35 21 AF target mark p. 20 22 Camera - Olympus VG-120 | VG-140 Instruction Manual (English) - Page 11
15 16 1 Battery check p. 16 2 Print reservation/number of prints p. 51/p. 49 3 Protect p. 40 4 Adding sound p. 38 5 Current memory p. 61 6 balance p. 32 13 Image size p. 34, 35 14 File number 15 Date and time p. 17 16 Compression (still images p. 34 Frame rate (movies p. 35 17 Volume - Olympus VG-120 | VG-140 Instruction Manual (English) - Page 12
Do not touch the contact area directly. 3 1 2 Write-protect switch This camera allows the user to take pictures using the internal memory even when no SD/SDHC memory card (sold separately) is inserted. "Using an SD/SDHC memory card" (p. 60) "Number of storable pictures (still images)/Continuous - Olympus VG-120 | VG-140 Instruction Manual (English) - Page 13
not correctly connected or the battery, camera, computer, or USB cable may not be functioning as expected. We recommend that you use a computer equipped with Windows XP (Service Pack 2 or later), Windows Vista, or Windows 7. See "Charging the battery with the supplied USB-AC adapter" (p. 16) if you - Olympus VG-120 | VG-140 Instruction Manual (English) - Page 14
after connecting the camera to the computer, the battery may be exhausted. Leave the camera connected to the computer until the battery has charged, then disconnect and reconnect the camera. Connecting the camera Multi-connector OLYMPUS Viewer 2 Operating System Windows XP (Service Pack 2 or - Olympus VG-120 | VG-140 Instruction Manual (English) - Page 15
* Other languages can be selected from the language combo box. For information on using the software, see online help. 3 Copy the camera manual. ● Click the "Camera Instruction Manual" button to open the folder containing the camera manuals. Copy the manual for your language to the computer. EN 15 - Olympus VG-120 | VG-140 Instruction Manual (English) - Page 16
to the camera. The camera cannot playback without the battery even when connected to the USB-AC adapter. 1 USB cable USB cable (supplied) (supplied) USB connector USB connector Multiconnector Multiconnector 2 Indicator lamp On: Charging Off: Charged The battery is not fully charged at the - Olympus VG-120 | VG-140 Instruction Manual (English) - Page 17
that the m button, Q button, or zoom buttons should be used. 1 Reset 2 Image Size Compression AF Mode 1 Digital Zoom 2 AF Illuminat. Icon Guide Exit MENU 14M Normal Face/iESP Off On On Set OK Sel. Image Set OK Operation guide OK Erase/Cancel MENU Date, time, time zone, and language The date - Olympus VG-120 | VG-140 Instruction Manual (English) - Page 18
3 Press I to save the setting for [Y]. X Y M D Time 2011 Y/M/D Cancel MENU 4 As in Steps 2 and 3, use FGHI and the Q button to set [M] (month), [D] (day), [Time] (hours and minutes), and [Y/M/D] (date order). For a more accurate setting, press the Q button when the time signal hits 00 seconds - Olympus VG-120 | VG-140 Instruction Manual (English) - Page 19
to a wide range of other shooting menu functions, such as exposure compensation, white balance, etc. as needed. 1 Press the n button to turn on the camera. [Program Auto] indicator P Current shooting mode display Program Auto P 0.0 WB AUTO ISO AUTO 4 14M Press the n button again to turn off the - Olympus VG-120 | VG-140 Instruction Manual (English) - Page 20
all the way down while being careful not to shake the camera. P Press fully 1/400 F2.8 Image review screen To view images during shooting Pressing the q button R button again to end recording. During sound recording, only the digital zoom can be used. To record a movie with optical zoom, set [R] ( - Olympus VG-120 | VG-140 Instruction Manual (English) - Page 21
is less than the full resolution after reaching the maximum optical zoom, the camera will automatically resize and crop the image to the selected image size and enter the digital zoom range if [Digital Zoom] is [On]. Photographs taken with the zoom bar displayed in red may appear "grainy." EN 21 - Olympus VG-120 | VG-140 Instruction Manual (English) - Page 22
display The display of the screen information can be changed to best match the situation, for example, the need for a clear view image Displays next image Hold I to fast forward and hold H to reverse. The display size of the images can be changed. "Index view and close-up view" (p. 24) To - Olympus VG-120 | VG-140 Instruction Manual (English) - Page 23
To play back movies Select a movie, and press the Q button. Operations during pausing playback 4/30 Movie Play OK '11/02/26 12:30 Movie Operations during movie playback Elapsed time/ Total recording time 00:12/00:34 During playback Pausing and resuming playback Fast forward Rewind Press - Olympus VG-120 | VG-140 Instruction Manual (English) - Page 24
Erasing images during playback (Single image erase) 1 Display the image you want to erase and press G (D). Erase Index view and close-up view Index view enables quick selection of a desired image. Close-up view (up to 10× magnification) allows checking of image details. 1 Press the zoom buttons. - Olympus VG-120 | VG-140 Instruction Manual (English) - Page 25
1 Press F (INFO). ● The displayed image information changes in the order shown below each time the button is pressed. Normal 10 4/30 Using the menu guide Pressing the E button in the setup menu displays a description of the current item. "Using the Menu" (p. 4) '11/02/26 12:30 No information - Olympus VG-120 | VG-140 Instruction Manual (English) - Page 26
automatically selects. Reducing blur on shooting (N mode) This mode enables the user to reduce blur that is caused by camera shake and subject movement. 1 Set the shooting mode to N. N mode indicator 0.0 WB AUTO 4 14M # Using the best mode for the shooting scene (s mode) 1 Set the shooting mode - Olympus VG-120 | VG-140 Instruction Manual (English) - Page 27
to the submenu. Portrait 4 14M 3 Use HI to select the best shooting mode for the scene, and press the Q button. 4 the Q button to set. 2 Hold the camera to align the AF target mark on the subject and press the Q button. ● When the camera recognizes the subject, the AF target mark automatically - Olympus VG-120 | VG-140 Instruction Manual (English) - Page 28
Shooting with special effects (P mode) Add an artistic effect to your photo by selecting the desired magic filter. 1 Set the shooting mode to P. Magic Filter 0.0 WB AUTO 4 14M 2 Press G to go to the submenu. Pop Art 0.0 WB AUTO 3 Use HI to select the desired effect and then press the Q button to set - Olympus VG-120 | VG-140 Instruction Manual (English) - Page 29
) Take pictures that can be joined to form a panorama using the supplied software. The focus, exposure, zoom position (p. 21), and white balance (p. 32) are locked at the first frame. The flash (p. 30) is fixed to $ (Flash Off) mode. 1 Set the shooting mode to ~. Panorama P 3 Press the shutter - Olympus VG-120 | VG-140 Instruction Manual (English) - Page 30
can be selected to best match the shooting conditions. 1 Select the flash option in the shooting function menu. P Flash Auto 0.0 WB AUTO ISO does not fire. Shooting closeups (Macro shooting) This function enables the camera to focus and shoot subjects at close distances. 1 Select the macro option - Olympus VG-120 | VG-140 Instruction Manual (English) - Page 31
the self-timer after it starts Press the m button. Adjusting the brightness (Exposure compensation) The standard brightness (appropriate exposure) set by the camera based on the shooting mode (M and s excluded) can be adjusted brighter or darker to obtain a desired shot. 1 Select the exposure - Olympus VG-120 | VG-140 Instruction Manual (English) - Page 32
ISO sensitivity is fixed to the selected value. "ISO" is short for "International Organization for Standardization." ISO standards specify the sensitivity for digital cameras and film, thus codes such as "ISO 100" are used to represent sensitivity. In the ISO setting, although smaller values result - Olympus VG-120 | VG-140 Instruction Manual (English) - Page 33
frame. The camera takes sequential shots at a faster speed than in [j]. The camera takes sequential shots Size/Compression] (p. 34). When set to [j], the flash (p. 30) cannot be set to [Redeye]. In addition, when set to [c] or [d], the flash is fixed to [Flash Off]. When set to [c] or [d], [Image Size - Olympus VG-120 | VG-140 Instruction Manual (English) - Page 34
following menu functions to the default settings. • Shooting mode (p. 26) • Flash (p. 30) • Macro (p. 30) • Self-timer (p. 31) • in.). 1M (1280×960) Suitable for printing pictures at postcard size. VGA (640×480) Suitable for viewing pictures on a TV memory and SD/ SDHC memory cards" (p. 62) 34 EN - Olympus VG-120 | VG-140 Instruction Manual (English) - Page 35
size and frame rate. Higher N 30fps*1/ O 15fps*1 frame rates provide smoother movie images. *1 frames per second "Number of storable pictures (still images)/Continuous recording length (movies) in the internal memory and SD/SDHC memory cards blinks in red, the camera is unable to focus. Try again - Olympus VG-120 | VG-140 Instruction Manual (English) - Page 36
Zoom] affects the appearance of the zoom bar. "To take larger images [Digital Zoom]" (p. 21) Using the AF illuminator to focus on a shadowed subject [AF Illuminat.] (VG-140/D-715, VG-130/D-710) p (Shooting menu 1) X AF Illuminat. Submenu 2 Off On Application The AF illuminator is not used. When - Olympus VG-120 | VG-140 Instruction Manual (English) - Page 37
function menu icon is selected (position the cursor on the icon for a while to display the explanation). Icon guide Program Auto P Functions can be changed manually. 0.0 WB AUTO ISO AUTO 4 14M Imprinting the date of recording [Date Stamp] q (Shooting menu 2) X Date Stamp Submenu 2 Off - Olympus VG-120 | VG-140 Instruction Manual (English) - Page 38
select an image, and press the Q button. 2 Use the zoom buttons to choose the crop size and FGHI to position the crop. Set OK 3 Press the Q button. ● The edited image will 3 Press the Q button. ● Recording starts. ● The camera adds (records) sound for approx. 4 seconds while playing back the image. - Olympus VG-120 | VG-140 Instruction Manual (English) - Page 39
Images are individually selected and erased. Deletes the image displayed. When erasing pictures in a internal memory, do not insert the card into the camera. When erasing pictures from the card, insert a card into the camera in advance. To erase all images [All Erase] 1 Use FG to select [All Erase - Olympus VG-120 | VG-140 Instruction Manual (English) - Page 40
51) Print reservation can be set only for still images that are recorded to the card. Rotating images [y] q (Playback menu) X y 1 Use HI to select an [Sel. Image], or [All Erase] (p. 39), but all images are erased by [Memory Format]/[Format] (p. 41). 1 Use HI to select an image. 2 Press the Q - Olympus VG-120 | VG-140 Instruction Manual (English) - Page 41
data in the internal memory to the card. Cancels the backup. It takes some time to back up data. Check that the battery has sufficient power before starting the backup. Selecting a method for connecting the camera to other devices [USB Connection] r (Settings 1) X USB Connection Submenu 2 Auto - Olympus VG-120 | VG-140 Instruction Manual (English) - Page 42
ports, proper operation is not guaranteed in the following cases. ● computers with USB ports installed using an expansion card, etc. ● computers without a factory-installed OS and home-built computers Turning on the camera with the q button [q Power On] r (Settings 1) X q Power On Submenu 2 No Yes - Olympus VG-120 | VG-140 Instruction Manual (English) - Page 43
, and no adjustment is needed right after purchase. Approximately once a year is recommended. For best results, wait at least one minute after taking or viewing pictures before performing pixel mapping. If the camera is turned off during pixel mapping, be sure to perform it again. To adjust the CCD - Olympus VG-120 | VG-140 Instruction Manual (English) - Page 44
cover AV cable (supplied) Connect to the TV video input jack (yellow) and audio input jack (white). 3 Turn on the TV, and change "INPUT" to "VIDEO (an input jack connected to the camera)." For details on changing the input source of the TV, refer to the TV's instruction manual. 4 Press the - Olympus VG-120 | VG-140 Instruction Manual (English) - Page 45
[Power Save] s (Settings 2) X Power Save Submenu 2 Off On Application Cancels [Power Save]. When the camera is not being used for approx. 10 seconds, the monitor automatically turns off to save battery power. To resume standby mode Press any button. Changing the display language [W] s (Settings - Olympus VG-120 | VG-140 Instruction Manual (English) - Page 46
*1 In areas where daylight saving time is in effect, use FG to turn daylight saving time ([Summer]) on. *2 When you select a time zone, the camera automatically calculates the time difference between the selected zone and the home time zone (x) to display the time in the travel destination time zone - Olympus VG-120 | VG-140 Instruction Manual (English) - Page 47
a computer. To find out if your printer supports PictBridge, refer to the printer's instruction manual. *1 PictBridge is a standard for connecting digital cameras and printers of different makers and printing out pictures directly. The printing modes, paper sizes, and other parameters that can be set - Olympus VG-120 | VG-140 Instruction Manual (English) - Page 48
screen, disconnect the USB cable from the camera and printer. Exit stored in the internal memory or card. Multi Print This Size] (Submenu 3), and press I. If the [Printpaper] screen is not displayed, the [Size], [Borderless], and [Pics/Sheet] are set to the printer's standard. Printpaper Size - Olympus VG-120 | VG-140 Instruction Manual (English) - Page 49
4 Use FG to select the [Borderless] or [Pics/ Sheet] settings, and press the Q button. Submenu 4 Application Off/On*1 The image is printed with a border around it ([Off]). The image is printed to fill the entire paper ([On]). (The number of images per sheet varies depending on the printer.) The - Olympus VG-120 | VG-140 Instruction Manual (English) - Page 50
the size of USB Cable] is displayed, press the m button, use FG to select [Cancel], and then press the Q button. Do Not Remove USB Cable Cancel MENU Print Continue Cancel Set OK 10 Press the m button. 11 When the message [Remove USB Cable] is displayed, disconnect the USB cable from the camera - Olympus VG-120 | VG-140 Instruction Manual (English) - Page 51
. This enables easy printing at a printer or print shop supporting DPOF by using only the print reservations on the card without a computer or a camera. *1 DPOF is a standard for storing automatic printout information from digital cameras. Print reservations can be set only for the images stored on - Olympus VG-120 | VG-140 Instruction Manual (English) - Page 52
Back MENU Set Cancel Set OK 6 Use FG to select [Set], and press the Q button. Reserving one print each of all images on the card [U] 1 Follow Steps 1 and 2 in [ - Olympus VG-120 | VG-140 Instruction Manual (English) - Page 53
Resetting the print reservation data for selected images 1 Follow Steps 1 and 2 in [ - Olympus VG-120 | VG-140 Instruction Manual (English) - Page 54
below to fix the problem(s). Troubleshooting Battery "The camera does not work even when batteries are installed". ● Insert recharged batteries in the correct direction. "Inserting the battery and the SD/SDHC memory card (sold separately)" (p. 12), "Charging the battery and setting up using - Olympus VG-120 | VG-140 Instruction Manual (English) - Page 55
the camera automatically performs actions of auto focus as far as it is ready to shoot. Error message When one of the messages below is displayed on the monitor, check the corrective action. Error message Corrective action Card Error Write Protect Memory Full Card Full Card problem Insert - Olympus VG-120 | VG-140 Instruction Manual (English) - Page 56
Corrective action Cannot Print*4 Problem with selected image Use a computer to print. *1 Before erasing important images, download them to a computer. making the print settings on the camera. *4 This camera may be unable to print images taken by other cameras. Shooting tips When you are unsure - Olympus VG-120 | VG-140 Instruction Manual (English) - Page 57
distances Fast-moving object The subject is not in the center of the frame Camera shake "Taking pictures without camera shake" ● Taking pictures using N mode (p. 26) ● Select C (Sport appear. When taking pictures of black subjects, on the other hand, it is effective to adjust in the negative - Olympus VG-120 | VG-140 Instruction Manual (English) - Page 58
) Best results zoom Avoid using digital zoom (p. 21, memory "To remove the SD/SDHC memory card" (p. 13) Editing "Erasing the sound recorded to a still image" ● Record over the sound with silence when playing back the image "Adding sound to still images [R]" (p. 38) Batteries "Making batteries - Olympus VG-120 | VG-140 Instruction Manual (English) - Page 59
Mold may form on the lens surface if the lens is left dirty. Storage • When storing the camera for extended periods, remove the battery, USB-AC adapter and card, and keep in a cool, dry place that is well ventilated. • Periodically insert the battery and test the camera functions. Avoid leaving the - Olympus VG-120 | VG-140 Instruction Manual (English) - Page 60
to the "LOCK" side, you will not be able to write to the card, delete data or format. Release the switch to enable writing. LOCK Cards compatible with this camera SD/SDHC memory cards (visit the Olympus website for information on memory cards that have been tested and approved for use) 60 EN - Olympus VG-120 | VG-140 Instruction Manual (English) - Page 61
v: Internal memory is being used w: Card is being used P Current memory indicator Readout/recording process of the card During shooting, the current memory indicator lights in red while the camera is writing data. Never open the battery/card compartment cover or unplug the USB cable. This can - Olympus VG-120 | VG-140 Instruction Manual (English) - Page 62
length (movies) in the internal memory and SD/SDHC memory cards The figures for the number of storable still pictures and continuous recording length are approximate. The actual capacity varies with shooting conditions and the card used. Still images Image Size 6 4288×3216 4 3264×2448 n 2560 - Olympus VG-120 | VG-140 Instruction Manual (English) - Page 63
Movies Image Size L 1280×720 8 640×480 9 320×240 Frame Rate N O N O N O Continuous recording length Internal memory SD/SDHC memory card (1 GB) With sound Without sound With sound Without sound 14 sec. 14 sec. 4 min. 54 sec. 4 min. 54 sec. 29 sec. 29 sec. 9 min. 46 - Olympus VG-120 | VG-140 Instruction Manual (English) - Page 64
USER-SERVICEABLE PARTS INSIDE. REFER SERVICING TO QUALIFIED OLYMPUS SERVICE PERSONNEL. DANGER WARNING CAUTION An exclamation mark enclosed in a triangle alerts you to important operating and maintenance instructions camera strap, causing strangulation. • Accidentally swallowing the battery, cards - Olympus VG-120 | VG-140 Instruction Manual (English) - Page 65
shocks or burns. DANGER • The camera uses a lithium ion battery specified by Olympus. Charge the battery with the specified USB-AC adapter. Do not use any other USB-AC adapters. • Never heat or incinerate batteries. • Take precautions when carrying or storing batteries to prevent them from coming into - Olympus VG-120 | VG-140 Instruction Manual (English) - Page 66
's manual. Battery Handling Precautions • This camera uses a lithium ion battery specified by Olympus. Do not use any other type of battery. • If the battery's terminals get wet or greasy, camera contact failure may result. Wipe the battery well with a dry cloth before use. • Always charge a battery - Olympus VG-120 | VG-140 Instruction Manual (English) - Page 67
from the use of a battery and/or USB-AC adapter that are not genuine Olympus accessories. For customers in North and South America For customers in USA Declaration of Conformity Model Number: VG-140/D-715 VG-130/D-710 VG-120/D-705 Trade Name: OLYMPUS Responsible Party: Address: 3500 - Olympus VG-120 | VG-140 Instruction Manual (English) - Page 68
use of non-"OLYMPUS" brand accessories, consumables, or supplies, or use of the Products in combination with non-compatible devices; (d) software programs; (e) supplies and consumables (including but not limited to lamps, ink, paper, film, prints, negatives, cables and batteries); and/or (f) Products - Olympus VG-120 | VG-140 Instruction Manual (English) - Page 69
the Product (unless it is a model on which Olympus does not place and record serial numbers). 3 A detailed description of the problem. 4 Sample prints, negatives, digital prints (or files on disk) if available and related to the problem. When service is completed, the Product will be returned to you - Olympus VG-120 | VG-140 Instruction Manual (English) - Page 70
to any other accessory equipment, such as the case, strap, lens cap and batteries. 4 Olympus's sole liability under Olympus authorized service station listed in the instructions and request the necessary repairs. 2 The customer shall transport the product to the dealer or Olympus authorized service - Olympus VG-120 | VG-140 Instruction Manual (English) - Page 71
accessory equipment, such as the case, strap, lens cap and batteries. 5 Olympus' of the Olympus authorized service stations listed in the instructions. Notes use these written materials or software. Some states do not camera file systems referred to in this manual are the "Design rule for Camera - Olympus VG-120 | VG-140 Instruction Manual (English) - Page 72
or licensors of that software, under which such software is provided to you. Those terms and other third party software notices, if any, may be found in the software notice PDF file stored within the accompanying CD-ROM or at http://www.olympus.co.jp/en/support/imsg/digicamera/download/ notice/notice - Olympus VG-120 | VG-140 Instruction Manual (English) - Page 73
Motion JPEG : Internal memory, SD/SDHC memory card No. of effective pixels Image pickup device : 14,000,000 pixels : 1/2.3" CCD (primary color filter) Lens Photometric system : Olympus lens 4.7 to 23.5 mm, f2.8 to 6.5 (equivalent to 26 to 130 mm on a 35 mm camera) : Digital ESP metering system - Olympus VG-120 | VG-140 Instruction Manual (English) - Page 74
ion rechargeable battery : DC 3.6 V Standard capacity Battery life Operating environment : 650 mAh : Approx. 300 full charges (varies on usage) Temperature : 0°C to 40°C (32°F to 104°F) (charging)/ -10°C to 60°C (14°F to 140°F) (operation)/ -20°C to 35°C (-4°F to 95°F) (storage) USB-AC adapter - Olympus VG-120 | VG-140 Instruction Manual (English) - Page 75
- Olympus VG-120 | VG-140 Instruction Manual (English) - Page 76
VR406901
-
 1
1 -
 2
2 -
 3
3 -
 4
4 -
 5
5 -
 6
6 -
 7
7 -
8
-
9
-
10
-
11
-
12
-
13
-
14
-
15
-
16
-
17
-
18
-
19
-
20
-
21
-
22
-
23
-
24
-
25
-
26
-
27
-
28
-
29
-
30
-
31
-
32
-
33
-
34
-
35
-
36
-
37
-
38
-
39
-
40
-
41
-
42
-
43
-
44
-
45
-
46
-
47
-
48
-
49
-
50
-
51
-
52
-
53
-
54
-
55
-
56
-
57
-
58
-
59
-
60
-
61
-
62
-
63
-
64
-
65
-
66
-
67
-
68
-
69
-
70
-
71
-
72
-
73
-
74
-
75
-
76
 |
 |
Instruction Manual
VG-140/D-715
VG-140/D-715
VG-130/D-710
VG-130/D-710
VG-120/D-705
VG-120/D-705
DIGITAL CAMERA
●
Thank you for purchasing an Olympus digital camera. Before you start to use your new camera, please read these
instructions carefully to enjoy optimum performance and a longer service life. Keep this manual in a safe place for
future reference.
●
We recommend that you take test shots to get accustomed to your camera before taking important photographs.
●
In the interest of continually improving our products, Olympus reserves the right to update or modify information
contained in this manual.
●
The screen and camera illustrations shown in this manual were produced during the development stages and may
differ from the actual product. Unless otherwise speci
fi
ed, the explanation about these illustrations is provided for
VG-140/D-715.