Olympus VG-120 VG-140 Instruction Manual (English) - Page 13
To remove the SD/SDHC memory card, Windows, Charging the battery and setting up, using the supplied CD - software
 |
View all Olympus VG-120 manuals
Add to My Manuals
Save this manual to your list of manuals |
Page 13 highlights
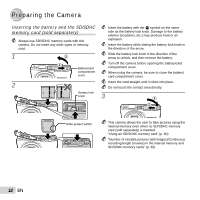
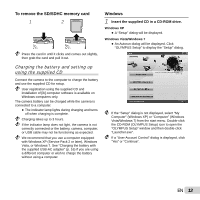
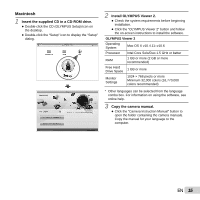
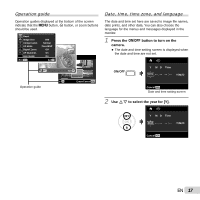
To remove the SD/SDHC memory card 1 2 Press the card in until it clicks and comes out slightly, then grab the card and pull it out. Windows 1 Insert the supplied CD in a CD-ROM drive. Windows XP ● A "Setup" dialog will be displayed. Windows Vista/Windows 7 ● An Autorun dialog will be displayed. Click "OLYMPUS Setup" to display the "Setup" dialog. Charging the battery and setting up using the supplied CD Connect the camera to the computer to charge the battery and use the supplied CD for setup. User registration using the supplied CD and installation of [ib] computer software is available on Windows computers only. The camera battery can be charged while the camera is connected to a computer. ● The indicator lamp lights during charging and turns off when charging is complete. Charging takes up to 3 hours. If the indicator lamp does not light, the camera is not correctly connected or the battery, camera, computer, or USB cable may not be functioning as expected. We recommend that you use a computer equipped with Windows XP (Service Pack 2 or later), Windows Vista, or Windows 7. See "Charging the battery with the supplied USB-AC adapter" (p. 16) if you are using a different computer or wish to charge the battery without using a computer. If the "Setup" dialog is not displayed, select "My Computer" (Windows XP) or "Computer" (Windows Vista/Windows 7) from the start menu. Double-click the CD-ROM (OLYMPUS Setup) icon to open the "OLYMPUS Setup" window and then double-click "Launcher.exe". If a "User Account Control" dialog is displayed, click "Yes" or "Continue". EN 13
-
 1
1 -
2
-
3
-
4
-
5
-
6
-
7
-
 8
8 -
 9
9 -
 10
10 -
 11
11 -
 12
12 -
 13
13 -
 14
14 -
 15
15 -
 16
16 -
 17
17 -
 18
18 -
19
-
20
-
21
-
22
-
23
-
24
-
25
-
26
-
27
-
28
-
29
-
30
-
31
-
32
-
33
-
34
-
35
-
36
-
37
-
38
-
39
-
40
-
41
-
42
-
43
-
44
-
45
-
46
-
47
-
48
-
49
-
50
-
51
-
52
-
53
-
54
-
55
-
56
-
57
-
58
-
59
-
60
-
61
-
62
-
63
-
64
-
65
-
66
-
67
-
68
-
69
-
70
-
71
-
72
-
73
-
74
-
75
-
76
 |
 |
