Olympus VN-180 VN-180 Instructions (English) - Page 3
Before Your First Recording - recorder
 |
View all Olympus VN-180 manuals
Add to My Manuals
Save this manual to your list of manuals |
Page 3 highlights
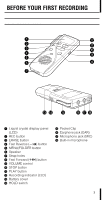
BEFORE YOUR FIRST RECORDING Parts Identification 1 B 2 3 4 5 A 0 9 6 8 7 C D E F GH 1 Liquid crystal display panel (LCD) 2 REC button 3 ERASE button 4 Fast Reverse ( ) button 5 MENU/FOLDER button 6 Speaker 7 Strap holes 8 Fast Forward ( ) button 9 VOLUME control 0 STOP button A PLAY button B Recording indicator (LED) C Battery cover D HOLD switch E Pocket Clip F Earphone jack (EAR) G Microphone jack (MIC) H Built-in microphone 3
-
 1
1 -
 2
2 -
 3
3 -
 4
4 -
 5
5 -
 6
6 -
 7
7 -
 8
8 -
 9
9 -
10
-
11
-
12
-
13
-
14
-
15
-
16
-
17
-
18
-
19
-
20
-
21
-
22
-
23
-
24
-
25
-
26
 |
 |

3
BEFORE YOUR FIRST RECORDING
Parts Identification
1
2
3
4
5
6
7
B
A
0
9
8
CD
E
F GH
1
Liquid crystal display panel
(LCD)
2
REC button
3
ERASE button
4
Fast Reverse (
) button
5
MENU/FOLDER button
6
Speaker
7
Strap holes
8
Fast Forward (
) button
9
VOLUME control
0
STOP button
A
PLAY button
B
Recording indicator (LED)
C
Battery cover
D
HOLD switch
E
Pocket Clip
F
Earphone jack (EAR)
G
Microphone jack (MIC)
H
Built-in microphone