Onkyo DV-C501 Owner Manual - Page 14
Basic Playback, Playing back Discs
 |
View all Onkyo DV-C501 manuals
Add to My Manuals
Save this manual to your list of manuals |
Page 14 highlights
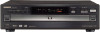
Playing back Discs CAUTION Keep your fingers clear of the disc drawer as it is closing to avoid personal injury. STANDBY/ON DISC 1-5 DISC SKIP / 2 DIMMER DISPLAY DISC SELECT 1 2 3 DISC SKIP 4 5 STANDBY / ON This section shows you the basics on how to playback a disc. Most steps in this manual need to be performed using the POWER ON OFF supplied remote controller. The relative buttons are usually indicated at the beginning of a section. POWER 3 NEXT SELECTION CD PLAY SKIP STOP PAUSE PLAY OPEN/CLOSE DVD / VIDEO CD / CD CHANGER DV-C501 Basic Playback s Preparations • To view a video disc, switch on your TV set and select the video input the DV-C501 is connected to. See also pages 10, 11 for how to connect the DVD Changer to your TV set. • If you are also using an amplifier for separate audio playback (see pages 11, 12, 13), switch on the amplifier and select the input the DV-C501 is connected to. 1 -2 POWER -3 STANDBY /ON or POWER Connecting to a Wall Outlet and Powering On. 1 Plug the power cable into a suitable wall outlet. 2 Press the POWER button on the main unit to switch it to Standby mode. The STANDBY/ON indicator on the main unit lights. 3 Press the STANDBY/ON button on the main unit, or the POWER button on the supplied remote controller to switch on the DVD Changer. The display lights up, and the STANDBY indicator goes dark. Note: When you use the DV-C501 for the first time: When the DV-C501 is shipped from the factory, the POWER switch is set to ON ( ON OFF ). Therefore, when you plug in the power cable to the AC outlet, the STANDBY/ON indicator lights up and the unit enters Standby mode as described in Step 1- 2. 2 OPEN/CLOSE or OPEN/ CLOSE Press the OPEN/CLOSE button. The disc drawer opens, and the disc indicator lights up. (See "DISC INDICATORS ATTENTION" on page 42.) Note: The disc drawer can also be opened when the DVD Changer is switched off. 3 4 OPEN/CLOSE 14 Place a disc in the front disc tray (DISC 1). DISC 2 DISC 1 Be sure to insert the disc with the playback side down. s Placing discs in the remaining disc trays. Repeatedly press the DISC SKIP / button DISC SKIP on the main unit to rotate the disc drawer in the direction of the arrow of the button, and place a disc in each desired tray (1-5). Notes: • The DV-C501 supports two disc sizes. To avoid damaging your discs or causing malfunction, be sure to insert the discs in the correct guide. • Only use DVD video discs or audio CDs. Other data carriers may damage your DVD Changer and/or amplifier/TV set. Press the OPEN/CLOSE button again. The disc drawer closes. Press one of the DISC 1-5 buttons to select the desired disc on the tray for playback. Note: Alternatively, press one of the DISC 1-5 buttons to close the disc drawer and play the selected disc automatically.
-
 1
1 -
2
-
3
-
4
-
5
-
6
-
7
-
8
-
 9
9 -
 10
10 -
 11
11 -
 12
12 -
 13
13 -
 14
14 -
 15
15 -
 16
16 -
 17
17 -
 18
18 -
 19
19 -
20
-
21
-
22
-
23
-
24
-
25
-
26
-
27
-
28
-
29
-
30
-
31
-
32
-
33
-
34
-
35
-
36
-
37
-
38
-
39
-
40
-
41
-
42
-
43
-
44
 |
 |
