Onkyo NS-6170 User Manual English etc. - Page 18
Listening to DAB Digital Radio
 |
View all Onkyo NS-6170 manuals
Add to My Manuals
Save this manual to your list of manuals |
Page 18 highlights
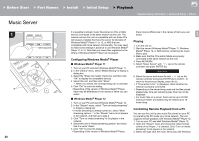
> Before Start > Part Names > Install > Initial Setup > Playback Supplementary information | Advanced Setup | Others Listening to DAB Digital Radio 1 a b c d 18 Tuning 1. Turn the unit on. 2. Repeatedly press TUNER to switch input to DAB. DAB 0 The very first time you select DAB, the Auto Tuning function automatically scans the DAB Band 3 for the multiplexes (i.e., stations) available in your area. Scan: 100% 0 Once the scanning process is complete, the first station that was detected is selected. 0 If a new DAB station is introduced, or you move to a new area, press SETUP (c) on the remote controller, then use "DAB Scan" in "Option" - "Tuner Setting". 3. Select the desired radio station with the cursors (b) on the remote controller. Changing the order stations are displayed You can sort the abailable stations alphabetically or by multiplex. 1. Press TUNING MODE (d) repeatedly to set the method for sorting the display order from the following. Alphabet (default setting) : Sort stations alphabetically. Multiplex : Sort stations by multiplex. Displaying DAB Radio Information 1. Press the DISPLAY button (a) repeatedly to display more information about the selected DAB station. Broadcast Information DLS (Dynamic Label Segment) : When tuned to a station that's broadcasting DLS text data, the text will scroll across the display. Program Type : Displays the type of program. E N Bit Rate and Audio Mode : Displays the station's bit rate and audio mode (Stereo, Mono). Quality : Displays the signal quality. 0 - 59: Poor reception 60 - 79: Good reception 80 - 100: Excellent reception Multiplex Name : Displays the name of the current multiplex. Multiplex Number and Frequency : Displays the number and frequency of the current multiplex.
-
 1
1 -
2
-
3
-
4
-
5
-
6
-
7
-
8
-
9
-
10
-
11
-
12
-
 13
13 -
 14
14 -
 15
15 -
 16
16 -
 17
17 -
 18
18 -
 19
19 -
 20
20 -
 21
21 -
 22
22 -
 23
23 -
24
-
25
-
26
-
27
-
28
-
29
-
30
-
31
-
32
-
33
-
34
 |
 |
