Onkyo R-N855 User Manual English - Page 27
Using the Alarm to Start Play
 |
View all Onkyo R-N855 manuals
Add to My Manuals
Save this manual to your list of manuals |
Page 27 highlights
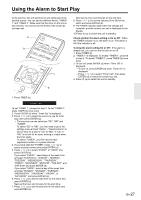
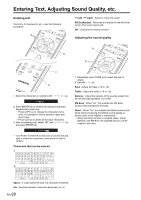
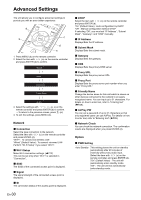
Using the Alarm to Start Play At the set time, the unit switches on and starts play of the desired source. You can set two different timers, "TIMER 1" and "TIMER 2". Make sure that the clock on this unit is set correctly. You cannot use the timers if the clock has not been set. a b c Next set the hour and minutes for the end time. 8. Press / (c) to set the volume (00 to 50) for the alarm and press ENTER (d). 9. The TIMER indicator lights when the settings are complete, and the content you set is displayed on the display. 10.Press Í (a) to switch the unit to standby. Check whether the alarm setting is On or Off : When the TIMER indicator is on, the alarm is on. The alarm is off if the indicator is off. Turning the alarm setting On or Off : If the alarm is already set, you can turn the function on or off. 1. Press TIMER (b). 2. "TIMER 1" is displayed. To modify "TIMER 1", proceed to step 3. To modify "TIMER 2", press TIMER (b) once more. 3. To turn off, press ENTER (d) when "Timer Off" is displayed. 0 To turn on, press ENTER (d) when "Timer On" is displayed. 0 Press / (c) to select "Timer Call", then press ENTER (d) to check the content you set. 4. Press Í (a) to switch the unit to standby. d 1. Press TIMER (b). Timer1 Set To set "TIMER 1", proceed to step 2. To set "TIMER 2", press TIMER (b) once more. 2. Press ENTER (d) when "Timer Set" is displayed. 3. Press / (c) to select the source to use for timer play, then press ENTER (d). 0 The sources you can select are "CD", "MD" and "TUNER". To select "CD" or "MD", you first need to go to the settings menu and set "Option" - "Selector Name" to set an input for a jack to "CD" or "MD". If "CD" or "MD" is not set for an input, nothing is output when the timer starts. To select "TUNER", you first need to have registered a station in a preset channel. 4. If you have selected "TUNER", press / (c) to select a preset number and press ENTER (d). 5. Press / (c) to select "EVERY" or "ONCE" and press ENTER (d). If you select "EVERY", select days of the week from amongst "EVERYDAY", "SUNDAY", "MONDAY", "TUESDAY", "WEDNESDAY", "THURSDAY", "FRIDAY", "SATURDAY", "MON-FRI", "TUE-SAT", and "SAT-SUN" and press ENTER (d). If you select "ONCE", select a day of the week from amongst "SUNDAY", "MONDAY", "TUESDAY", "WEDNESDAY", "THURSDAY", "FRIDAY", or "SATURDAY" and press ENTER (d). 6. Press / (c) to set the start time for the alarm and press ENTER (d). Next set the hour and minutes for the start time. 7. Press / (c) to set the end time for the alarm and press ENTER (d). En-27
-
 1
1 -
2
-
3
-
4
-
5
-
6
-
7
-
8
-
9
-
10
-
11
-
12
-
13
-
14
-
15
-
16
-
17
-
18
-
19
-
20
-
21
-
 22
22 -
 23
23 -
 24
24 -
 25
25 -
 26
26 -
 27
27 -
 28
28 -
 29
29 -
 30
30 -
 31
31 -
 32
32 -
33
-
34
-
35
-
36
-
37
-
38
-
39
-
40
-
41
-
42
-
43
-
44
 |
 |
