Onkyo R-N855 User Manual English - Page 6
Front Panel
 |
View all Onkyo R-N855 manuals
Add to My Manuals
Save this manual to your list of manuals |
Page 6 highlights
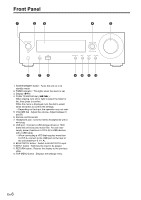
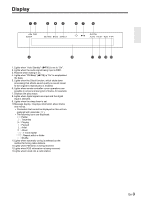
Front Panel 1. ÍON/STANDBY button : Turns the unit on or to standby mode. 2. TIMER indicator : This lights when the alarm is set. 3. Display ( P9) 4. PUSH TO ENTER dial (:/9) : When playing, turn left or right to select the folder or file, then press to confirm. While the menu is displayed, turn the dial to select items and press to confirm the settings. 0 Depending on the input, the operation may not start. 5. VOLUME dial : Adjust the volume. Adjust between 0 and 50. 6. Remote control sensor 7. Headphone jack : Connect stereo headphones with a mini plug. 8. USB port : Connect a USB storage device or HDD (hard disk drive) to play music files. You can also supply power (maximum 5 V/0.5 A) to USB devices with a USB cable. 0 When connecting a HDD that requires more than 5 V/0.5 A, connect to the USB port on the rear of the unit (maximum 5 V/1 A). 9. BLUETOOTH button : Switch to BLUETOOTH input. 10.INPUT button : Switches the input to be played. 11. RETURN button : Returns the display to the previous state. 12.TOP MENU button : Displays the settings menu. En-6
-
 1
1 -
 2
2 -
 3
3 -
 4
4 -
 5
5 -
 6
6 -
 7
7 -
 8
8 -
 9
9 -
 10
10 -
 11
11 -
 12
12 -
13
-
14
-
15
-
16
-
17
-
18
-
19
-
20
-
21
-
22
-
23
-
24
-
25
-
26
-
27
-
28
-
29
-
30
-
31
-
32
-
33
-
34
-
35
-
36
-
37
-
38
-
39
-
40
-
41
-
42
-
43
-
44
 |
 |
