Optoma HD72 User Manual - Page 35
The screen of the Notebook or PowerBook computer is not, displaying your presentation, Unstable or - manual
 |
UPC - 796435115890
View all Optoma HD72 manuals
Add to My Manuals
Save this manual to your list of manuals |
Page 35 highlights
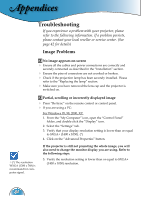
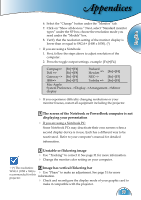
Appendices English 6. Select the "Change" button under the "Monitor" tab. 7. Click on "Show all devices." Next, select "Standard monitor types" under the SP box; choose the resolution mode you need under the "Models" box. 8. Verify that the resolution setting of the monitor display is lower than or equal to SXGA+ (1400 x 1050). (*) If you are using a Notebook: 1. First, follow the steps above to adjust resolution of the computer. 2. Press the toggle output settings. example: [Fn]+[F4] Compaq=> [Fn]+[F4] Dell => [Fn]+[F8] Packard Hewlett => [Fn]+[F4] Gateway=> [Fn]+[F4] NEC=> [Fn]+[F3] IBM=> [Fn]+[F7] Toshiba => [Fn]+[F5] Mac Apple: System Preference-->Display-->Arrangement-->Mirror display If you experience difficulty changing resolutions or your monitor freezes, restart all equipment including the projector. The screen of the Notebook or PowerBook computer is not displaying your presentation If you are using a Notebook PC: Some Notebook PCs may deactivate their own screens when a second display device is in use. Each has a different way to be reactivated. Refer to your computer's manual for detailed information. Unstable or flickering image Use "Tracking" to correct it. See page 31 for more information. Change the monitor color setting on your computer. (*) The resolution: Image has vertical flickering bar WXGA (1280 x 768) is recommended for this projector. Use "Phase" to make an adjustment. See page 31 for more information. Check and reconfigure the display mode of your graphic card to make it compatible with the projector. 35
-
 1
1 -
2
-
3
-
4
-
5
-
6
-
7
-
8
-
9
-
10
-
11
-
12
-
13
-
14
-
15
-
16
-
17
-
18
-
19
-
20
-
21
-
22
-
23
-
24
-
25
-
26
-
27
-
28
-
29
-
 30
30 -
 31
31 -
 32
32 -
 33
33 -
 34
34 -
 35
35 -
 36
36 -
 37
37 -
 38
38 -
 39
39 -
 40
40 -
41
-
42
 |
 |
