Oregon Scientific BPW810 User Manual - Page 9
Setting Date, Time And Measurement Units, Positioning The Wrist Cuff
 |
View all Oregon Scientific BPW810 manuals
Add to My Manuals
Save this manual to your list of manuals |
Page 9 highlights
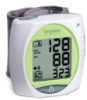
EN SETTING DATE, TIME AND MEASUREMENT UNITS It is important to set the clock before using your blood pressure monitor, so that a time stamp can be assigned to each record that is stored in the memory. 1. When the unit is off, press and hold SET for 2 seconds to enter the setting mode. 1. Remove all accessories (watch, bracelet, etc.) from your left wrist. If your physician has diagnosed you with poor circulation in your left arm, use your right wrist. 2. Roll or push up your sleeve to expose the skin. 3. Apply the cuff to your left wrist with your palm facing up. 4. Position the edge of the cuff about 0.4 inches (1cm) from the bottom of your palm. 5. Fasten the wrist cuff around your wrist, leaving no extra room between the cuff and your skin. If the cuff is too loose, the measurement will not be accurate. 2. The setting order is as follows: 12/24 hour format, hour, minute, year, month/day or day / month format, month, date, and measurement unit (kPa or mmHg). 3. Press or to increase / decrease a value or change the setting. 4. Press SET to accept the change and switch to the next setting. 5. When you are finished, press to exit the setup menu. POSITIONING THE WRIST CUFF It is important to properly position the wrist cuff to ensure that you receive an accurate reading. NOTE Graphics may not exactly match product. 8
-
 1
1 -
2
-
3
-
 4
4 -
 5
5 -
 6
6 -
 7
7 -
 8
8 -
 9
9 -
 10
10 -
 11
11 -
 12
12 -
 13
13 -
 14
14 -
15
-
16
-
17
-
18
-
19
-
20
 |
 |
