Palsonic TFTV421080HD Owners Manual
Palsonic TFTV421080HD Manual
 |
View all Palsonic TFTV421080HD manuals
Add to My Manuals
Save this manual to your list of manuals |
Palsonic TFTV421080HD manual content summary:
- Palsonic TFTV421080HD | Owners Manual - Page 1
OWNER'S MANUAL 107CM WIDE SCREEN LCD TV/MONITOR MODEL: TFTV421080HD N111 PALSONIC CORPORATION PTY LTD 1 JOYNTON AVENUE WATERLOO NSW 2017 AUSTRALIA TEL:(02)9313 7111 FAX:(02)9313 7555 PALSONIC CUSTOMER SERVICE TELEPHONE AUSTRALIA:1300 657 888 - Palsonic TFTV421080HD | Owners Manual - Page 2
...21 System Setup ...23 Rating and Lock Setup ...24 Timer Setup...26 EPG Operation...28 Teletext & Subtitle ...29 Screen setup for D-SUB (PC) Mode ...30 Troubleshooting ...31 Specifications ...33 - Palsonic TFTV421080HD | Owners Manual - Page 3
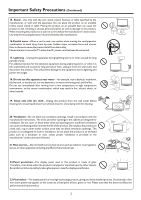
SHOCK OR FIRE HAZARD. In order to prevent potential danger, please observe the following instructions when installing, operating and cleaning the product. To ensure your safety and prolong the service life of your TV product, please read the following precautions carefully before using the product - Palsonic TFTV421080HD | Owners Manual - Page 4
in serious personal injuries as well as damage to the product. When mounting the product on a wall, be sure to follow the manufacturer's instructions. Use only the mounting hardware recommended by the manufacturer. 16.Careful move---When a cart is used, use caution when moving the cart/apparatus - Palsonic TFTV421080HD | Owners Manual - Page 5
to remove stubborn dirt from the screen. ! Never use alcohol, paint thinner or benzine to clean this unit. ! Before using a chemically treated cloth, read the instructions that came with the cloth carefully. 3 - Palsonic TFTV421080HD | Owners Manual - Page 6
on battery use Improper use of batteries can result in a leakage of chemicals and/or explosion. Be sure to follow the instructions below. - Palsonic TFTV421080HD | Owners Manual - Page 7
Preparations (continued) Antenna Connection INSTALL the unit in a room where direct light will not fall upon the screen. Total darkness or a reflection on the picture screen may cause eyestrain. Soft and indirect lighting is recommended for comfortable viewing. Optimum reception of colour requires - Palsonic TFTV421080HD | Owners Manual - Page 8
to turn the set back to STANDBY. Note Functions of CH+/-, VOL+/-, MENU, SOURCE and POWER are also provided to the remote control. This operation manual provides a description based on operating functions with the remote control. 6 - Palsonic TFTV421080HD | Owners Manual - Page 9
from external sources such as VCR or DVD player. 7. AV outputs(Video, Audio L, R) Connect to your VCR to record programs. 8. RS232 interface For service use . The user cannot operate the unit through this terminal. 9. S/PDIF digital audio out terminal(coaxial) Connect to the digital audio input of - Palsonic TFTV421080HD | Owners Manual - Page 10
: Switches the TV power on or Standby. 2 TV/Radio: Switches between TV and Radio mode. (DTV only) 1 3 EPG: Displays the Electronic Program Guide (DTV only). 4 FAV.LIST: Displays the favorite channel list. 2 14 3 15 5 FAV+/ FAV-: Selects the favorite channel. 6 0 - 9 number buttons: Press to - Palsonic TFTV421080HD | Owners Manual - Page 11
equipment may be different depending on your model. Loose connectors can result in image or colour problems. Make sure that all connectors are securely inserted into their terminals. Refer to the operating manual of the external device as well. When connecting an external device, turn the power off - Palsonic TFTV421080HD | Owners Manual - Page 12
and set it to output mode. (For details, refer to your camcorder user manual.) 4. Insert the tape into the camcorder and press Play button. Note The your device and set it to the correct mode. See the device's user guide for more information. Note If the external device has DVI output only, use - Palsonic TFTV421080HD | Owners Manual - Page 13
Component1 (or Component2), then press OK to confirm. 3. Turn on your external device and set it to the correct mode. See the device's user guide for more information. Connecting a Computer TV REAR D-Sub cable (analog RGB) To monitor port (15-pin D-Sub) To audio output jack Audio cable (stereo - Palsonic TFTV421080HD | Owners Manual - Page 14
Connections (Continued) Connecting a VCR (for Recording) TV REAR VCR for Recording S-VIDEO AV cable How to connect: Connect the Audio/Video cables between the Audio (L/R)/Video jacks on the unit and VCR. To record program 1. Turn on your TV, select a program you wish to record. 2. Turn on your VCR - Palsonic TFTV421080HD | Owners Manual - Page 15
Set Password Block Program Parental Guidance Restore Factory Default Option Off Lock No Block Channel Picture Sound Time Auto Tuning DTV Manual Tuning ATV Manual Tuning Programme Edit Option Lock Channel Select Move Menu Exit Select Move Menu Exit To navigate through the OSD main - Palsonic TFTV421080HD | Owners Manual - Page 16
Basic Operations (Continued) Turning On/Off the Power Turning On Insert the power cord into the wall outlet. Press the Power Switch on the unit to power on. If the unit is in standby mode, press Power button on the unit or the remote control to turn on the unit, and you will be ready to use its - Palsonic TFTV421080HD | Owners Manual - Page 17
item, then press4or OK to access. 2 Highlight VHF CH item, press 3or4 button to select your desired channel number. 3 Press OK to begin the manual DTV channel search. At the bottom of the menu screen the DTV Signal strength bar is displayed. You can make use of it to check - Palsonic TFTV421080HD | Owners Manual - Page 18
3 During the process, press EXIT to exit, and RED button to save the effect. Note = Fine Tune is only for analog TV program. ATV Manual Tuning Storage To 1 Color System PAL Audio System BG Current CH 1 Search Fine-Tune Frequency 445.25 MHz Exit SAVE Select Setting Audio System Normally - Palsonic TFTV421080HD | Owners Manual - Page 19
and the main menu screen displays. 2 Press 3or4to select Channel menu, press 6 to access the menu. Picture Sound Time Auto Tuning DTV Manual Tuning ATV Manual Tuning Programme Edit Option Lock Channel 3 Press 6or5 to select Programme Edit item, press 4 or OK to open the Programme Edit menu - Palsonic TFTV421080HD | Owners Manual - Page 20
Memorizing the Channels (Continued) Channel List Management After auto search, a default channel list is created. You can make use of Program Edit menu to select program, to skip unnecessary channels, to sort programs, and to create a favorite channel list. To skip unnecessary channels After auto - Palsonic TFTV421080HD | Owners Manual - Page 21
Channel and Program Selection Please note: your new TV is capable of receiving both radio and TV broadcasts. And for TV reception, your new TV is capable of receiving both traditional analog channels and digital channels. When watching digital TV program and you want to listen to radio program, - Palsonic TFTV421080HD | Owners Manual - Page 22
Picture Adjustment Customizing the Picture 1 Press MENU and the main menu screen displays. 2 Press 3or4to select Picture menu, press 6 to access the menu. 3 Within the menu, press 5 or 6 to scroll through the page upward or downward, and press 5,6,3,4 to navigate through the options or adjust an - Palsonic TFTV421080HD | Owners Manual - Page 23
Sound Adjustment Adjusting the Volume Using the volume buttons (VOL+ and VOL - ) Press the VOL + or VOL- to increase or decrease the volume. Using the Mute Press the MUTE button to temporarily turn off all sound. To restore the sound, press the MUTE button again. Adjusting the Sound 1 Press MENU - Palsonic TFTV421080HD | Owners Manual - Page 24
Sound Adjustment (Continued) Stereo/Bilingual Selection (for analog channels) You can quickly select sound multiplex mode by using the STEREO button on the remote control. NICAM Broadcast Selection This enables the selection of the reception mode when receiving a NICAM signal. To let you enjoy NICAM - Palsonic TFTV421080HD | Owners Manual - Page 25
System Setup System Setup You may change system settings such as Hearing impaired, SPDIF, Audio Preference etc. by making use of Option menu. 1 Press MENU and the main menu screen displays. 2 Press 3or4to select Option menu, press 6 to access the menu. 3 Within the menu, press 5,6,3,4 to navigate - Palsonic TFTV421080HD | Owners Manual - Page 26
Rating and Lock Setup Password Setup The Password setup sub-menu is used to set a new system password or to change an existing system password. By default, the system password is 0000 and you may change it. To access Parental Guidance, to lock or unlock channels, to view locked channels, etc., the - Palsonic TFTV421080HD | Owners Manual - Page 27
Rating and Lock Setup (Continued) Parental Guidance Setup Parental Guidance blocks programs according to their classification so that children can not view certain programs. 1 Navigate to the Lock menu and input the correct password to access. Picture Sound Time Lock Tuning Set Password Block - Palsonic TFTV421080HD | Owners Manual - Page 28
Timer Setup Time Zone Selection To obtain local time, you should first set local time zone. and it depends on your local station whether has broadcast time zone information. 1 Press MENU and the main menu screen displays. 2 Press 3or4to select Time menu, press 6 to access. 3 Press 5or6 to select - Palsonic TFTV421080HD | Owners Manual - Page 29
Time Setup (Continued) Off Timer Setup With Off Timer function On, the TV will automatically turn off at the preset time. 1 Navigate to the Time menu press 6 to access. 2 Press 5or6 to select Off Time item, press 4or OK to access Picture Sound Time Option Lock Channel the submenu. Clock - Palsonic TFTV421080HD | Owners Manual - Page 30
. Opereation 1 Press the EPG button to open the EPG (Electronic Program Guide). In the EPG window (as shown on the right), several channels' If you want to switch between TV and Radio programmes, please press TV/Radio. PROGRAMME GUIDE 28 Jul 2008 15:03 DTV 72 7 Digital 2 15:00 - 16:00 BLUE - Palsonic TFTV421080HD | Owners Manual - Page 31
decodes them into graphical format for viewing. News, weather and sports information, stock exchange prices and programme previews are among the many services available. To Turn On/Off Teletext Select a TV channel providing the Teletext program. Press TTX button to display the teletext. Press TTX - Palsonic TFTV421080HD | Owners Manual - Page 32
Screen Setup for D-SUB(PC) Mode Before adjusting the screen, make sure that you select the correct source (D-SUB). Screen Setup 1 Press MENU and the main menu screen displays. 2 Press 3or4to select the Picture menu, press 6 to access the menu. 3 Within the menu, press 5 or 6 to scroll through the - Palsonic TFTV421080HD | Owners Manual - Page 33
Troubleshooting If, after reading these operating instructions, you have additional questions related to the use of your television, please call the services center in your local area. Before calling service, please check the symptoms and follow suggested solutions. Remote Control Problem trouble. - Palsonic TFTV421080HD | Owners Manual - Page 34
Troubleshooting General Problem One or some channels can't be displayed Possible Solutions ! These channels may be Then re-plug the power cord and turn on the unit again. Note If your problem is not solved, turn your unit off and then on again. Cautions: Never attempt to repair a defective TV - Palsonic TFTV421080HD | Owners Manual - Page 35
Specifications Type: Display Size diagonal: Power Supply: Power Consumption: Dimensions(mm): Unit Weight(kg): TV System: LCD TV 42" AC100-240V 50/60Hz 200W 1070 (W) x 815(H) x 325(D) 37 Analogue: CCIR(PAL-B/G, NTSC(AV)) Digital: DVB-T(2K/8K OFDM) Note ! Design and specifications are subject to - Palsonic TFTV421080HD | Owners Manual - Page 36
PALSONIC CORPORATION PTY LTD 1 JOYNTON AVENUE WATERLOO NSW 2017 AUSTRALIA TEL:(02)9313 7111 FAX:(02)9313 7555 PALSONIC CUSTOMER SERVICE TELEPHONE AUSTRALIA:1300 657 888 5944032490 Ver 1.0
-
 1
1 -
 2
2 -
 3
3 -
 4
4 -
 5
5 -
 6
6 -
 7
7 -
8
-
9
-
10
-
11
-
12
-
13
-
14
-
15
-
16
-
17
-
18
-
19
-
20
-
21
-
22
-
23
-
24
-
25
-
26
-
27
-
28
-
29
-
30
-
31
-
32
-
33
-
34
-
35
-
36
 |
 |