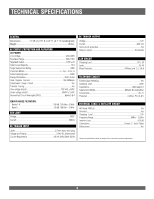
Panamax M7500-PRO Manual - Page 12
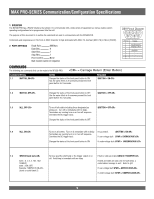
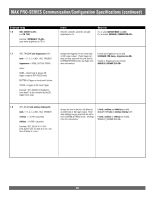
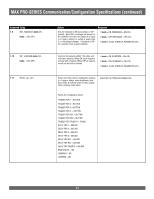
MAX PRO-SERIES Communication/Configuration Specifications continued
 |
UPC - 050616008068
View all Panamax M7500-PRO manuals
Add to My Manuals
Save this manual to your list of manuals |
Page 12 highlights
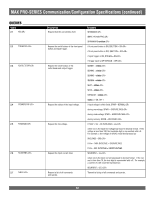
MAX PRO-SERIES Communication/Configuration Specifications (continued) Command String 1.6 !SET_BRIGHT x x = {10 -100} Example: !SETBRIGHT 75 (sets meter brightness to 75%) Action Sets the voltmeter, ammeter and LED brightness to x% Response If x is valid, $BRIGHTNESS = x If x is invalid, $INVALID_PARAMETER 1.7 !SET_TRIGGER bank triggersource bank = { 1, 2, 3, 4,HC1, HC2, TRIGOUT} triggersource = { NONE, BUTTON, TRIGIN} where NONE = Outlet bank is always ON, trigger output is OFF (RS232 only) BUTTON = Trigger on front panel button. TRIGIN = Trigger on DC input trigger Example: !SET_TRIGGER 3 TRIGIN (sets bank 3 to be controlled by the DC trigger input only) Assigns the trigger(s) for an outlet bank or DC trigger output. These trigger settings are only used with the unit isset in CUSTOM SETTING mode. See Page 4 for more information. If bank and triggersource are valid, $TRIGGER FOR bank = triggersource If bank or triggersource are invalid, $INVALID_PARAMETER 1.8 !SET_DELAY bank ondelay offdelay bank = { 1, 2, 3, 4,HC1, HC2, TRIGOUT} ondelay = { 0-240 } (seconds) offdelay = { 0-240 } (seconds) Example: !SET_DELAY 4 5 1 (sets bank 4 turn-on delay to 5 sec. and turn-off delay to 1 sec.) Assigns the turn on and turn off delays for an outlet bank or DC trigger output. These delay settings are only used with the unit is set in CUSTOM SETTINGS mode. See Page 4 for more information If bank, ondelay and offdelay are valid, $DELAY FOR bank = ondelay offdelay If bank, ondelay or offdelay are invalid, $INVALID_PARAMETER 10
-
 1
1 -
2
-
3
-
4
-
5
-
6
-
 7
7 -
 8
8 -
 9
9 -
 10
10 -
 11
11 -
 12
12 -
 13
13 -
 14
14 -
 15
15 -
 16
16 -
 17
17
 |
 |
