Panasonic AG-AC160A Operating Instructions Basic - Page 24
Remote control, Recharging the battery, Recharging, Preparation - ag ac160ap camera
 |
View all Panasonic AG-AC160A manuals
Add to My Manuals
Save this manual to your list of manuals |
Page 24 highlights
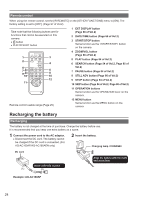
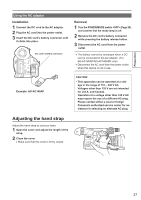
Remote control When using the remote control, set the [IR REMOTE] on the [OTHER FUNCTIONS] menu to [ON]. The factory setting is set to [OFF]. (Page 97 of Vol.2) Take note that the following buttons are for functions that cannot be executed on this camera. •• button ••PHOTO SHOT button 1 EXT DISPLAY button (Page 66 of Vol.2) 2 DATE/TIME button (Page 66 of Vol.2) 3 START/STOP button Same function as the button on the camera. 1 2 5 7 9 6 8 10 11 EXT DISPLAY PHOTO SHOT START/ STOP DATE/ TIME ZOOM VOL SEARCH PLAY SEARCH STILL ADV PAUSE STILL ADV SKIP STOP SKIP MENU ENTER 3 4 6 8 10 12 4 ZOOM/VOL button (Page 66 of Vol.2) 5 PLAY button (Page 54 of Vol.2) 6 SEARCH button (Page 54 of Vol.2, Page 65 of Vol.2) 7 PAUSE button (Page 54 of Vol.2) 8 STILL ADV button (Page 66 of Vol.2) 9 STOP button (Page 54 of Vol.2) 10 SKIP button (Page 54 of Vol.2, Page 65 of Vol.2) 11 OPERATION buttons Same function as the OPERATION lever on the camera. Remote control usable range (Page 29) Recharging the battery 12 MENU button Same function as the MENU button on the camera. Preparation Recharging The battery is not charged at the time of purchase. Charge the battery before use. It is recommended that you keep one extra battery as a spare. 1 Connect the power cord to the AC adaptor. ••Disconnect the DC cord. The battery cannot be charged if the DC cord is connected. (For AG-AC160AP/AG-AC160AEN only) 2 Insert the battery. Charging lamp DC cord Insert until fully in place. (1) (2) Align the battery with the mark and insert fully. Example: AG-AC160AP 24
-
 1
1 -
2
-
3
-
4
-
5
-
6
-
7
-
8
-
9
-
10
-
11
-
12
-
13
-
14
-
15
-
16
-
17
-
18
-
 19
19 -
 20
20 -
 21
21 -
 22
22 -
 23
23 -
 24
24 -
 25
25 -
 26
26 -
 27
27 -
 28
28 -
 29
29 -
30
-
31
-
32
-
33
-
34
-
35
-
36
-
37
-
38
-
39
-
40
-
41
-
42
 |
 |
