Panasonic AG-AC160A Operating Instructions Basic - Page 33
Setting the calendar, Example: AG-AC160AP
 |
View all Panasonic AG-AC160A manuals
Add to My Manuals
Save this manual to your list of manuals |
Page 33 highlights
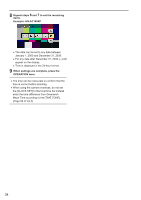
Preparation Setting the calendar The [CLOCK SET] value is recorded in the contents (clip) and affects the playback sequence of the thumbnails. Before shooting, be sure to check/set the [TIME ZONE] and [CLOCK SET]. This section will explain the steps on how to set the calendar to September 22, 2011, 17:20. 1 Turn the camera's POWER/MODE switch . (Page 30) 2 Press the button. ••Menu operation (Page 31) ••Operations can also be performed using buttons on the remote control that correspond to those on the camera. For details, see "Remote control" (Page 24). 3 Select the [TIME ZONE] item on the setup menu [OTHER FUNCTIONS] screen and press the OPERATION lever (or tilt it to the < > direction). 5 Tilt the OPERATION lever in the < > direction and select [YES] in the [CLOCK SET] item on the setup menu [OTHER FUNCTIONS] screen. 6 Tilt the OPERATION lever in the < >< > directions to set to [2011]. Example: AG-AC160AP 4 Since pressing the OPERATION lever will display the settings screen, tilt the OPERATION lever in the < >< > directions to set the time difference from Greenwich Mean Time, then press the OPERATION lever again. Factory default setting is [0:00]. 7 Tilt the OPERATION lever in the < > direction to change to the next item, then tilt the lever in the < >< > directions to set to [09]. Example: AG-AC160AP 33
-
 1
1 -
2
-
3
-
4
-
5
-
6
-
7
-
8
-
9
-
10
-
11
-
12
-
13
-
14
-
15
-
16
-
17
-
18
-
19
-
20
-
21
-
22
-
23
-
24
-
25
-
26
-
27
-
 28
28 -
 29
29 -
 30
30 -
 31
31 -
 32
32 -
 33
33 -
 34
34 -
 35
35 -
 36
36 -
 37
37 -
 38
38 -
39
-
40
-
41
-
42
 |
 |
