Panasonic AG-AC90APJ Operating Instructions Basic - Page 27
Setting date and time
 |
View all Panasonic AG-AC90APJ manuals
Add to My Manuals
Save this manual to your list of manuals |
Page 27 highlights
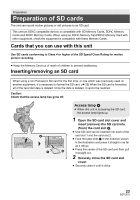
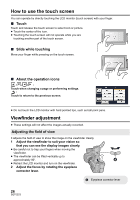
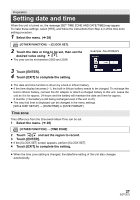
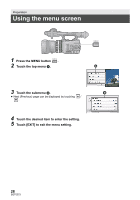
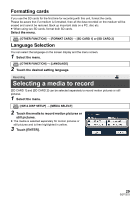
Preparation Setting date and time When this unit is turned on, the message [SET TIME ZONE AND DATE/TIME] may appear. To make these settings, select [YES], and follow the instructions from Step 2-3 of the time zone setting procedure. 1 Select the menu. (l 28) MENU : [OTHER FUNCTION] # [CLOCK SET] 2 Touch the date or time to be set, then set the desired value using / . ≥ The year can be set between 2000 and 2039. Example: AG-AC90APJ 3 Touch [ENTER]. 4 Touch [EXIT] to complete the setting. ≥ The date and time function is driven by a built-in lithium battery. ≥ If the time display becomes [- -], the built-in lithium battery needs to be charged. To recharge the built-in lithium battery, connect the AC adaptor or attach a charged battery to this unit. Leave the unit as it is for approx. 24 hours and the battery will maintain the date and time for approx. 6 months. (The battery is still being recharged even if the unit is off.) ≥ The way that time is displayed can be changed in the menu settings. [SW & DISP SETUP] # [DATE/TIME] or [DATE FORMAT] Time zone Time difference from the Greenwich Mean Time can be set. 1 Select the menu. (l 28) MENU : [OTHER FUNCTION] # [TIME ZONE] 2 Touch / and set the region to record. 3 Touch [ENTER]. ≥ If the [CLOCK SET] screen appears, perform [CLOCK SET]. 4 Touch [EXIT] to complete the setting. ≥ When the time zone setting is changed, the date/time setting of the unit also changes automatically. 27 SQT0323
-
 1
1 -
2
-
3
-
4
-
5
-
6
-
7
-
8
-
9
-
10
-
11
-
12
-
13
-
14
-
15
-
16
-
17
-
18
-
19
-
20
-
21
-
 22
22 -
 23
23 -
 24
24 -
 25
25 -
 26
26 -
 27
27 -
 28
28 -
 29
29 -
 30
30 -
 31
31 -
 32
32 -
33
-
34
-
35
-
36
-
37
-
38
-
39
-
40
 |
 |