Panasonic AG-AC90APJ Operating Instructions Basic - Page 33
Manual shutter speed, USER button, Setting the USER button
 |
View all Panasonic AG-AC90APJ manuals
Add to My Manuals
Save this manual to your list of manuals |
Page 33 highlights
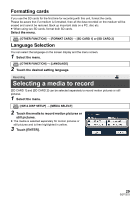
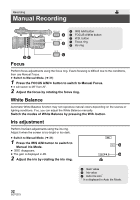
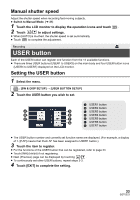
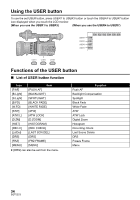
Manual shutter speed Adjust the shutter speed when recording fast-moving subjects. ≥ Switch to Manual Mode. (l 31) 1 Touch the LCD monitor to display the operation icons and touch SHTR . 2 Touch / to adjust settings. ≥ When [AUTO] is touched, the shutter speed is set automatically. ≥ Touch SHTR to complete the adjustment. Recording USER button Each of the USER button can register one function from the 14 available functions. ≥ There are three USER buttons (USER1 to USER3) on the main body and four USER button icons (USER4 to USER7) displayed on the LCD monitor. Setting the USER button 1 Select the menu. MENU : [SW & DISP SETUP] # [USER BUTTON SETUP] 2 Touch the USER button you wish to set. A USER1 button B USER2 button C USER3 button D USER4 button E USER5 button F USER6 button G USER7 button ≥ The USER button number and currently set function name are displayed. (For example, a display of 1. [P.AF] means that Push AF has been assigned to USER1 button.) 3 Touch the item to register. ≥ For the functions of the USER button that can be registered, refer to page 34. ≥ Touch [INH] (Inhibit) if not registering. ≥ Next (Previous) page can be displayed by touching / . ≥ To continuously set other USER buttons, repeat steps 2-3. 4 Touch [EXIT] to complete the setting. 33 SQT0323
-
 1
1 -
2
-
3
-
4
-
5
-
6
-
7
-
8
-
9
-
10
-
11
-
12
-
13
-
14
-
15
-
16
-
17
-
18
-
19
-
20
-
21
-
22
-
23
-
24
-
25
-
26
-
27
-
 28
28 -
 29
29 -
 30
30 -
 31
31 -
 32
32 -
 33
33 -
 34
34 -
 35
35 -
 36
36 -
 37
37 -
 38
38 -
39
-
40
 |
 |