Panasonic AG-DVX200 Operating Instructions - Volume 2 - Page 68
Adjusting the audio input level, Selecting an adjustment method
 |
View all Panasonic AG-DVX200 manuals
Add to My Manuals
Save this manual to your list of manuals |
Page 68 highlights
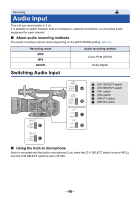
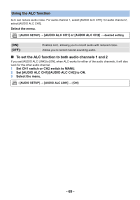
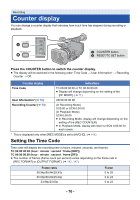
ヱヶヴラ To remove the external microphone, etc., from the AUDIO INPUT1, 2 terminals (XLR 3 pin) Remove while pushing on the PUSH section of the AUDIO INPUT1, 2 terminals (XLR 3 pin). ≥ Set the input signal to built-in microphone by switching the CH1 SELECT, CH2 SELECT switches to INT (L) or INT (R) after removing the external microphone. Audio will not be recorded when motion picture is recorded without switching. A PUSH section ≥ Set INPUT1, 2 switches to LINE or MIC if you connect equipment not compatible with +48 V. You can damage this unit or such equipment if you leave the setting at +48V. ≥ This unit is turned off when a problem occurs with the +48 V power supply. ≥ The battery will discharge faster if you use a phantom microphone. Adjusting the audio input level Selecting an adjustment method You can set how to adjust the audio input level for each audio channel. Use the CH1 switch for channel 1 and the CH2 switch for channel 2. 1 Set the position of the CH1 or CH2 switch. AUTO: Adjusts the level automatically. MANU: Adjusts the level manually. 2 (If you have set to MANU) Adjust the input level operating the AUDIO LEVEL CH1/AUDIO LEVEL CH2 knobs. CH1 AUDIO LEVEL CH2 A AUDIO LEVEL CH1/AUDIO LEVEL CH2 knobs B Audio level meter C -12 dB D 0 dB ≥ Adjust confirming the audio level meter. - 68 -
-
 1
1 -
2
-
3
-
4
-
5
-
6
-
7
-
8
-
9
-
10
-
11
-
12
-
13
-
14
-
15
-
16
-
17
-
18
-
19
-
20
-
21
-
22
-
23
-
24
-
25
-
26
-
27
-
28
-
29
-
30
-
31
-
32
-
33
-
34
-
35
-
36
-
37
-
38
-
39
-
40
-
41
-
42
-
43
-
44
-
45
-
46
-
47
-
48
-
49
-
50
-
51
-
52
-
53
-
54
-
55
-
56
-
57
-
58
-
59
-
60
-
61
-
62
-
 63
63 -
 64
64 -
 65
65 -
 66
66 -
 67
67 -
 68
68 -
 69
69 -
 70
70 -
 71
71 -
 72
72 -
 73
73 -
74
-
75
-
76
-
77
-
78
-
79
-
80
-
81
-
82
-
83
-
84
-
85
-
86
-
87
-
88
-
89
-
90
-
91
-
92
-
93
-
94
-
95
-
96
-
97
-
98
-
99
-
100
-
101
-
102
-
103
-
104
-
105
-
106
-
107
-
108
-
109
-
110
-
111
-
112
-
113
-
114
-
115
-
116
-
117
-
118
-
119
-
120
-
121
-
122
-
123
-
124
-
125
-
126
-
127
-
128
-
129
-
130
-
131
-
132
-
133
-
134
-
135
-
136
-
137
-
138
-
139
-
140
-
141
-
142
-
143
-
144
-
145
-
146
-
147
-
148
-
149
-
150
-
151
-
152
-
153
-
154
-
155
-
156
-
157
-
158
-
159
-
160
-
161
-
162
-
163
-
164
-
165
-
166
-
167
-
168
-
169
-
170
-
171
-
172
-
173
-
174
-
175
-
176
-
177
-
178
-
179
-
180
-
181
-
182
-
183
-
184
-
185
-
186
-
187
-
188
-
189
-
190
-
191
-
192
-
193
-
194
-
195
-
196
-
197
-
198
-
199
-
200
-
201
-
202
-
203
 |
 |
