Panasonic AG-DVX200PJ Operating Instructions - Volume 2 - Page 73
Setting the Recording Counter, Synchronizing the time code with an external device
 |
View all Panasonic AG-DVX200PJ manuals
Add to My Manuals
Save this manual to your list of manuals |
Page 73 highlights
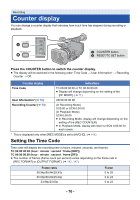
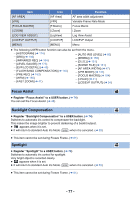
Setting the Recording Counter Recording Counter will display the recording time in seconds. 0:00:00 (hour : minute : second (When [REC COUNTER] is set to [TOTAL])) SCN 0:00:00 (hour : minute : second (When [REC COUNTER] is set to [SCENE])) [REC COUNTER] Select the counting method during the recording. Select the menu. MENU : [DISP SETUP] # [REC COUNTER] # desired setting [TOTAL]: The count continues to increase until the Recording Counter is reset. [SCENE]: Resets the Recording Counter at start of recording. Counts the time of each recording session. To reset the Recording Counter for the Recording Mode The Recording Counter will be set to 0:00:00 when the RESET/TC SET button is pressed while displaying the counter. Synchronizing the time code with an external device You can synchronize the default time code during multi-camera recording. ≥ In the following section, the device with the reference time code is referred to as "master", while 1the device to be synchronized is referred to as "slave". Connect the TC PRESET IN/OUT terminals of the two devices with a BNC cable (commercially-available), and turn them on. ≥ Apply the same [REC FORMAT], [OUTPUT FORMAT] and [DF MODE] settings to the two TC PRESET IN/OUT devices. (l 71, 142, 147) 2 (On the master device) Select the [TCG] menu. A TC PRESET IN/OUT terminal MENU : [RECORD SETUP] # [TCG] # [FREE RUN] 3 (On the master device) Select the [EXT TC LINK] menu. MENU : [RECORD SETUP] # [EXT TC LINK] # [MASTER] ≥ The time code will be output from the TC PRESET IN/OUT terminal. ≥ To cancel the output of the time code, touch [EXIT]. 4 (On the slave device) Select the [EXT TC LINK] menu. - 73 -
-
 1
1 -
2
-
3
-
4
-
5
-
6
-
7
-
8
-
9
-
10
-
11
-
12
-
13
-
14
-
15
-
16
-
17
-
18
-
19
-
20
-
21
-
22
-
23
-
24
-
25
-
26
-
27
-
28
-
29
-
30
-
31
-
32
-
33
-
34
-
35
-
36
-
37
-
38
-
39
-
40
-
41
-
42
-
43
-
44
-
45
-
46
-
47
-
48
-
49
-
50
-
51
-
52
-
53
-
54
-
55
-
56
-
57
-
58
-
59
-
60
-
61
-
62
-
63
-
64
-
65
-
66
-
67
-
 68
68 -
 69
69 -
 70
70 -
 71
71 -
 72
72 -
 73
73 -
 74
74 -
 75
75 -
 76
76 -
 77
77 -
 78
78 -
79
-
80
-
81
-
82
-
83
-
84
-
85
-
86
-
87
-
88
-
89
-
90
-
91
-
92
-
93
-
94
-
95
-
96
-
97
-
98
-
99
-
100
-
101
-
102
-
103
-
104
-
105
-
106
-
107
-
108
-
109
-
110
-
111
-
112
-
113
-
114
-
115
-
116
-
117
-
118
-
119
-
120
-
121
-
122
-
123
-
124
-
125
-
126
-
127
-
128
-
129
-
130
-
131
-
132
-
133
-
134
-
135
-
136
-
137
-
138
-
139
-
140
-
141
-
142
-
143
-
144
-
145
-
146
-
147
-
148
-
149
-
150
-
151
-
152
-
153
-
154
-
155
-
156
-
157
-
158
-
159
-
160
-
161
-
162
-
163
-
164
-
165
-
166
-
167
-
168
-
169
-
170
-
171
-
172
-
173
-
174
-
175
-
176
-
177
-
178
-
179
-
180
-
181
-
182
-
183
-
184
-
185
-
186
-
187
-
188
-
189
-
190
-
191
-
192
-
193
-
194
-
195
-
196
-
197
-
198
-
199
-
200
-
201
-
202
-
203
 |
 |
