Panasonic AG-HMC80PJ Editing AVCHD with Final Cut Express 4 - Page 10
Step #4, Select A Clip., Step #5 - Click On Add Clip To Queue.
 |
View all Panasonic AG-HMC80PJ manuals
Add to My Manuals
Save this manual to your list of manuals |
Page 10 highlights
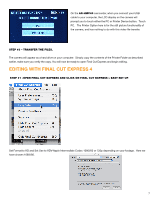
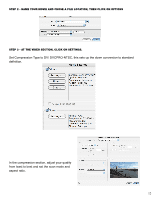
Step #4 - Select a clip. You can now view the selected clip in the Preview area. Here you can change the reel and clip name and add any logging notes you prefer. You can also make your rough "in" and "out" points here. This is a good idea as only that section of your native AVCHD footage will be transcoded in the next step, making the process much faster. Step #5 - Click on Add clip to queue. Your clip will appear in the transfer queue area, where you can watch the status of the transfer. Once the clip has been transcoded it will appear in the bin section. 10
-
 1
1 -
2
-
3
-
4
-
 5
5 -
 6
6 -
 7
7 -
 8
8 -
 9
9 -
 10
10 -
 11
11 -
 12
12 -
 13
13 -
 14
14 -
 15
15 -
16
-
17
-
18
 |
 |

10
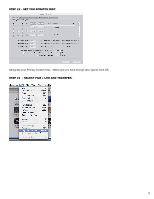
STEP #4
– SELECT A CLIP.
You can now view the selected clip in the Preview area.
Here you
can change the reel and clip name and add any logging notes you
prefer.
You can also make your rough “in” and “out” points here.
This is a good idea as only that section of your native AVCHD
footage will be transcoded in the next step, making the process
much faster.
STEP #5 – CLICK ON ADD CLIP TO QUEUE.
Your clip will appear in the transfer queue area, where you
can watch the status of the transfer.
Once the clip has been
transcoded it will appear in the bin section.