Panasonic BB-HCM735A Installation Guide - Page 4
Ceiling/Wall Mount, Flexible Stand Mount, Tripod Mount
 |
UPC - 037988845620
View all Panasonic BB-HCM735A manuals
Add to My Manuals
Save this manual to your list of manuals |
Page 4 highlights
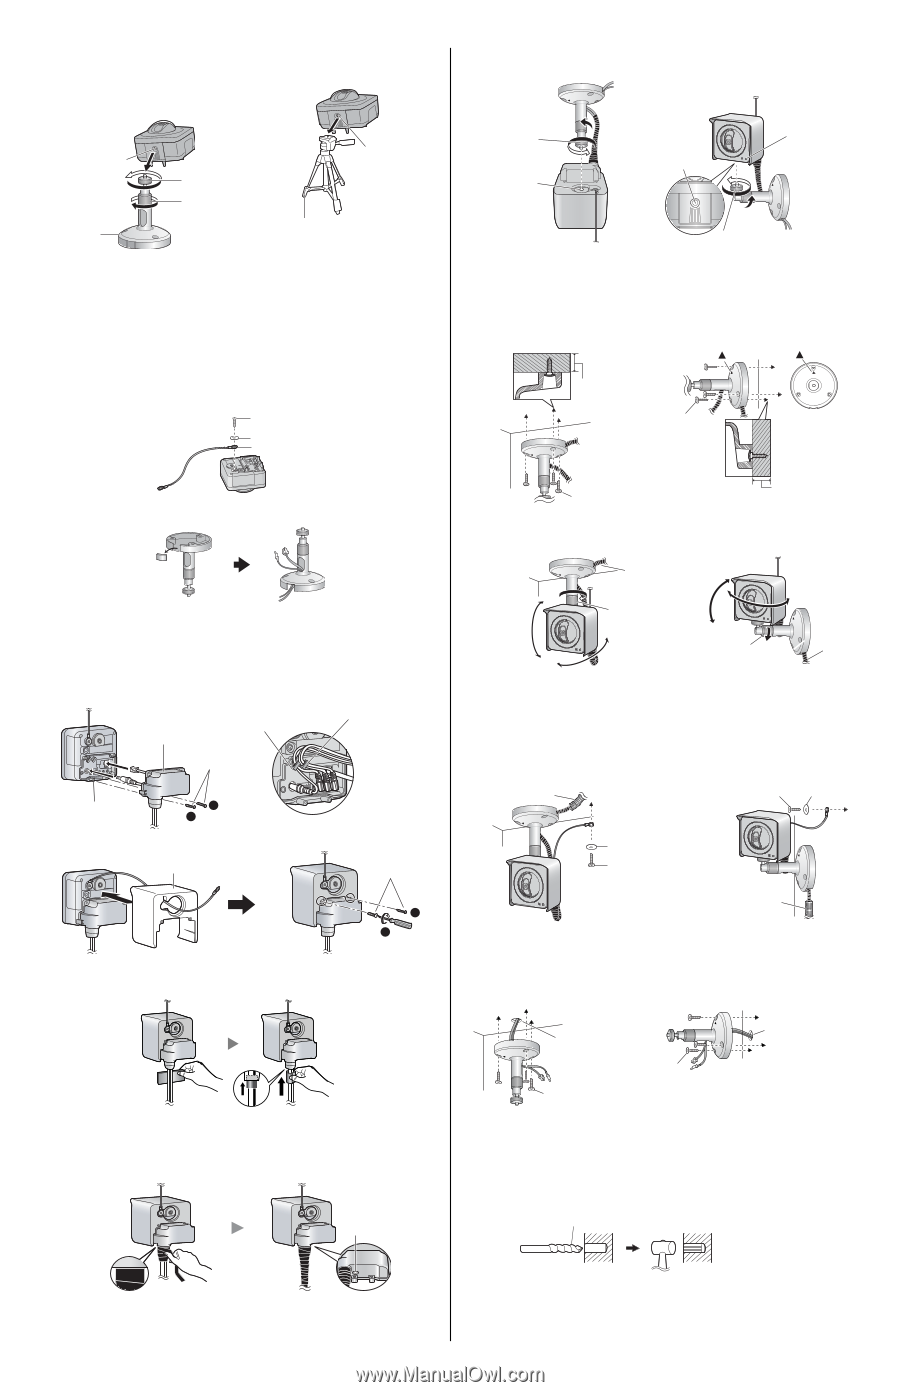
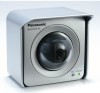
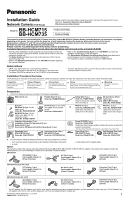
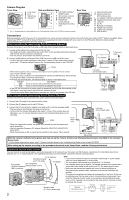
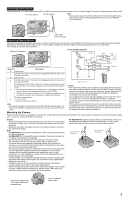
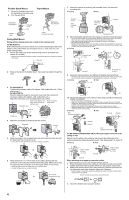
Flexible Stand Mount 1. Screw the threaded mount into the stand/tripod mounting hole. 2. Turn the grip firmly. Tripod Mount Stand/tripod mounting hole Flexible stand Threaded mount Grip Stand/tripod mounting hole Tripod (customer-provided) Ceiling/Wall Mount Wiring without making a hole for a cable in the ceiling or wall For BB-HCM735: Before following the procedures below, we recommend passing all cables (AC adaptor, LAN, audio/video, etc.) through a duct (i.e., hose, tube, etc.) for proper waterproofing. 1. Secure the safety wire to the camera using screw A (included) and washer S (included). • Make sure you attach the safety wire when mounting the camera, to prevent the camera from falling. Screw A Washer S Safety wire 2. Remove the tab on the flexible stand. Then pass the cables through the notch. 3. For BB-HCM715: Connect all necessary cables (AC adaptor, LAN, audio/video, etc.). Then skip to step 7. For BB-HCM735: Pass the cables through the connector cover, and then connect all necessary cables (AC adaptor, LAN, audio/video, etc.). Attach the connector cover by fastening the two screws. Hook for AC adaptor cord, Hook for external video cable, external I/O audio cables interface wires Connector cover Screw A Screw hole 2 1 4. Attach the sunshade by fastening the two screws. Sunshade Screw A 3 4 5. Wrap the cables in the included foam strip and insert the foam strip into the opening of the connector cover. • Leave about 10 mm (3/8 inches) of the foam exposed, as shown. 6. Wrap the first 20 cm (7 7/8 inches) of the cables (starting with the connector cover) using the included self bonding tape. Make sure to wrap the opening of the connector cover thoroughly (three or four times). • Stretch the tape to twice its length when you wrap the cables. • Overlap the tape when you wrap the cables. Do not cover the ventilation hole. 7. Attach the camera by screwing the threaded mount into the stand mounting hole. N Ceiling N Wall Threaded mount Stand mounting hole Stand/tripod mounting hole Indicator Threaded mount 8. Mount the flexible stand firmly to the ceiling or wall with screw B (included). • Do not drive the screws into a soft material. Drive the screws into a secure area of the wall, such as a column, otherwise the camera may fall and be damaged. • Use screws that are suited for the type of material the camera is mounted to. • Be careful not to nip the cables. • Make sure the flexible stand is firmly mounted on a beam of wood (25 mm [1 inch] and greater) etc. When there is no beam, apply a board on the other side of the ceiling or wall to make sure the camera does not drop. N Ceiling N Wall At least 25 mm (1 inch) Screw B Screw B At least 25 mm (1 inch) 9. Adjust the camera position and tighten the flexible stand grip firmly. • Confirm that the cords have been waterproofed and that the portion of the cord protruding from the flexible stand is wrapped in self bonding tape, as shown in (A) below. N Ceiling N Wall (A) Grip Grip (A) 10. Secure the safety wire to the ceiling or wall using screw B (included) and washer L (included). • Leave some slack in the safety wire, as shown. • Make sure the safety wire is firmly mounted on a beam of wood (25 mm [1 inch] and greater) etc. When there is no beam, apply a board on the other side of the ceiling or wall to make sure the camera does not drop. • Make sure to waterproof the opening of the duct so that water does not enter it. • Attach the safety wire in a position so that if the camera were to become detached, it would not fall on nearby people. N Ceiling N Wall Duct (customer-provided) Screw B Washer L Washer L Screw B Duct (customer-provided) For BB-HCM715 (INDOOR USE ONLY): Wiring through a hole made in the ceiling or wall Make a hole for cables in the ceiling or wall. Secure the safety wire to the camera and pass the cables through the notch. Then follow steps 7, 8, 9 and 10. N Ceiling N Wall Hole for cables φ 25 mm (φ 1 inch) Screw B Hole for cables φ 25 mm (φ 1 inch) Screw B When mounting on a mortar or concrete surface • Prepare anchors for 4 mm (3/16 inch) diameter screws for mounting. 1. Place the flexible stand on the ceiling or wall where you plan to mount the flexible stand and mark the points where you are going to make holes. 2. Make holes with an electric drill. Insert anchors (customer-provided) into the holes and push them inside the holes with a hammer. • Mortar ceilings or walls break easily when drilling. Be careful of pieces of mortar which may become loose and fall. Drill for concrete (in case of tile, use a drill for tile) 3. Mount the flexible stand using the screws. 4
-
 1
1 -
 2
2 -
 3
3 -
 4
4
 |
 |