Panasonic BL-C140A Installation Guide - Page 20
Adjust the camera position., Wrap the included foam strip around the cable, insert it into the opening - mount
 |
UPC - 037988845415
View all Panasonic BL-C140A manuals
Add to My Manuals
Save this manual to your list of manuals |
Page 20 highlights
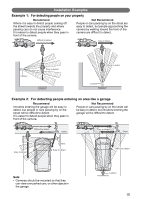
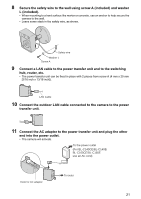
5 Wrap the included foam strip around the cable, insert it into the opening of the right-angle joint, and then wrap at least the first 50 mm (1 15/16 inches) of the cable using the included self bonding tape. • Leave about 10 mm (3/8 inches) of the foam exposed, as shown. • Stretch the tape to twice its length when you wrap the cable. • Overlap the tape when you wrap the cable. • Make sure that there are no gaps in the wrapped tape for water to enter. 50 mm (1 15/16 inches) 6 Attach the camera by screwing the threaded mount into the stand mounting hole. • Loosen the flexible stand grip to make adjusting the angle of the camera easier. Once the camera is adjusted to the desired angle, retighten the grip firmly into place. Threaded mount Grip 7 Adjust the camera position. • Leave some slack in the cable, as shown. 20
-
 1
1 -
2
-
3
-
4
-
5
-
6
-
7
-
8
-
9
-
10
-
11
-
12
-
13
-
14
-
 15
15 -
 16
16 -
 17
17 -
 18
18 -
 19
19 -
 20
20 -
 21
21 -
 22
22 -
 23
23 -
 24
24 -
 25
25 -
26
-
27
-
28
-
29
-
30
-
31
-
32
 |
 |
