Panasonic BL-C140A Installation Guide - Page 21
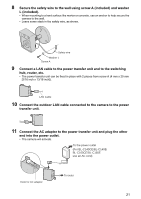
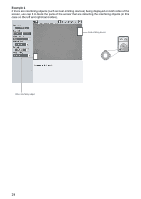
Connect the AC adaptor to the power transfer unit and plug the other, end into the power outlet.
 |
UPC - 037988845415
View all Panasonic BL-C140A manuals
Add to My Manuals
Save this manual to your list of manuals |
Page 21 highlights
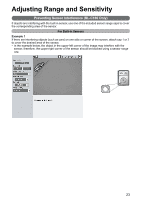
8 Secure the safety wire to the wall using screw A (included) and washer L (included). • When mounting to a hard surface like mortar or concrete, use an anchor to help secure the camera to the wall. • Leave some slack in the safety wire, as shown. Safety wire Washer L Screw A 9 Connect a LAN cable to the power transfer unit and to the switching hub, router, etc. • The power transfer unit can be fixed in place with 2 pieces from screw A (4 mm x 20 mm [3/16 inch x 13/16 inch]). LAN Cable 10 Connect the outdoor LAN cable connected to the camera to the power transfer unit. 11 Connect the AC adaptor to the power transfer unit and plug the other end into the power outlet. • The camera will activate. To the power outlet (For BL-C140CE/BL-C140E/ BL-C160CE/BL-C160E use an AC cord) Hook for AC adaptor To router 21
-
 1
1 -
2
-
3
-
4
-
5
-
6
-
7
-
8
-
9
-
10
-
11
-
12
-
13
-
14
-
15
-
 16
16 -
 17
17 -
 18
18 -
 19
19 -
 20
20 -
 21
21 -
 22
22 -
 23
23 -
 24
24 -
 25
25 -
 26
26 -
27
-
28
-
29
-
30
-
31
-
32
 |
 |
