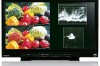
Panasonic BT-4LH310 Parts List - Page 20
Service menu, 1. Service Menu Operation Method
 |
View all Panasonic BT-4LH310 manuals
Add to My Manuals
Save this manual to your list of manuals |
Page 20 highlights
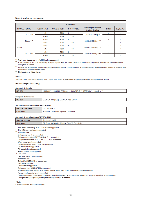
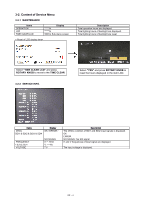
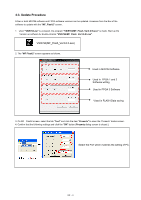
3.Service menu 3-1. Service Menu Operation Method 1. While simultaneously pressing and holding the"SDI", "HDMI-DUAL", "HDMI-SINGLE"buttons, turn ON the power. 2. After about twenty seconds, the characters of "SERVICE PAGE ON" are momentarily displayed in the upper left of the LCD screen. 3. Press the MENU button so that the service menu appears on the LCD. 4. Turn the ROTARY KNOB to select the menu items, and press the ROTARY KNOB to move into the setting screen. 5. Turn the ROTARY KNOB to select the setting item, and the setting values can be changed by pressing the ROTARY KNOB. (The settings values turn green in color.) 6. After being changed, the setting values are fixed by pressing the ROTARY KNOB (The settings values turn white in color.). 7. Turn off the power and turn it on again to cancel the service menu display mode. <SERVICE MENU screen> MAINTENANCE SERVICE INFO REMOTE TYPE GPI TYPE INITIALIZE MAIN AREA SERIAL No SOFTWARE VER FPGA REV : Display the number of total operation hours and lighting hours of backlight. : Display the condition of the CRCC of input SDI signal and the frequency of input signal. : Set the RS-232 communication. : Select the operating condition of GPI input signal.(not supported in this model) : Initialize the MENU. : The destination can be set. : The serial number is displayed. : Each software version is displayed. : The largest version number among VIDEO1, 2 and 3 is displayed. INF - 3
-
 1
1 -
2
-
3
-
4
-
5
-
6
-
7
-
8
-
9
-
10
-
11
-
12
-
13
-
14
-
 15
15 -
 16
16 -
 17
17 -
 18
18 -
 19
19 -
 20
20 -
 21
21 -
 22
22 -
 23
23 -
 24
24 -
 25
25 -
26
-
27
-
28
-
29
-
30
-
31
-
32
-
33
-
34
-
35
-
36
-
37
-
38
-
39
-
40
-
41
-
42
-
43
-
44
-
45
-
46
-
47
-
48
-
49
-
50
-
51
-
52
-
53
-
54
-
55
-
56
-
57
-
58
-
59
-
60
-
61
-
62
-
63
-
64
-
65
-
66
-
67
-
68
-
69
-
70
-
71
-
72
-
73
-
74
-
75
-
76
-
77
-
78
-
79
-
80
-
81
-
82
-
83
-
84
-
85
-
86
-
87
-
88
-
89
-
90
-
91
-
92
-
93
-
94
-
95
-
96
-
97
-
98
-
99
-
100
-
101
-
102
-
103
-
104
-
105
-
106
-
107
-
108
-
109
-
110
-
111
-
112
-
113
-
114
-
115
-
116
-
117
-
118
-
119
-
120
-
121
-
122
-
123
-
124
-
125
 |
 |
