Panasonic BT-LH2170 Operating Instructions - Page 16
On-screen Display, Operating status display, Main menu (MAIN MENU)/FUNCTION menu/INPUT SELECT menu
 |
View all Panasonic BT-LH2170 manuals
Add to My Manuals
Save this manual to your list of manuals |
Page 16 highlights
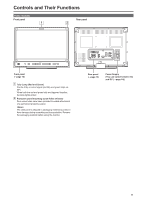
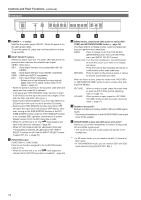
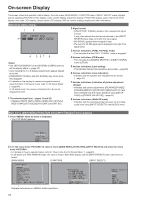
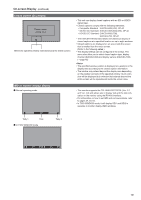
On-screen Display The screen shows the operation status display, the main menu (MAIN MENU) / FUNCTION menu / INPUT SELECT menu displays, picture adjusting (PICTURE) menu display, audio volume display, sharpness display, FUNCTION display, audio volume bar meter display, time code (TC) display, closed caption (CC) display, IMD (in monitor display) display and other information. Operating status display 1 2 SDI1 1080/60i 3G:A 3 P-P FILM ANALOG 4 5 67 8 • Use [STATUS DISPLAY] in the [SYSTEM CONFIG] menu to set the display status.(→page 30) • Icons meeting the 3 to 8 display requirements appear aligned to the left. • [UNSUPPORT SIGNAL] and [NO SIGNAL] may not be prop- erly displayed. • For details on the display of names and signal formats of assist functions in 3D assist mode, refer to "3D Assist Mode" (→page49). In 3D assist mode, the various indications (4 to 8) can be displayed as well. 1. The selected input line (→pages 12 and 20) • Displays [VIDEO], [SDI1], [SDI2], [HDMI], [DVI-I] ([YPBPR]/ [RGB-COMP.]/[DVI-VIDEO]/[DVI-COMP.]) and [INT-SG]. 2. Signal format • [UNSUPPORT SIGNAL] appears if an unsupported signal is input. It may also indicate that the format selected in the [INPUT SELECT] menu does not match the input signal. • [NO SIGNAL] appears when no signal is input. • The level of a 3G-SDI signal input is displayed to the right of the signal format. 3. Various indications (PIXEL TO PIXEL mode) • This indicates that the PIXEL TO PIXEL mode is engaged. 4. Various indications (FILM mode) • This indicates that [GAMMA SELECT] in [VIDEO CONFIG] is set to [FILM]. 5. Various indications (Lock setting) • This indicates that the front operations are locked.(→page 48) 6. Various indications (mute indication) • Indicates that the speaker and headphones are muted. (→page 21) 7. Various indications (indication of picture adjustment change) • Indicates that picture adjustments ([PEAKING]/[PHASE]/ [CHROMA]/[BRIGHT]/[CONTRAST]/[BACKLIGHT]) have been changed from the values assigned using [SETUP LOAD] or [POWER ON SETUP].(→page 21) 8. Various indications (ANALOG mode) • Indicates that the operating mode has been set to analog audio input using [INPUT SELECT] in the [AUDIO] menu. Main menu (MAIN MENU)/FUNCTION menu/INPUT SELECT menu displays 1. Press when no menu is displayed. • The [TOP MENU] appears. [TOP MENU] MAIN MENU FUNCTION INPUT SELECT MENU EXIT 2. Turn the rotary knob to select a menu ([MAIN MENU], [FUNCTION], [INPUT SELECT]) and press the rotary knob . • For details on how to operate menus, refer to "How to Use the On Screen Menu" (→page20). • In 3D assist and TWO WINDOW mode, the input is fixed to SDI1/SDI2 display and the [INPUT SELECT] menu cannot be se- lected. [MAIN MENU] [FUNCTION] [INPUT SELECT] [MAIN MENU] 2D/3D ASSIST MARKER VIDEO CONFIG SYSTEM CONFIG FUNCTION GPI INPUT SELECT AUDIO DISPLAY SETUP CONTROL HOURS METER MENU EXIT SEL. 2D ENTER RETURN RETURN [FUNCTION] F1:WFM/VECTOR F2:TWO WINDOW F3:FOCUS-IN-RED F4:TIME CODE F5:LEVEL METER WFM/VECTOR OFF MENU EXIT RETURN RETURN [INPUT SELECT] VIDEO SDI1 SDI2 HDMI DVI-I INT-SG MENU EXIT RETURN RETURN Displays instructions on button operations. 16
-
 1
1 -
2
-
3
-
4
-
5
-
6
-
7
-
8
-
9
-
10
-
 11
11 -
 12
12 -
 13
13 -
 14
14 -
 15
15 -
 16
16 -
 17
17 -
 18
18 -
 19
19 -
 20
20 -
 21
21 -
22
-
23
-
24
-
25
-
26
-
27
-
28
-
29
-
30
-
31
-
32
-
33
-
34
-
35
-
36
-
37
-
38
-
39
-
40
-
41
-
42
-
43
-
44
-
45
-
46
-
47
-
48
-
49
-
50
-
51
-
52
-
53
-
54
-
55
-
56
-
57
-
58
-
59
-
60
-
61
-
62
-
63
-
64
-
65
-
66
-
67
-
68
-
69
-
70
-
71
-
72
-
73
-
74
-
75
-
76
-
77
-
78
-
79
-
80
 |
 |
