Panasonic CQC7413U CQC7113U User Guide - Page 30
Display Setting
 |
View all Panasonic CQC7413U manuals
Add to My Manuals
Save this manual to your list of manuals |
Page 30 highlights
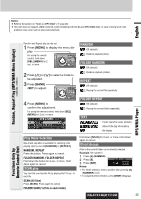
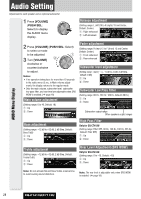
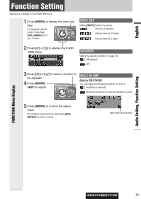
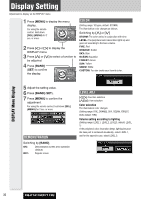
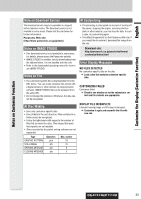
Display Setting Adjustment to display on the DISPLAY menu 1 Press [MENU] to display the menu display. For using the remote control, hold down [SEL] (MENU) for 2 sec. or more. 2 Press []] or [[] to display the DISPLAY menu. 3 Press [}] or [{] to select a function to be adjusted. 4 Press [BAND] (SET) to confirm the display. COLOR (Setting range: 10 types, default: STORM) The illumination color changes as follows. Switching by [}] or [{] STORM: The color varies in conjunction with time. LEVEL: The peripheral color decoration lights up and goes out according to the bass volume. FIRE: Red ORANGE: Amber SKY: Blue OCEAN: Aquablue FOREST: Green SUN: Yellow SNOW: White CUSTOM: You can create your favorite color. DISPLAY Menu Display 5 Adjust the setting value. 6 Press [BAND] (SET). 7 Press [MENU] to confirm the adjustment. For using the remote control, hold down [SEL] (MENU) for 2 sec. or more. DEMONSTRATION Switching by [BAND]. ON: Demonstration screen at no operation (default) OFF: Regular screen LEVEL ADJ []][[]: Function selection [}][{]: Item selection Color selection The illumination color changes. (Setting range: FIRE, ORANGE, SKY, OCEAN, FOREST, SUN, default: FIRE) Volume setting according to lighting (Setting range: LEVEL1, LEVEL2, LEVEL3, default: LEVEL 1) If the peripheral color decoration keeps lighting because the bass part is contained abundantly, select LEVEL 1, and for the opposite case, select LEVEL 3. 30 CQ-C7413U/C7113U
-
 1
1 -
2
-
3
-
4
-
5
-
6
-
7
-
8
-
9
-
10
-
11
-
12
-
13
-
14
-
15
-
16
-
17
-
18
-
19
-
20
-
21
-
22
-
23
-
24
-
 25
25 -
 26
26 -
 27
27 -
 28
28 -
 29
29 -
 30
30 -
 31
31 -
 32
32 -
 33
33 -
 34
34 -
 35
35 -
36
-
37
-
38
-
39
-
40
-
41
-
42
-
43
-
44
-
45
-
46
-
47
-
48
-
49
-
50
-
51
-
52
-
53
-
54
-
55
-
56
-
57
-
58
-
59
-
60
-
61
-
62
-
63
-
64
-
65
-
66
-
67
-
68
-
69
-
70
-
71
-
72
-
73
-
74
-
75
-
76
-
77
-
78
-
79
-
80
-
81
-
82
-
83
-
84
-
85
-
86
-
87
-
88
-
89
-
90
-
91
-
92
-
93
-
94
-
95
-
96
-
97
-
98
-
99
-
100
-
101
-
102
-
103
-
104
-
105
-
106
-
107
-
108
-
109
-
110
-
111
-
112
-
113
-
114
 |
 |
