Panasonic CT36SX12F CT32SX12 User Guide - Page 9
Cable Box Connection, Optional Equipment Connections
 |
View all Panasonic CT36SX12F manuals
Add to My Manuals
Save this manual to your list of manuals |
Page 9 highlights
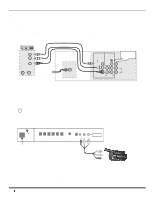
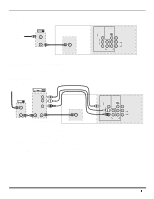
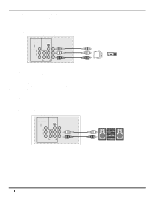
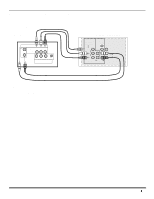
Cable Box Connection Follow this diagram when connecting your television to a cable box only. CABLE BOX Incoming Cable ANT IN ANT OUT ANT OPTIONAL EQUIPMENT CONNECTIONS TERMINALS ON BACK OF THE TV INPUT 1 COMPONENT VIDEO INPUTS VIDEO/Y INPUT 2 S-VIDEO PROG OUT VIDEO PB L PR R L L TO AUDIO AMP R R AUDIO CABLES NOT SUPPLIED Note: The remote control must be programmed with supplied codes to operate the cable box. Viewing a premium (scrambled) cable channel Procedure 1. Tune the television to Channel 3 or 4 depending on the RF out setting of the cable box. 2. Using the cable box, tune to the premium cable channel you want to view. VCR and Cable Box Connection Follow this diagram when connecting your television to both a VCR and a cable box. Incoming Cable VCR TERMINALS ON BACK OF THE TV CABLE BOX ANT IN VIDEO OUT L AUDIO OUT R INPUT 1 COMPONENT VIDEO INPUTS VIDEO/Y INPUT 2 S-VIDEO PROG OUT VIDEO ANT OUT ANT IN ANT OUT ANT CABLES NOT SUPPLIED PB L PR R L L TO AUDIO AMP R R AUDIO Note: The remote control must be programmed with supplied codes to operate the VCR and cable box. Viewing a premium (scrambled) cable channel Procedure 1. Tune the television to CH 3 or CH 4 depending on the Cable box RF out. 2. Using the cable box, tune to the premium cable channel you want to view. Recording a premium (scrambled) cable channel Procedure 1. Press the TV/VIDEO button on the remote control to select the video input (VIDEO 1, VIDEO 2, etc.) connected to your VCR. 2. Turn the VCR ON. 3. Tune the VCR to Channel 3 or 4, depending on your VCR. 4. Using your cable box, tune to the premium cable channel you want to record. 5. Begin recording. 7
-
 1
1 -
2
-
3
-
 4
4 -
 5
5 -
 6
6 -
 7
7 -
 8
8 -
 9
9 -
 10
10 -
 11
11 -
 12
12 -
 13
13 -
 14
14 -
15
-
16
-
17
-
18
-
19
-
20
-
21
-
22
-
23
-
24
-
25
-
26
-
27
-
28
-
29
-
30
-
31
-
32
-
33
-
34
-
35
-
36
-
37
-
38
-
39
-
40
-
41
-
42
-
43
-
44
-
45
-
46
-
47
-
48
-
49
-
50
-
51
-
52
-
53
-
54
-
55
-
56
-
57
-
58
-
59
-
60
-
61
-
62
-
63
-
64
-
65
-
66
-
67
-
68
-
69
-
70
-
71
-
72
 |
 |
