Panasonic DMC-FX5 Digital Still Camera - Page 59
Setting The White Balance Manually ( White Set
 |
UPC - 037988977581
View all Panasonic DMC-FX5 manuals
Add to My Manuals
Save this manual to your list of manuals |
Page 59 highlights
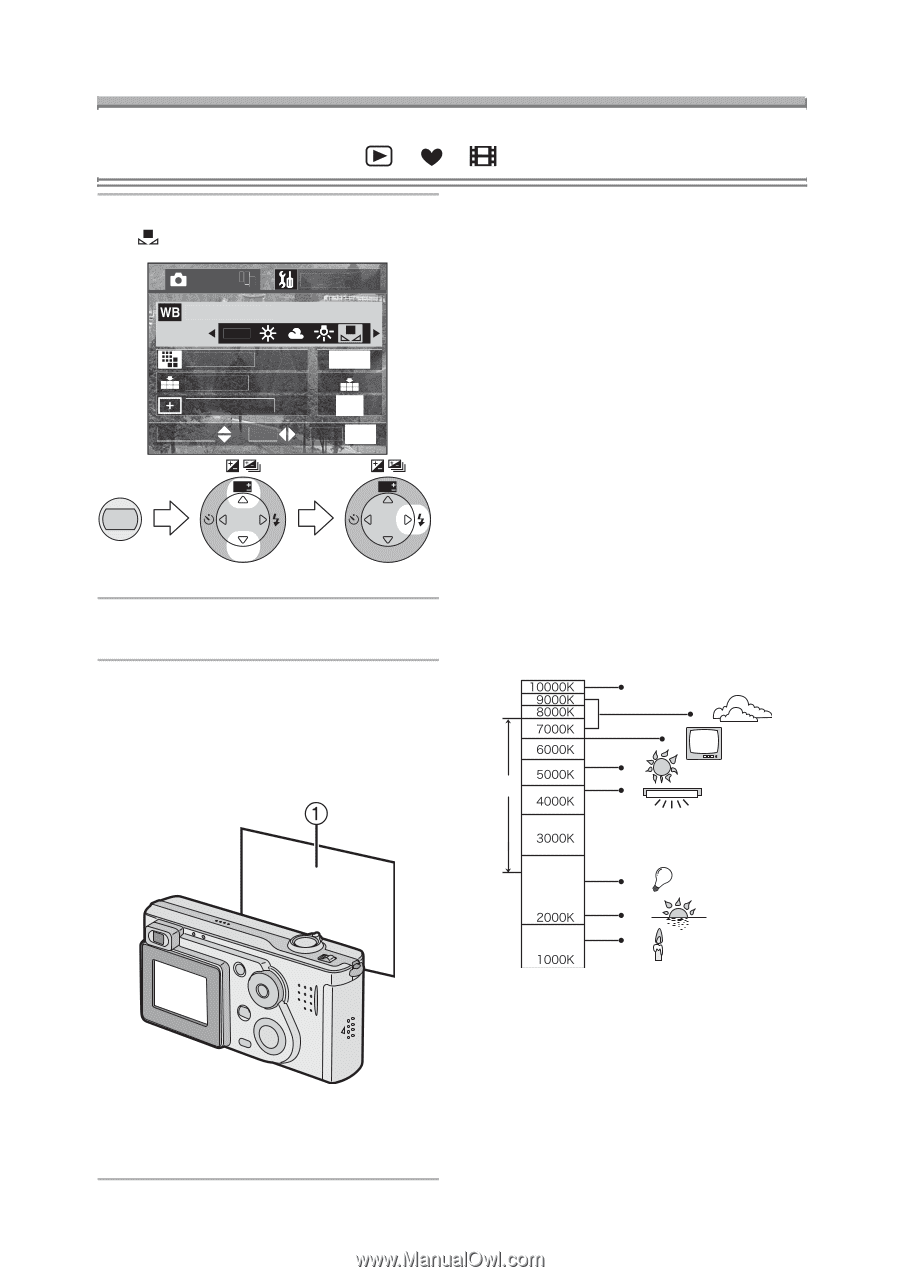
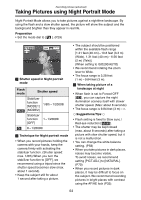
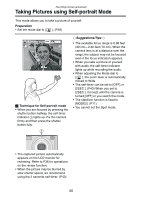
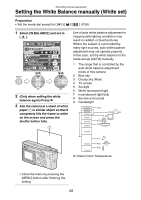
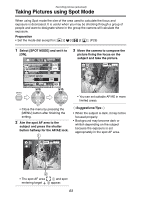
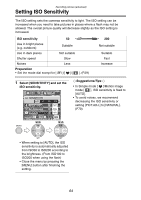
Recording pictures (advanced) Setting the White Balance manually (White set) Preparation • Set the mode dial except for [ ]/[ ]/[ ]. (P29) 1 Select [W.BALANCE] and set to [ ]. REC 1/3 W.BALANCE AUTO PICT.SIZE QUALITY SPOT MODE SELECT SET SETUP 1600 OFF EXIT MENU MENU WB WB REVIEW SET REVIEW SET 2 (Only when setting the white balance again) Press 1. 3 Aim the camera at a sheet of white paper 1 or similar object so that it completely fills the frame to white on the screen and press the shutter button fully. Use of auto white balance adjustment in inappropriate lighting conditions may result in reddish or bluish pictures. Where the subject is surrounded by many light sources, auto white balance adjustment may not operate properly. In this case, set the white balance to the mode except [AUTO] manually. 1 The range that is controlled by the auto white balance adjustment mode of this camera 2 Blue sky 3 Cloudy sky (Rain) 4 TV screen 5 Sunlight 6 White fluorescent light 7 Incandescent light bulb 8 Sunrise and sunset 9 Candlelight 2) 3) 4) 5) 1) 6) 7) 8) 9) KlKelvin Color Temperature • Close the menu by pressing the [MENU] button after finishing the setting. 59
-
 1
1 -
2
-
3
-
4
-
5
-
6
-
7
-
8
-
9
-
10
-
11
-
12
-
13
-
14
-
15
-
16
-
17
-
18
-
19
-
20
-
21
-
22
-
23
-
24
-
25
-
26
-
27
-
28
-
29
-
30
-
31
-
32
-
33
-
34
-
35
-
36
-
37
-
38
-
39
-
40
-
41
-
42
-
43
-
44
-
45
-
46
-
47
-
48
-
49
-
50
-
51
-
52
-
53
-
 54
54 -
 55
55 -
 56
56 -
 57
57 -
 58
58 -
 59
59 -
 60
60 -
 61
61 -
 62
62 -
 63
63 -
 64
64 -
65
-
66
-
67
-
68
-
69
-
70
-
71
-
72
-
73
-
74
-
75
-
76
-
77
-
78
-
79
-
80
-
81
-
82
-
83
-
84
-
85
-
86
-
87
-
88
-
89
-
90
-
91
-
92
-
93
-
94
-
95
-
96
-
97
-
98
-
99
-
100
-
101
-
102
-
103
-
104
-
105
-
106
-
107
-
108
-
109
-
110
-
111
-
112
-
113
-
114
-
115
-
116
-
117
-
118
-
119
-
120
-
121
-
122
-
123
-
124
-
125
-
126
-
127
-
128
-
129
-
130
-
131
-
132
 |
 |