Panasonic DVDCP72K DVDCP72 User Guide - Page 20
Unit information, Progress indicator, Auto1, Picture Menu, When PROGRESSIVE OUT indicator is off
 |
View all Panasonic DVDCP72K manuals
Add to My Manuals
Save this manual to your list of manuals |
Page 20 highlights
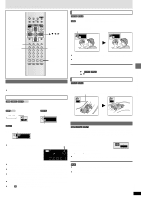
Using On-Screen Menu Icons Unit information \RAM\ \DVD-A\ \DVD-V\ [VCD] Picture Menu When PROGRESSIVE OUT indicator is on N 480P Auto1 a b c d ∫ User mode U 1 a e f g When PROGRESSIVE OUT indicator is off N 480I a b ∫ User mode U 1 a h i j U 2 480P Auto1 a b c d U 2 a e f g Advanced operations U 3 480I a b a Picture Mode ≥N: Normal mode ≥C1 (Cinema 1): Mellows images and enhances detail in dark scenes ≥C2 (Cinema 2): Sharpens images and enhances detail in dark scenes ≥U1/U2/U3§: User mode (➡ right) §U3 appears only when PROGRESSIVE OUT indicator is off. b Video Output Mode (➡ page 25, Glossary-Interlace and progressive output) 480I: Interlace video (PROGRESSIVE OUT indicator off) e u 480P: Progressive video (PROGRESSIVE OUT indicator on) You can change the video output mode only when "Progressive Out" in the Video menu is set to "Enable" (➡ page 21). c Transfer Mode Select the method of conversion for progressive output to suit the type of material being played (➡ page 25, Glossary-Film and video). ≥Auto 1 (normal): for viewing film material ≥Auto 2: for viewing film material (the same as Auto 1, but able to convert 30-frame-per-second progressive video) ≥Video: for video material d H Position (Horizontal position) (j20 to i20) Change the picture's position if it is off center. 1. Press [ENTER]. 2. Press [2, 1] to move the picture. 3. Press [ENTER] to enter the position (saved even if you turn the unit off). ∫ User mode To change the user mode 1. Select User mode and press [1] to highlight the number. 2. Press [3,4] to select "1", "2" or "3". U 1 -MPEG Digital Noise Reduction- e 3D-NR (0 to i4) Reduces overall noise. f Block NR (0 to i3) Smoothes block noise. g Mosquito NR (0 to i3) Reduces the smudging that appears around contrasting sections of the picture. -Picture Control- h Contrast (j7 to i7) Increases the contrast between light and dark parts of the picture. i Brightness (0 to i15) Brightens the picture. j Color (j7 to i7) Adjust the shade of the picture's color. Progress indicator Indicates how far you have played through an item. e.g. DVD-Video a bc a Current position [RAM] [DVD-A] [DVD-V] [VCD] [CD] [WMA] [MP3] RQT6263 b PG: Program number [RAM] PL: Play list number [RAM] T: Title number [DVD-V] Track number [VCD] [CD] G: Group number [DVD-A] [WMA] [MP3] c T: Track number in group [DVD-A] [WMA] [MP3] 20 C: Chapter number [DVD-V] d e d Condition - play, pause, or slow/search [RAM] [DVD-A] [DVD-V] [VCD] [CD] [WMA] [MP3] e Changing the time display [RAM] [DVD-A] [DVD-V] [VCD] [CD] Press [3, 4] to show the elapsed play time or remaining time for the program, track or title (or chapter during program and random play). Elapsed play time [WMA] [MP3] (display only, cannot be changed)
-
 1
1 -
2
-
3
-
4
-
5
-
6
-
7
-
8
-
9
-
10
-
11
-
12
-
13
-
14
-
 15
15 -
 16
16 -
 17
17 -
 18
18 -
 19
19 -
 20
20 -
 21
21 -
 22
22 -
 23
23 -
 24
24 -
 25
25 -
26
-
27
-
28
 |
 |
