Panasonic DVDLX95 Portable Dvd Player - Page 6
Recharging The Battery, Adjusting The Lcd Angle, Preparations
 |
View all Panasonic DVDLX95 manuals
Add to My Manuals
Save this manual to your list of manuals |
Page 6 highlights
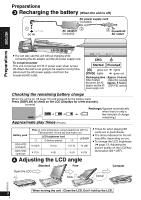
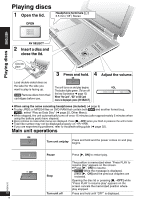
Preparations 3 Recharging the battery (When the unit is off) AC power supply cord (included) 1 DC IN 12 V % DC IN 2 AC adaptor (included) 3 To household AC outlet Preparations DC IN 12V VIDEO AUDIO/OPT OUT ≥ You can also use this unit without charging while connecting the AC adaptor and the AC power supply cord. To conserve power This unit consumes 0.5 W of power even when turned off. When the unit is not going to be used for a long time, disconnect the AC power supply cord from the household AC outlet. CHG Í Started Finished [Í] goes out ➜ lights [CHG] lights ➜ goes out Recharging time : Approx. 8 hours When finished, (CGR-H703, included) disconnect the AC Approx. 5 hours adaptor and the AC (CGR-H702, optional) power supply cord. Checking the remaining battery charge When the unit is on (➜ page 10) and powered by the battery pack Press [DISPLAY] to check on the LCD (Displays for a few seconds). (screen) Recharge (Appears automatically when there is only a few minutes of charge remaining.) Approximate play times (Hours) Battery pack CGR-H703 (included) CGR-H702 (optional) Play (at room temperature using headphones with the FM transmitter off and key illumination on) LCD brightness level j5 0 (factory preset) i5 LCD Off 10 (12.5) 8 (10) 6 (7.5) 16 (20) 6 (7.5) 4 (5) 3 (4) 8 (10) 4 Adjusting the LCD angle ≥ Times for when playing SD cards are in parenthesis. ≥ The times indicated on the left may differ depending on use. ≥ To change the LCD brightness (➜ page 13, Adjusting the picture quality on the LCD/Key illumination ON • OFF). Standard Free Compact Open the LCD Slide Clicks! RQT8075 When moving the unit : Close the LCD. Don't hold by the LCD. 6 6
-
 1
1 -
 2
2 -
 3
3 -
 4
4 -
 5
5 -
 6
6 -
 7
7 -
 8
8 -
 9
9 -
 10
10 -
 11
11 -
 12
12 -
13
-
14
-
15
-
16
-
17
-
18
-
19
-
20
-
21
-
22
-
23
-
24
-
25
-
26
-
27
-
28
-
29
-
30
-
31
-
32
-
33
-
34
-
35
-
36
-
37
-
38
-
39
-
40
-
41
-
42
-
43
-
44
-
45
-
46
-
47
-
48
-
49
-
50
-
51
-
52
-
53
-
54
-
55
-
56
-
57
-
58
-
59
-
60
-
61
-
62
-
63
-
64
-
65
-
66
-
67
-
68
-
69
-
70
-
71
-
72
-
73
-
74
-
75
-
76
 |
 |
