Panasonic KX-TS3282B Multi-line Phone - Page 17
Assigning the Extension Number - features
 |
UPC - 037988473717
View all Panasonic KX-TS3282B manuals
Add to My Manuals
Save this manual to your list of manuals |
Page 17 highlights
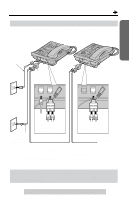
Preparation w w Assigning the Extension Number Assign the extension number to the unit to use the intercom feature. Make sure that the unit has been connected to other units (KX-TS3282B, KX-TS3282W and/or KX-T3281W) in parallel (p. 11-13) before programming. Make sure that the handset is on the cradle, the AC adaptor is connected and the SP-PHONE/HEADSET indicator light is off. 1 Press [FUNCTION/EDIT]. w Save M1,M2,M3 Save directory 2 Scroll to "Assign EXT#" by pressing [ ] or [ ]. w Set clock Assign EXT w 3 Press [ ]. • The numbers (1 to 8) that have already been assigned to other units are not displayed. w Extension# 12345678 Erase ENTER=Save w 4 Press [ ] or [ ] to move the cursor to select the extension number (1 to 8). 5 Press [ENTER] (Save key). • A beep sounds. Ex. Extension number 1 Extension# 1 • The extension number ([1] to [8]) is shown on the right. • You can exit the programming mode any time by pressing [EXIT]. • To change the extension number, start from step 1. The previous memory will be erased. • To exchange the extension numbers between two units, erase each number (see below), then re-assign the number to each unit. After you connect the AC adaptor (p. 10), all of the extension indicators flash until you assign the extension number of your unit. Even if you do not use the intercom, assign the number. Otherwise all of the extension indicators will continue flashing. w To erase the extension number Repeat steps 1 to 3, and select "Erase" by pressing [ ]. Press [ENTER] (Save key). • "Extension# Not assign" is displayed. • All extension indicators flash until you assign a number to the unit. For assistance, please call: 1-800-211-PANA(7262) 17
-
 1
1 -
2
-
3
-
4
-
5
-
6
-
7
-
8
-
9
-
10
-
11
-
 12
12 -
 13
13 -
 14
14 -
 15
15 -
 16
16 -
 17
17 -
 18
18 -
 19
19 -
 20
20 -
 21
21 -
 22
22 -
23
-
24
-
25
-
26
-
27
-
28
-
29
-
30
-
31
-
32
-
33
-
34
-
35
-
36
-
37
-
38
-
39
-
40
-
41
-
42
-
43
-
44
-
45
-
46
-
47
-
48
-
49
-
50
-
51
-
52
-
53
-
54
-
55
-
56
-
57
-
58
-
59
-
60
-
61
-
62
-
63
-
64
-
65
-
66
-
67
-
68
-
69
-
70
-
71
-
72
-
73
-
74
-
75
-
76
 |
 |
