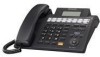
Panasonic KX-TS4200B 4-line/16 Ext.phone - Page 24

Date and time, Dialing mode, Important, MENU/SET, Example - 4 line phone

Page 24 highlights

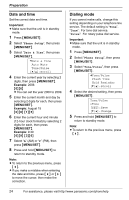
Preparation Date and time Set the correct date and time. Important: L Make sure that the unit is in standby mode. 1 Press {MENU/SET}. 2 Select "Phone Setup", then press { MENU/SET} . 3 Select "Date & Time", then press { MENU/SET} . ➔Date & Time Auto Mute Tone/Pulse [V/^]:Scroll 4 Enter the current year by selecting 2 digits, then press {MENU/SET}. Example: 2006 { 0} { 6} L You can set the year 2000 to 2099. 5 Enter the current month and day by selecting 2 digits for each, then press { MENU/SET} . Example: August 15 {0}{8} {1}{5} 6 Enter the current hour and minute (12-hour clock format) by selecting 2 digits for each, then press { MENU/SET} . Example: 9:30 {0}{9} {3}{0} 7 Select "A" (AM) or "P" (PM), then press {MENU/SET}. 8 Press and hold {MENU/SET} to return to standby mode. Note: L To return to the previous menu, press {

  • 1
  • 2
  • 3
  • 4
  • 5
  • 6
  • 7
  • 8
  • 9
  • 10
  • 11
  • 12
  • 13
  • 14
  • 15
  • 16
  • 17
  • 18
  • 19
  • 20
  • 21
  • 22
  • 23
  • 24
  • 25
  • 26
  • 27
  • 28
  • 29
  • 30
  • 31
  • 32
  • 33
  • 34
  • 35
  • 36
  • 37
  • 38
  • 39
  • 40
  • 41
  • 42
  • 43
  • 44
  • 45
  • 46
  • 47
  • 48
  • 49
  • 50
  • 51
  • 52
  • 53
  • 54
  • 55
  • 56
  • 57
  • 58
  • 59
  • 60
  • 61
  • 62
  • 63
  • 64
  • 65
  • 66
  • 67
  • 68

Preparation
24
For assistance, please visit http://www.panasonic.com/phonehelp
Date and time
Set the correct date and time.
Important:
L
Make sure that the unit is in standby
mode.
1
Press
{
MENU/SET
}
.
2
Select “
Phone Setup
”, then press
{
MENU/SET
}
.
3
Select “
Date & Time
”, then press
{
MENU/SET
}
.
4
Enter the current year by selecting 2
digits, then press
{
MENU/SET
}
.
Example:
2006
{
0
}{
6
}
L
You can set the year 2000 to 2099.
5
Enter the current month and day by
selecting 2 digits for each, then press
{
MENU/SET
}
.
Example:
August 15
{
0
}{
8
}
{
1
}{
5
}
6
Enter the current hour and minute
(12-hour clock format) by selecting 2
digits for each, then press
{
MENU/SET
}
.
Example:
9:30
{
0
}{
9
}
{
3
}{
0
}
7
Select “
A
” (AM) or “
P
” (PM), then
press
{
MENU/SET
}
.
8
Press and hold
{
MENU/SET
}
to
return to standby mode.
Note:
L
To return to the previous menu, press
{<}
.
L
If you make a mistake when entering
the date and time, press
{<}
or
{>}
to move the cursor, then make the
correction.
Dialing mode
If you cannot make calls, change this
setting depending on your telephone line
service. The default setting is “
Tone
”.
Tone
”:
For tone dial service.
Pulse
”:
For rotary pulse dial service.
Important:
L
Make sure that the unit is in standby
mode.
1
Press
{
MENU/SET
}
.
2
Select “
Phone Setup
”, then press
{
MENU/SET
}
.
3
Select “
Tone/Pulse
”, then press
{
MENU/SET
}
.
4
Select the desired setting, then press
{
MENU/SET
}
.
5
Press and hold
{
MENU/SET
}
to
return to standby mode.
Note:
L
To return to the previous menu, press
{<}
.
Date & Time
Auto Mute
Tone/Pulse
[
V
/
^
]:Scroll
Tone/Pulse
Flash Time
Hold Reminder
[
V
/
^
]:Scroll
Tone/Pulse
=Tone
[SET]:Save
[
V
/
^
]:Change