Panasonic NE1022F NE1022F User Guide - Page 10
IlWEE
 |
View all Panasonic NE1022F manuals
Add to My Manuals
Save this manual to your list of manuals |
Page 10 highlights
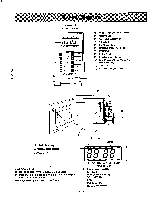
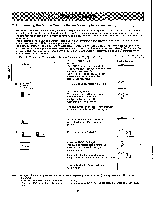
HEATING Open the door and place food in the oven cavity. Close the door. "0" must be showing in the Display Window. A. Manual Single Stage Heating: This feature gives the user maximum flexibility to set the oven to desired heating time and power level. Ideal for menus that require various heating requirements. Example: To heat for 2 minutes at High Power Display Window 1. 'hill POWER •Press the POWER Level Selector Pad one time. 2. :201 0 3:30 LL th O 3. START • 0 3:30 •Press the Memory Pads 2, 0 and 0. •Press the START Pad. Heating will start. ' The time in the Display Window will count down. 2 Op 4. Beep tone will sound. •All heating will stop. • When opening the door, the display will stop blinking. B. Manual 2 or 3 Stage Heating: This feature allows you to set to begin heating at one power level then shift automatically to a different power level after the designated amount of heating time. Example: To heat for 2 minutes at Defrost power for 2 stage heating 1. Follow steps 1 and 2 above. 2. IlWEE POWER 3. El :20 0 3:30 0 3:30 •Press the POWER Level Selector' Pad 5 times. Indicator will change each time the pad is pressed. •Press the Memory Pads 2, 0 and 0. Display Window 1 2 2 sob 4. e START •Press the START Pad. The total time for both stages will be displayed. The oven lamp will be turned on. Heating will start. •Th'e time in the Display Window will countdown. •When oven shifts to the next stage, a single beep tone will sound. 1 2 900 DES 7 59 Off 5. Beep tone will sound. •All heating will stop. When opening the door, the display will stop blinking. NOTE: For a 3 stage heating cycle, select a power level again and set the cooking time, between steps 3 and 4 above. SPECIAL NOTE: For both single and 2 or 3 stage heating. 1. While heating, one touch on the STOP/RESET Pad stops the oven. You can restart by pressing the START Pad or a second, touch on the STOP/RESET Pad will cancel the selected program. 2. One touch on the STOP/RESET Pad, before the heating cycle is started, will cancel the selected program. - 10 -
-
 1
1 -
2
-
3
-
4
-
 5
5 -
 6
6 -
 7
7 -
 8
8 -
 9
9 -
 10
10 -
 11
11 -
 12
12 -
 13
13 -
 14
14 -
 15
15 -
16
-
17
-
18
-
19
-
20
 |
 |
