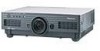
Panasonic PT-D5600U Dlp Projector- English/french - Page 12
Rear View Of The Main Unit/controls On Rear Panel, Power On I Button - lamps
 |
UPC - 791871111352
View all Panasonic PT-D5600U manuals
Add to My Manuals
Save this manual to your list of manuals |
Page 12 highlights
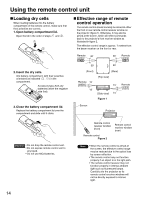
Name and function of parts Rear view of the main unit Controls on rear panel Controls on rear panel Ventilation holes Lamp unit cover The lamp unit is housed. MAIN POWER switch (page 23) Use this switch to turn on "I" and off "O" the main power applied to the projector. Remote control receiver window (rear) (page 14) This also receives the signal beam coming from the remote control. POWER ON ( I ) button (page 23) Turns on the power. POWER OFF ( ) button (page 24) Turns off the power. RGB1 button (page 23) Switches to RGB1 input. RGB2 button (page 23) Switches to RGB2 input. VIDEO button (page 23) Switches to video input. S-VIDEO button (page 23) Switches to S-VIDEO input. MENU button (page 28) Displays and clears the Main Menu. It can also return to the previous screen when the menu is displayed. The on-screen display (OSD) selection menu can be displayed by holding down the menu key for at least three seconds. AUTO SETUP button (page 26) Pressing this button while projecting an image automatically corrects the picture positioning on the screen. DVI button (page 23) Switches to DVI-D input. SHUTTER button (page 26) Press this button to black out the image temporarily. ENTER button (page 28) Press this button to enter your menu selection or to run function. LENS button (page 25) Switches to the adjustment mode for lens focus, zoom and shift (position). Arrow ( ) buttons (page 28) Use to select an item on the menu screen, change setting and adjust the level. Also use them to enter the "SECURITY" password. 12
-
 1
1 -
2
-
3
-
4
-
5
-
6
-
 7
7 -
 8
8 -
 9
9 -
 10
10 -
 11
11 -
 12
12 -
 13
13 -
 14
14 -
 15
15 -
 16
16 -
 17
17 -
18
-
19
-
20
-
21
-
22
-
23
-
24
-
25
-
26
-
27
-
28
-
29
-
30
-
31
-
32
-
33
-
34
-
35
-
36
-
37
-
38
-
39
-
40
-
41
-
42
-
43
-
44
-
45
-
46
-
47
-
48
-
49
-
50
-
51
-
52
-
53
-
54
-
55
-
56
-
57
-
58
-
59
-
60
-
61
-
62
-
63
-
64
-
65
-
66
-
67
-
68
 |
 |
