Panasonic PT-D5600U Dlp Projector- English/french - Page 37
Displaying The Internal Test Pattern, Cycle Of Displayed Internal Test Patterns, Setting The Security - projector pt
 |
UPC - 791871111352
View all Panasonic PT-D5600U manuals
Add to My Manuals
Save this manual to your list of manuals |
Page 37 highlights
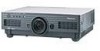
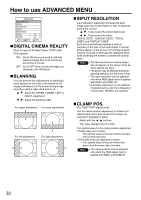
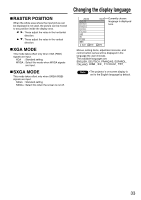
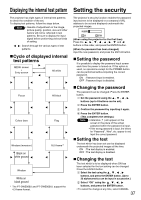
Displaying the internal test pattern The projector has eight types of internal test patterns to check the condition of the set. To display test patterns, follow the steps below. Note • Results of adjustment on the image, picture quality, position, size and other factors will not be reflected in test patterns. Be sure to display the input signal before performing various kinds of setting. : Search through the various types of test patterns Cycle of displayed internal test patterns MENU screen + Entry screen All white Focus All black Colour bars Flag Window (inversion) Black on white ground 16:9 frame Window White on black ground The PT-DW5000U and PT-DW5000UL support the 4:3 frame format. Setting the security The projector's security function enables the password input screen to be displayed or a company's URL address to be set and displayed underneath the projected images. PASSWORD OK RETURN (When using the projector for the first time) Press the and buttons in this order, and press the ENTER button. (When the password has been changed) Input the new password, and press the ENTER button. Setting the password It is possible to display the password input screen each time the power is turned on. If this option is used, no operations except for the POWER button can be performed without inputting the correct password. ON : Password input is enabled. OFF : Password input is disabled. Changing the password The password can be changed. Press the ENTER button. Set the password using the , , , buttons (up to 8 buttons can be set). Press the ENTER button. Confirm the password by inputting it again. Press the ENTER button. (This completes the settings.) Note • Asterisks ( ) will appear on the screen in the place of the actual password when the password is input. • If the wrong password is input, the letters for "Password", "New", etc. appear in red. Input the correct password. Setting the text The text which has been set can be displayed underneath the projected images all the time. ON : The text display is enabled. OFF : The text display is disabled. Changing the text The text which is to be displayed when ON has been selected for the text setting can be changed. Press the ENTER button. Select the text using the , , , buttons, and press the ENTER button. (Up to 22 alphanumerics can be input in succession.) Select "OK" using the , , , buttons, and press the ENTER button. • To cancel the change at any time, select CANCEL. 37
-
 1
1 -
2
-
3
-
4
-
5
-
6
-
7
-
8
-
9
-
10
-
11
-
12
-
13
-
14
-
15
-
16
-
17
-
18
-
19
-
20
-
21
-
22
-
23
-
24
-
25
-
26
-
27
-
28
-
29
-
30
-
31
-
 32
32 -
 33
33 -
 34
34 -
 35
35 -
 36
36 -
 37
37 -
 38
38 -
 39
39 -
 40
40 -
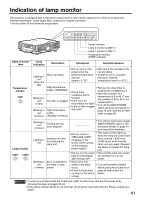 41
41 -
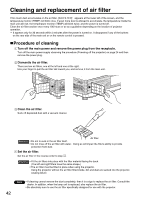 42
42 -
43
-
44
-
45
-
46
-
47
-
48
-
49
-
50
-
51
-
52
-
53
-
54
-
55
-
56
-
57
-
58
-
59
-
60
-
61
-
62
-
63
-
64
-
65
-
66
-
67
-
68
 |
 |
