Panasonic PT-DW6300US Functional Instructions - Page 25
Display Option Menu, Color Matching, Color Correction, Contrast Mode, Screen Setting, Auto Signal
 |
UPC - 791871111888
View all Panasonic PT-DW6300US manuals
Add to My Manuals
Save this manual to your list of manuals |
Page 25 highlights
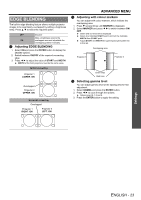
DISPLAY OPTION menu Remote control COLOR CORRECTION You can adjust 6 colours and register the result for each of 4 types of signals, VIDEO, S-VIDEO, RGB and YPBPR/YCBCR. See "Navigating through the menu" on page 15. See "Main menu and Sub-menu" on page 12. COLOR MATCHING When multiple projectors are used simultaneously, you can adjust the difference of the colours. Press I H to cycle through the options. OFF 3 COLORS 7 COLORS MEASURED Deactive. Adjusting RGB gain of RED, GREEN and BLUE, and also GAIN of WHITE. Press I H to change the value and switch ON/ OFF the AUTO TEST PATTERN. Setting range: 0 to +2048 Adjusting RGB gain of RED, GREEN, BLUE, CYAN, MAGENTA, YELLOW and WHITE. Press I H to change the value and switch ON/OFF the AUTO TEST PATTERN. Setting range: 0 to +2048 Adjusting 7 colours based on measured values using colorimeter. Input measured result in MEASURED DATA, and adjust in TARGET DATA. Press I H to change the value and switch ON/OFF the AUTO TEST PATTERN. PICTURE MODE in PICTURE menu need to be set to DYNAMIC for using colorimeter. NOTE: • If the TARGET DATA is outside the colour range of the projector, the colours will not be projected correctly. • When each colour option is selected while AUTO TEST PATTERN is activated, its one colour pattern will be displayed. • Adjusting red gain of red colour changes its luminance, and likewise blue gain of blue and green gain of green. • COLOR MATCHING adjustment should be carried out by a person who is familiar with the projector or by a service person because a high level of skill is required to make successful adjustment. • Press the DEFAULT button to restore the factory default settings. • AI, COLOR CORRECTION and COLOR TEMPERATURE are not available with COLOR MATCHING. OFF USER Deactive Adjust 6 colours, RED, GREEN, BLUE, CYAN, MAGENTA and YELLOW. CONTRAST MODE You can switch the contrast mode for operating environment. NORMAL HIGH Maximum brightness Maximum contrast SCREEN SETTING J SCREEN FORMAT Select the required screen format by pressing I H. The SCREEN FORMAT setting will affect on the ASPECT setting. See "ASPECT" on page 18. PT-DZ6710E/PT-DZ6700E 16:10*1 H 16:9 H 4:3 PT-DW6300E 16:10*1 H 16:9 PT-D6000E 4:3*1 H 16:9 *1. SCREEN POSITION is not available. J SCREEN POSITION You can change the displaying position of the projecting area. Press I H to adjust the value. PT-DZ6710E/PT-DZ6700E PT-DW6300E PT-D6000E Setting range: 16:10 Not available. 16:9 -60 to +60 4:3 -160 to +160 Setting range: 16:10 Not available. 16:9 -40 to +40 Setting range: 4:3 Not available. 16:9 -96 to +96 AUTO SIGNAL You can turn ON/OFF automatically detecting system of the AUTO SETUP feature. OFF ON Only when the AUTO SETUP button is pressed, the projected image position will be adjusted. When the projector detects a COMPUTER or DVI signal, adjust the projected image position automatically. Settings ENGLISH - 25
-
 1
1 -
2
-
3
-
4
-
5
-
6
-
7
-
8
-
9
-
10
-
11
-
12
-
13
-
14
-
15
-
16
-
17
-
18
-
19
-
 20
20 -
 21
21 -
 22
22 -
 23
23 -
 24
24 -
 25
25 -
 26
26 -
 27
27 -
 28
28 -
 29
29 -
 30
30 -
31
-
32
-
33
-
34
-
35
-
36
-
37
-
38
-
39
-
40
-
41
-
42
-
43
-
44
-
45
-
46
-
47
-
48
-
49
-
50
-
51
-
52
 |
 |
