Panasonic PT-DW6300US Operating Instructions - Page 19
Projecting, Projecting a image
 |
UPC - 791871111888
View all Panasonic PT-DW6300US manuals
Add to My Manuals
Save this manual to your list of manuals |
Page 19 highlights
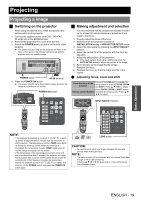
Projecting Projecting a image J Switching on the projector When using an optional lens, install a projection lens before switch on the projector. 1. Connect the supplied power cord (220 - 240 V AC, 50 Hz/60 Hz) to the AC IN terminal. 2. Remove the projection lens cover from the lens. 3. Switch the POWER switch on that is on the side of the projector. The power indicator lamp on the projector will flash in red. After a short period, the indicator will illuminate and the projector will enter standby mode. POWER switch AC IN terminal 4. Press the POWER ON button The power indicator lamp illuminates in green and soon the image is projected on the screen. POWER ON button J Making adjustment and selection It is recommended that the projector be allowed to warm up for at least 30 minutes before any adjustments are made to the focus. 1. Roughly adjust the focus of the lens. 2. Select and set the projection scheme of INSTALLATION setting in PROJECTOR SETUP menu. 3. Select the input signal by pressing the INPUT SELECT buttons. 4. Adjust the vertical tilt of the projector with the front leg adjusters. 5. Adjust the shift position of the projection. If the input signal is RGB signal, additionally press the AUTO SETUP button to adjust the position of the image. 6. Zoom the lens so the image fills the screen. 7. Readjust the focus. 8. Readjust the zoom so that the image size fits in the screen. Q Adjusting focus, zoom and shift Control buttons of the projector Pressing the LENS button changes the setup screen in order of FOCUS, ZOOM and SHIFT. Press F G I H to adjust. Press FOCUS, ZOOM or SHIFT button Remote control buttons to display the setup screen. Press F G I H to adjust. INPUT SELECT buttons Basic Operation . NOTE: • If the projector is powered up at about 0 °C (32 °F), a warm- up period of approximately 5 minutes may be necessary to start projection. The temperature monitor (TEMP) lamp lights up during the warm-up period. When the warm-up is completed, the temperature monitor (TEMP) lamp turns off and the image is projected on the screen. • If the temperature of the operating environment is low and warm-up takes more than 5 minutes, the projector will judge that a problem has occurred and the power will be turned off automatically. If this happens, increase the temperature around the projector so that it is 0 °C (32 °F) or higher, and then turn on the POWER switch and press the POWER ON button again. LENS button CAUTION: • Be careful not to catch your fingers between the lens and shroud when shifting the lens. NOTE: • The setup screen will be displayed with the optional fixed lens though, it will not be functioning. • Pressing F G I or H for 3 seconds or more, performance the adjustment faster. ENGLISH - 19
-
 1
1 -
2
-
3
-
4
-
5
-
6
-
7
-
8
-
9
-
10
-
11
-
12
-
13
-
 14
14 -
 15
15 -
 16
16 -
 17
17 -
 18
18 -
 19
19 -
 20
20 -
 21
21 -
 22
22 -
 23
23 -
 24
24 -
25
-
26
-
27
-
28
-
29
-
30
-
31
-
32
-
33
-
34
-
35
-
36
-
37
-
38
-
39
-
40
-
41
-
42
-
43
-
44
-
45
-
46
-
47
-
48
-
49
-
50
 |
 |
